Introduction
This manual provides essential information for the proper installation, operation, and maintenance of your Sangyue Oxygen O2 Sensor set. Please read these instructions carefully before proceeding with installation to ensure optimal performance and longevity of the product.
Product Features
- Two-Piece Set: Includes both Upstream and Downstream oxygen sensors.
- Quality Construction: Made with durable Aluminum and Stainless Steel components.
- Enhanced Performance: Designed to help solve check engine lights, improve fuel consumption, optimize engine performance, and increase power for smoother acceleration.
- Longevity: Engineered for a long service life to reduce maintenance costs.

Image: The Sangyue Oxygen Sensor product packaging on the left, displaying the brand and product type. On the right, two oxygen sensors are shown with their electrical connectors, highlighting the complete set.
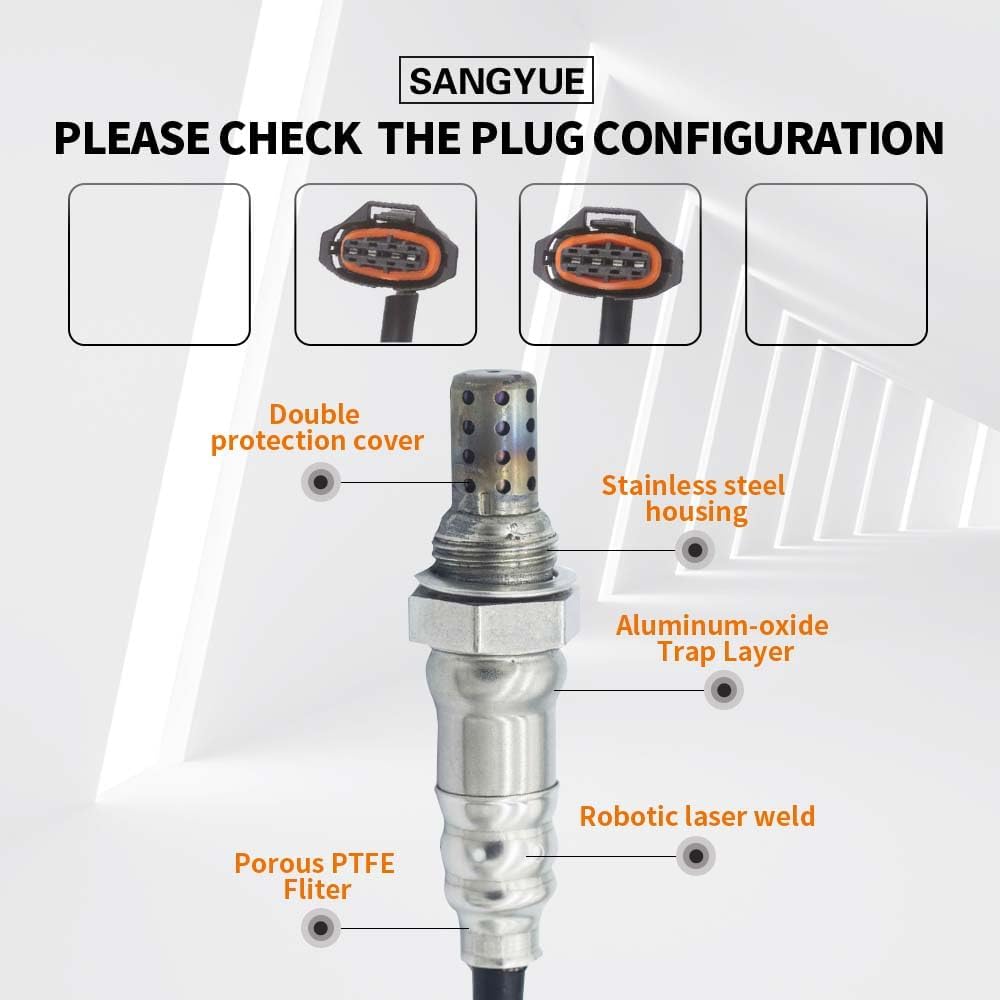
Image: A detailed diagram illustrating the internal components of the Sangyue Oxygen Sensor, including the double protection cover, stainless steel housing, aluminum-oxide trap layer, robotic laser weld, and porous PTFE filter. Also shows different plug configurations.
Compatibility
This oxygen sensor set is compatible with the following vehicle models:
- 2010-2015 Chevrolet Cruze 1.8L
- 2016 Chevrolet Cruze Limited 1.8L
- 2012-2017 Chevrolet Sonic 1.6L
- 2012-2018 Chevrolet Sonic 1.8L
- 2014-2017 Chevrolet Trax 1.8L
- 2010-2011 Saab 9-5 2.8L
It is highly recommended to verify compatibility using the "Amazon Confirmed Fit" tool by entering your vehicle's make, model, year, and engine details before purchase. Pay particular attention to the engine and any specific notes.

Image: A visual guide demonstrating how to use the "Amazon Confirmed Fit" tool on both desktop and mobile interfaces to ensure product compatibility with a specific vehicle.
Installation Guide
Installation of oxygen sensors typically requires basic automotive knowledge and tools. If you are not comfortable performing this procedure, it is recommended to seek professional assistance.
General Steps:
- Safety First: Ensure the vehicle is turned off, cooled down, and safely supported on jack stands if working underneath. Disconnect the negative battery terminal.
- Locate Sensors: Identify the upstream (pre-catalytic converter) and downstream (post-catalytic converter) oxygen sensors. Refer to your vehicle's service manual for exact locations.
- Disconnect Electrical Connector: Carefully unplug the electrical connector from the old sensor.
- Remove Old Sensor: Use an oxygen sensor wrench or appropriate socket to loosen and remove the old sensor. Be cautious as sensors can be tight due to heat and corrosion.
- Install New Sensor: Apply a small amount of anti-seize compound (if not pre-applied) to the threads of the new sensor, avoiding the sensor tip. Thread the new sensor into place by hand to prevent cross-threading, then tighten with the wrench to the manufacturer's specified torque.
- Connect Electrical Connector: Plug in the new sensor's electrical connector securely.
- Reconnect Battery: Reconnect the negative battery terminal.
- Clear Codes: If a "Check Engine" light was present, use an OBD-II scanner to clear any stored diagnostic trouble codes (DTCs).
- Test Drive: Perform a short test drive to ensure proper operation and that no new codes appear.
Note: Specific torque specifications and procedures may vary by vehicle model. Always consult your vehicle's official service manual for precise instructions.
Operation and Function
Oxygen sensors are critical components of your vehicle's engine management system. They measure the oxygen content in the exhaust gases and send this data to the engine control unit (ECU).
- Upstream Sensor (Sensor 1): Located before the catalytic converter, this sensor provides primary feedback to the ECU for air-fuel mixture adjustments, ensuring optimal combustion and emissions.
- Downstream Sensor (Sensor 2): Located after the catalytic converter, this sensor monitors the efficiency of the catalytic converter.
Properly functioning oxygen sensors contribute to:
- Improved fuel efficiency
- Reduced harmful emissions
- Stable engine idle and performance
- Prevention of "Check Engine" light illumination due to oxygen sensor related issues.

Image: A diagram illustrating the benefits of a properly functioning oxygen sensor, including solving check engine lights, improving fuel consumption, optimizing engine performance, increasing power, and reducing maintenance costs.
Maintenance and Care
Oxygen sensors are designed for long-term reliability, but their lifespan can be affected by various factors. While they do not require routine maintenance, certain conditions can lead to premature failure:
- Fuel Quality: Poor fuel quality or contaminated fuel can damage sensors.
- Engine Condition: Excessive oil consumption, coolant leaks, or rich/lean running conditions can foul sensor tips.
- Exhaust Leaks: Leaks in the exhaust system can cause inaccurate readings.
To maximize sensor life, ensure your vehicle's engine is well-maintained and address any engine performance issues promptly.
Troubleshooting
Common symptoms of a failing oxygen sensor include:
- Illuminated "Check Engine" light (often with codes like P0130-P0167)
- Decreased fuel economy
- Rough idle or engine hesitation
- Increased emissions (failing emissions test)
- Sulfur or rotten egg smell from exhaust
If you experience these symptoms after installation, or if the "Check Engine" light persists:
- Verify Installation: Double-check that the sensors are securely tightened and electrical connectors are fully seated.
- Check for Exhaust Leaks: Ensure there are no leaks in the exhaust system near the sensors.
- Scan for Codes: Use an OBD-II scanner to retrieve diagnostic trouble codes. These codes can provide specific information about the issue.
- Inspect Wiring: Look for any damaged, frayed, or pinched wiring leading to the sensors.
- Consult a Professional: If issues persist, it is advisable to consult a certified automotive technician for diagnosis and repair.
Specifications
| Attribute | Detail |
|---|---|
| Brand | Sangyue |
| Model Number | 1 & 2 (zebra11082) |
| Material | Aluminum, Stainless Steel |
| Item Weight | 0.2 Kilograms (7 ounces) |
| Mounting Type | Flange Mount |
| Output Type | Digital |
| UPC | 614537922072 |
| ASIN | B0BWDKCJTT |
Warranty and Support
This product comes with a One Year Unlimited Mileage Quality Guarantee.
For technical support or warranty claims, please contact the manufacturer or seller through the platform where the product was purchased. Provide your purchase details and a clear description of the issue for prompt assistance.