
OLAIKE 2023022003
OLAIKE Adjustable 30-60 Degree Angle Mount Instruction Manual
Model: 2023022003
1. Introduction
This instruction manual provides detailed guidance for the installation, operation, and maintenance of your OLAIKE Adjustable 30-60 Degree Angle Mount. This mount is designed to enhance the viewing angle and provide protection for various video doorbells, ensuring optimal surveillance and functionality.
2. Product Features
- Adjustable Viewing Angle: Easily adjust the doorbell's angle from 30° to 60° to achieve the optimal field of view, reducing blind spots and improving surveillance coverage.
- Broad Compatibility: Designed to fit a wide range of popular video doorbells, including models from Ring, Blink, and Nest.
- Enhanced Protection: The integrated rain shield offers protection against various weather conditions, including rain and snow.
- Durable Construction: Manufactured from robust ABS material and secured with high-quality stainless steel screws for long-lasting performance.
- Easy Installation: Features a straightforward installation process with all necessary components included, allowing for quick setup without complex tools.
3. Compatibility
The OLAIKE Adjustable Angle Mount is compatible with the following video doorbell models:
- Blink Video Doorbell
- Google Nest Doorbell (Wired)
- Ring Video Doorbell Wired
- Ring Video Doorbell Pro (Wired Doorbell Pro 2)
- Ring Video Doorbell Plus (Wired Doorbell Pro)
- Ring Video Doorbell (1st Gen)
- Ring Video Doorbell 2nd Gen (2020 Release)
- Ring Video Doorbell 2
- Ring Video Doorbell 3
- Ring Video Doorbell 3 Plus
- Ring Video Doorbell 4
Note: Please verify your doorbell model before installation to ensure compatibility.

Image: Visual guide to compatible doorbell models.
4. Package Contents
Ensure all components are present before beginning installation:
- Base Mount x1
- Rain Shield x1
- Base Plate x3 (for different angle adjustments)
- Waterproof Cap x2
- Screwdriver x1
- Various Screws (e.g., wall screws, M3 screws, M3 anti-skid screws)

Image: All components included in the package.
5. Setup and Installation
The installation process is designed to be straightforward and typically takes about 15 minutes. Follow these steps for a secure setup:
- Mark Drilling Positions: Hold the base mount against the desired wall location and mark the positions for drilling holes.
- Insert Wall Anchors: Drill holes at the marked positions (if required for your wall type) and insert the provided wall anchors.
- Mount the Bracket: Secure the base mount to the wall using the appropriate screws (e.g., 'a' screws x2).
- Attach Rain Shield: Slide the rain shield onto the top of the mounted bracket.
- Select and Attach Base Plate: Choose one of the three base plates to achieve your desired angle. Attach it to the mount and secure it with 'c' screws x4.
- Prepare Doorbell: Carefully remove the faceplate from your video doorbell.
- Secure Doorbell: Place your doorbell into the mount and lock it in place using 'c' screws x2.
- Reinstall Doorbell Faceplate: Reattach the doorbell's faceplate.
This mount supports both traditional screw-in installation and can function as a no-drill apartment door mount or a wedge kit, depending on your specific needs and doorbell model.

Image: Step-by-step installation guide.
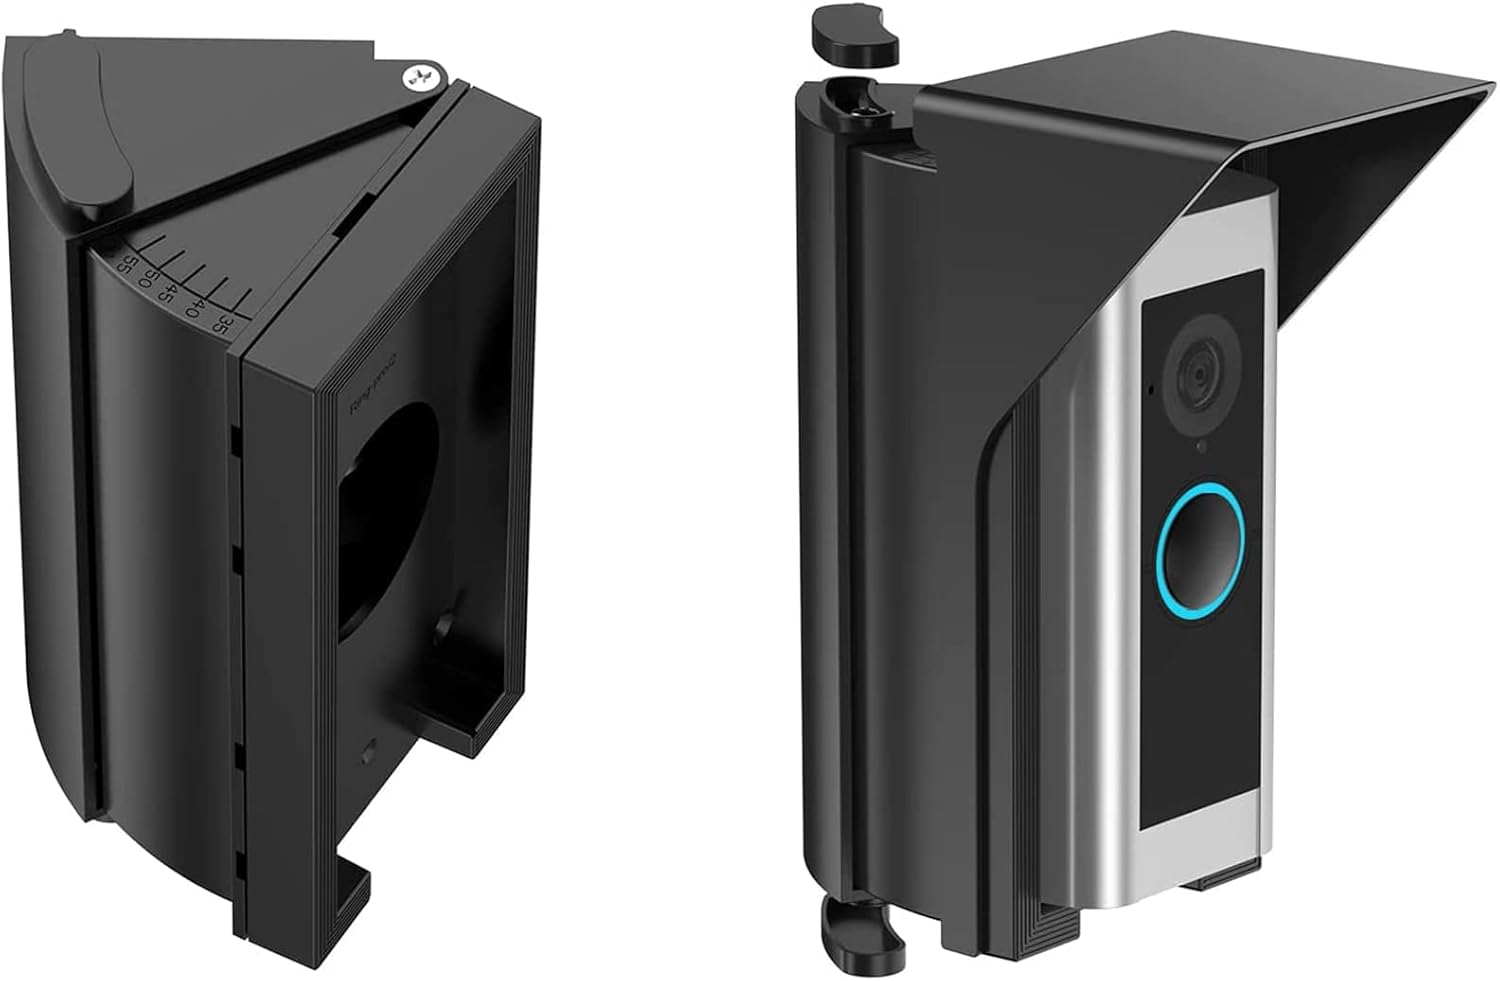
Image: Close-up of the adjustable angle mechanism and rain shield.
6. Operating Instructions: Angle Adjustment
The OLAIKE Angle Mount allows for flexible adjustment of your doorbell's viewing angle between 30° and 60°. This is achieved by selecting one of the three included base plates during installation. Each base plate provides a different fixed angle, allowing you to customize the doorbell's orientation to best suit your entrance and surveillance needs.
To adjust the angle after initial installation, you will need to partially disassemble the mount to swap the base plate. Refer to the installation steps for guidance on securing the base plate.

Image: Before and after view angle comparison.

Image: Examples of left and right side installations.
7. Maintenance
To ensure the longevity and optimal performance of your OLAIKE Adjustable Angle Mount, consider the following maintenance guidelines:
- Regular Cleaning: Periodically wipe the mount and rain shield with a soft, damp cloth to remove dust, dirt, or debris. Avoid abrasive cleaners that could damage the finish.
- Inspect Fasteners: Annually check all screws and fasteners to ensure they remain tight and secure. Re-tighten if necessary.
- Weather Protection: The integrated rain shield provides protection. Ensure it remains free of obstructions to effectively divert water.

Image: Mount demonstrating waterproof feature.
8. Troubleshooting
If you encounter issues with your OLAIKE Adjustable Angle Mount, consider the following:
- Poor Viewing Angle: Ensure you have selected the correct base plate for your desired angle. The mount offers 30° to 60° adjustment.
- Doorbell Not Fitting Securely: Double-check the compatibility list to confirm your doorbell model is supported. Ensure all screws are properly tightened during installation.
- Interference with Doorbell Functions: The mount is designed not to interfere with motion detection, video quality, audio, or night vision. If you experience issues, verify the doorbell is correctly seated and not obstructed by the mount.
- Mount Instability: Ensure the base mount is securely fastened to the wall using appropriate anchors and screws for your wall material.
9. Specifications
| Product Dimensions | 5.75 x 4.13 x 2.71 inches |
| Item Weight | 6.7 ounces |
| Model Number | 2023022003 |
| Manufacturer | OLAIKE |
| Material | Durable ABS, Stainless Steel Screws |
| Adjustable Angle Range | 30° to 60° |
10. Warranty and Support
OLAIKE is committed to customer satisfaction. While specific warranty details are not provided in this manual, OLAIKE offers a dedicated after-sales service team to assist with any issues or concerns you may have. This includes support for problems and options for free return and exchange.
For assistance, please contact OLAIKE customer support through the retailer where the product was purchased or visit the official OLAIKE store online.
OLAIKE Store: Visit OLAIKE Store on Amazon
Related Documents - 2023022003
 |
OLAIKE Wall Mount Installation Guide for Wyze Cam V2/V3 Comprehensive installation guide for the OLAIKE wall mount bracket compatible with Wyze Cam V2 and V3. Learn how to install using 3M tape or screws, and utilize its swivel and tilt features. |
 |
Playmobil Dollhouse 70894 Assembly Instructions Step-by-step assembly guide for the Playmobil Dollhouse set, model 70894. Includes detailed instructions, part identification, and safety warnings for building the playset. |
 |
ZANE ARTS COZ HOLDER 30/32 (TO-630/TO-632) 使用手冊 ZANE ARTS COZ HOLDER 30 (TO-630) 和 COZ HOLDER 32 (TO-632) 的官方使用手冊,詳細介紹產品特性、安裝、使用方法及保固資訊。 |
 |
Arista 7280R Series Switches: Q&A and Technical Overview Comprehensive Q&A document detailing the features, advantages, and technical specifications of the Arista 7280R series network switches, including deep buffers, FlexRoute, sFlow, MACsec, and VXLAN support. |
 |
MacroAir AVD370 HVLS Ceiling Fan: Specifications and Features Comprehensive guide to the MacroAir AVD370 High Volume Low Speed (HVLS) ceiling fan, detailing its features, specifications, performance data, controller options, and integration capabilities for commercial and industrial spaces. |
 |
MEAN WELL LPF-60 Series 60W LED Driver Datasheet Technical specifications, installation guide, and performance characteristics for the MEAN WELL LPF-60 series 60W constant voltage and constant current LED driver. |
Ask a question about this manual
Ask about setup, troubleshooting, compatibility, parts, safety, or missing instructions. Manuals+ will review the question and use this page’s manual context to help answer it.