ADVANCE OUTDOOR 01BY-02
ADVANCE OUTDOOR 6x8 ft Portable Storage Shelter Shed Instruction Manual
1. Introduction
This manual provides comprehensive instructions for the assembly, operation, maintenance, and troubleshooting of your ADVANCE OUTDOOR 6x8 ft Portable Storage Shelter Shed (Model 01BY-02). Please read this manual thoroughly before assembly and use to ensure safe and efficient operation of the product. Keep this manual for future reference.

Image 1.1: The ADVANCE OUTDOOR 6x8 ft Portable Storage Shelter Shed, shown with a lawnmower and ladder stored inside.
2. Safety Information
WARNING: Failure to follow these safety instructions may result in serious injury or property damage.
- Anchoring: Always ensure the product is properly anchored to the ground to prevent it from tipping over in windy conditions. Follow the instructions provided for proper anchoring using the included pegs.
- Assembly: Assembly should ideally be performed by two adults. Ensure all connections are secure before use.
- Location: Choose a level, clear area for installation, away from overhead power lines, trees, or other structures that could fall onto the shelter.
- Weather Conditions: In extreme weather conditions (heavy snow, strong winds), consider disassembling the shelter or taking additional precautions to secure it.
- Fire Hazard: Do not store flammable materials or operate open flames inside or near the shelter.
- Ventilation: Ensure proper ventilation to prevent condensation and maintain air quality inside the shelter.
3. Package Contents
Before beginning assembly, verify that all parts are present and undamaged. The product is typically shipped in two boxes: one for poles and one for the cover and connectors.
3.1. Components List
- Steel Frame Poles (various lengths and types)
- Connectors (for joining poles)
- Triple Layer 240g PE Cover (main canopy)
- 2 Removable Roll-up Zipper Doors
- L-Type Pegs (0.32X11.81 inch / 8X300mm) for anchoring
- Ratchet Straps (for tightening cover)
- Elastic Bungees (for securing doors and cover)
- Foot Pads
- Assembly Instructions Manual
If any parts are missing or damaged, please contact customer service immediately.
4. Setup and Assembly Instructions
Assembly is designed to be straightforward and tool-free for most connections. A rubber mallet may be useful for hammering pegs into the ground. It is recommended to have at least two people for assembly.
4.1. Preparation
- Clear the chosen installation area of any debris, rocks, or sharp objects.
- Lay out all components and identify them using the parts list.
4.2. Assembly Steps
- Install the Top Frame: Begin by assembling the roof frame components. Connect the steel poles according to the diagrams in the instruction manual. Ensure all connections snap securely into place.
- Install the Legs: Attach the vertical leg poles to the assembled top frame.
- Place Cover and Install Ground Bar: With one wall assembled, carefully drape the main cover over the frame. Ensure the cover is oriented correctly. Install the ground bar poles through the sleeves at the base of the cover.
- Secure Doors: Attach the two removable roll-up zipper doors to the front and back ends of the frame using the provided bungees. Ensure the zippers are closed during initial anchoring.
- Erect Second Wall and Adjust Cover: Raise the second wall of the frame. Adjust the main cover to ensure it is centered and evenly distributed over the frame.
- Tighten Cover with Ratchet Straps: Use the ratchet straps to secure and tighten the main cover to the frame, particularly at the four corners. This helps create a snug fit and prevents flapping in the wind.
- Anchor the Shelter: Securely anchor each foot pad to the ground using the L-Type pegs. Drive the pegs fully into the ground for maximum stability.

Image 4.1: Visual guide for the four main assembly steps: installing the top frame, installing the legs, placing the cover and ground bar, and securing the doors.

Image 4.2: Details of the ratchet mechanism for cover tightening and the L-shaped pegs for ground fixation, illustrating the shelter's reinforced structure.
5. Operating Instructions
5.1. Door Operation
The shelter features two removable roll-up zipper doors at the front and back. These doors can be:
- Opened: Unzip the doors completely.
- Rolled Up: Roll the unzipped doors upwards and secure them with the integrated buckles or ties to keep them open for easy access or increased airflow.
- Removed: The doors can be fully detached if desired.
- Closed: Zip the doors down completely to secure the contents and protect them from elements.
5.2. Ventilation
The shelter is equipped with a double-layer vent on each door. These vents are designed to:
- Facilitate airflow within the shelter.
- Prevent moisture buildup.
- Reduce condensation caused by temperature differences or rain.
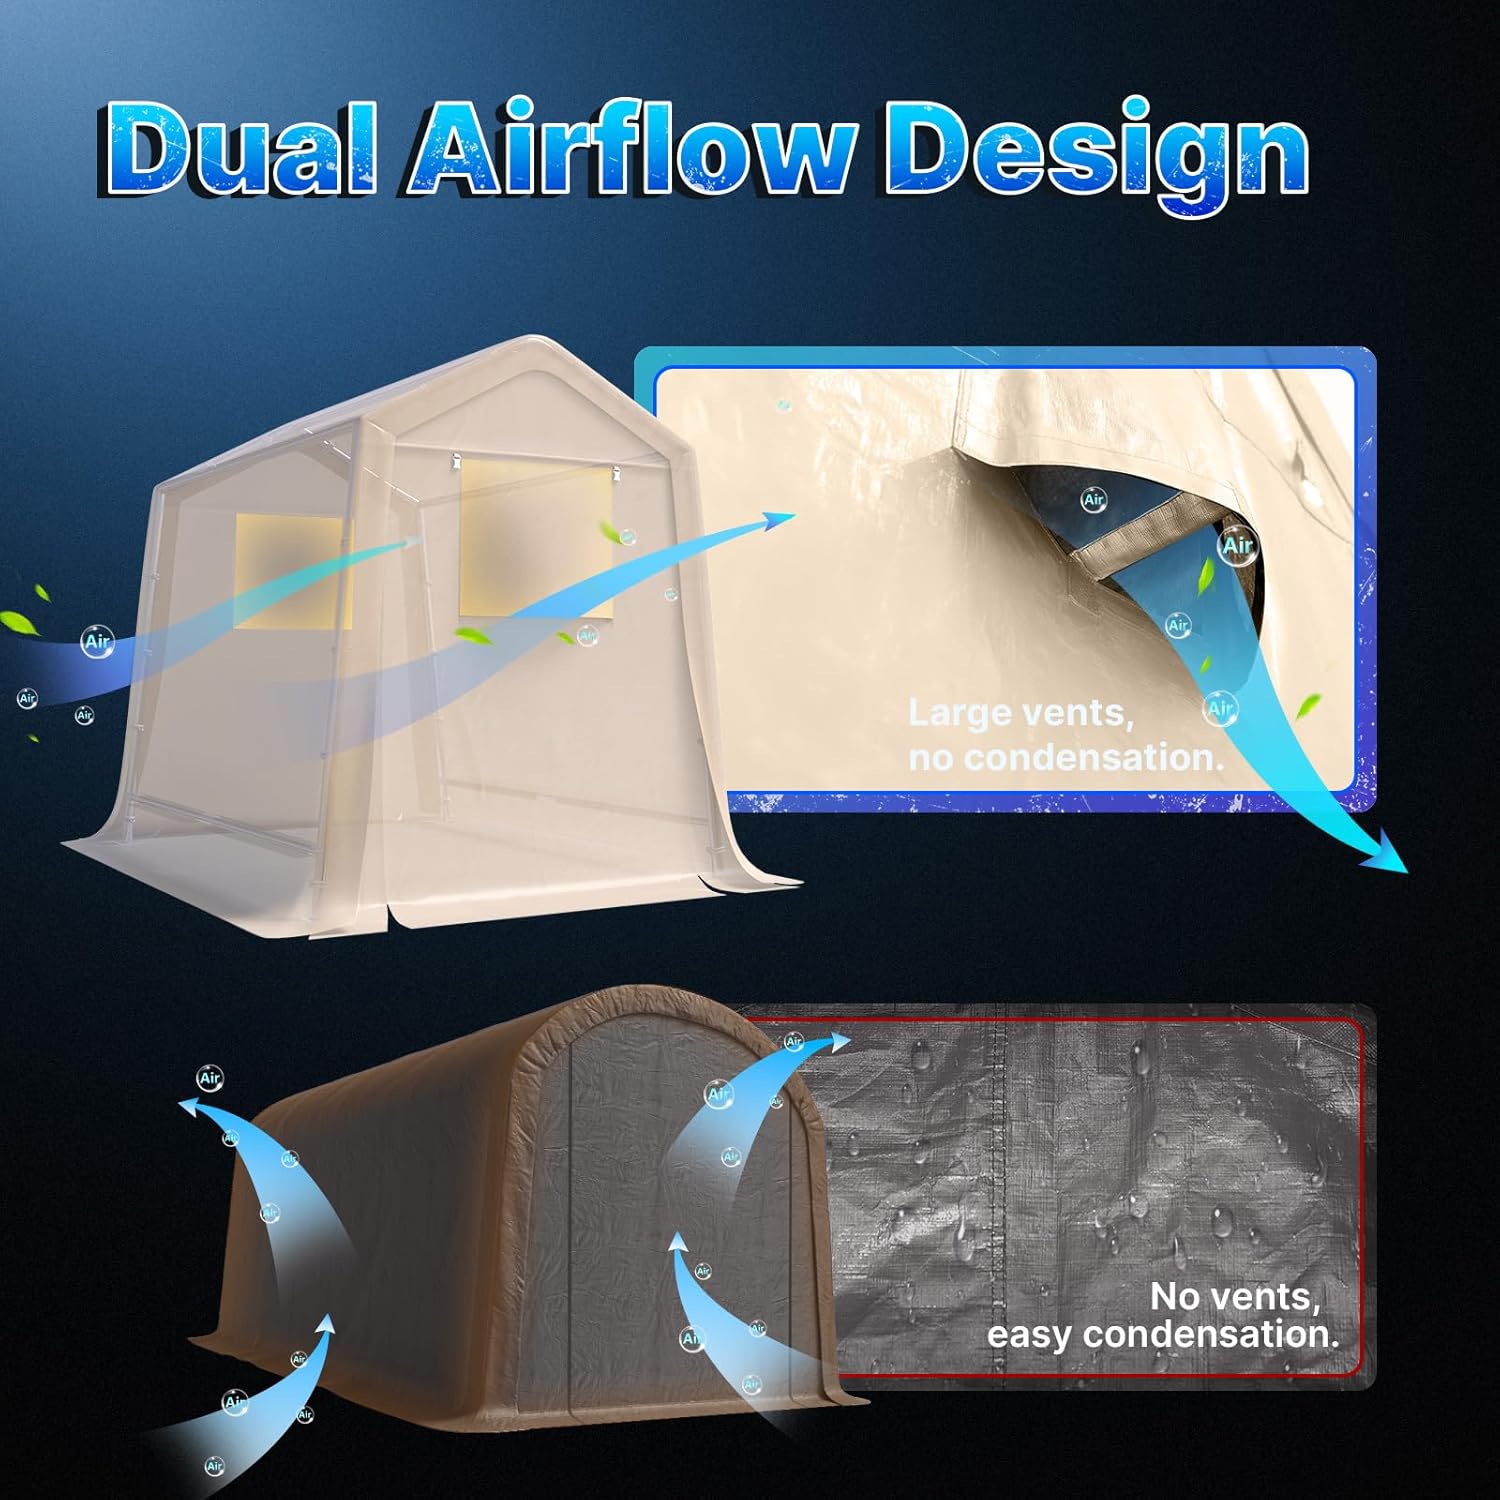
Image 5.1: Illustration of the dual airflow design, showing how vents promote air circulation to prevent condensation.
6. Maintenance
6.1. Cover Care
The shelter's cover is made from triple-layer 240g PE material, which is UV-treated, waterproof, and ripstop. To maintain its condition:
- Cleaning: Clean the cover periodically with mild soap and water. Avoid harsh chemicals or abrasive cleaners that could damage the material.
- Inspection: Regularly inspect the cover for any tears, punctures, or signs of wear. Promptly repair any damage to prevent further deterioration.
- Snow Removal: In areas with heavy snowfall, regularly remove accumulated snow from the roof to prevent excessive weight from damaging the frame. The gable roof design helps shed snow, but manual removal may still be necessary.

Image 6.1: The gable roof design, illustrating its effectiveness in shedding water and snow to prevent accumulation.

Image 6.2: Diagram showing the multi-layer construction and heat sealing technology of the PE cover, highlighting its UV protection, waterproofing, and tear resistance.
6.2. Frame Inspection
- Connections: Periodically check all pole connections and ensure they remain secure.
- Anchoring: Verify that all ground pegs are firmly in place and that the shelter remains securely anchored, especially after strong winds.
7. Troubleshooting
| Problem | Possible Cause | Solution |
|---|---|---|
| Shelter unstable in wind | Insufficient anchoring; loose frame connections; cover not tightened. | Ensure all L-Type pegs are fully driven into the ground. Check all pole connections. Tighten ratchet straps on the cover. Consider additional anchoring in high-wind areas. |
| Condensation inside shelter | Lack of airflow; high humidity. | Ensure vents are clear and unobstructed. Roll up doors periodically to increase air circulation. |
| Water pooling on roof | Improper cover tension; heavy snow/rain. | Ensure cover is taut and ratchet straps are tightened. Remove snow accumulation promptly. |
| Missing or damaged parts | Shipping damage; packaging error. | Contact ADVANCE OUTDOOR customer service for replacement parts. |
8. Specifications
| Feature | Detail |
|---|---|
| Model Number | 01BY-02 |
| Dimensions (L x W x H) | 96"L x 72"W x 84"H (6 ft x 8 ft x 7 ft) |
| Frame Material | Alloy Steel, Metal (1-1/2-inch diameter steel poles) |
| Cover Material | Triple Layer 240g PE (Polyethylene) |
| Color | Beige |
| Water Resistance Level | Waterproof |
| UV Protection | 98% UV Resistant |
| Item Weight | 58 Pounds |
| Doors | 2 Removable Roll-up Zipper Doors with Vents |
| Anchoring | Upgraded 0.32X11.81 inch (8X300mm) L-Type pegs |

Image 8.1: Diagram illustrating the dimensions of the 6x8 ft portable storage shelter.
9. Warranty and Support
ADVANCE OUTDOOR provides the following coverage for your portable storage shelter:
- Poles and Canopy Covers: One-year replacement coverage.
- Other Accessories: Replacement coverage for connectors, foot pads, pegs, anchors, and elastic bungees.
For warranty claims, replacement parts, or any other inquiries, please contact ADVANCE OUTDOOR customer service. Please have your model number (01BY-02) and purchase information ready.
Ask a question about this manual
Ask about setup, troubleshooting, compatibility, parts, safety, or missing instructions. Manuals+ will review the question and use this page’s manual context to help answer it.