Beko FRL 2244B
Beko Air Fryer FRL 2244B User Manual
Model: FRL 2244B | Brand: Beko
1. Introduction
Thank you for choosing the Beko Air Fryer FRL 2244B. This appliance is designed to cook a variety of foods using hot air circulation, offering a healthier alternative to traditional frying methods. This manual provides essential information for the safe and efficient operation, maintenance, and troubleshooting of your new air fryer. Please read it thoroughly before first use and keep it for future reference.

Image 1.1: The Beko Air Fryer FRL 2244B, showcasing its design and a basket filled with food.
2. Important Safety Information
Please observe the following safety precautions to prevent personal injury or damage to the appliance.
- Read all instructions before using the appliance.
- Do not immerse the appliance, cord, or plug in water or other liquids.
- Keep the appliance out of reach of children and pets.
- Ensure the voltage indicated on the appliance corresponds to your local mains voltage before connecting.
- Do not operate any appliance with a damaged cord or plug, or after the appliance malfunctions or has been damaged in any manner.
- Unplug from outlet when not in use and before cleaning. Allow to cool before putting on or taking off parts.
- Do not place the appliance against a wall or against other appliances. Leave at least 10 cm free space on the back and sides and 10 cm free space above the appliance.
- Do not cover the air inlet and air outlet openings while the appliance is operating.
- Do not fill the basket with oil as this may cause a fire hazard.
- Always place the ingredients to be fried in the basket to prevent any contact with the heating elements.
- During hot air frying, hot steam is released through the air outlet openings. Keep your hands and face at a safe distance from the steam and from the air outlet openings.
- The surfaces may become hot during use. Do not touch hot surfaces. Use handles or knobs.
- Always use oven mitts when handling hot components.
3. Product Overview and Components
Familiarize yourself with the main parts of your Beko Air Fryer FRL 2244B.

Image 3.1: Front view of the Beko Air Fryer, showing the digital control panel and handle.
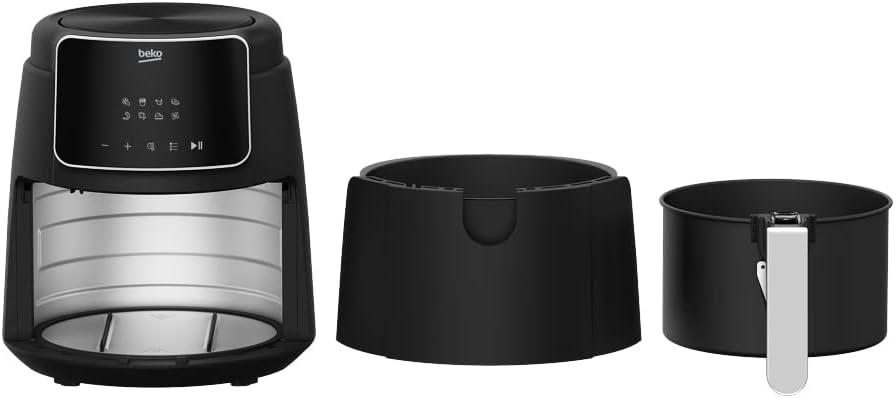
Image 3.2: The air fryer with its main components, including the outer pan and inner cooking basket, separated for cleaning or loading.
Components:
- Main Unit: Houses the heating element and fan.
- Digital Control Panel: For setting time, temperature, and selecting preset functions.
- Handle: For safely pulling out the cooking basket.
- Outer Pan: Collects drips and holds the cooking basket.
- Cooking Basket: Where food is placed for air frying.
- Cooking Rack: An optional accessory for certain foods (if included).
4. Setup and First Use
4.1 Unpacking and Initial Cleaning
- Remove all packaging materials and promotional labels from the air fryer.
- Wipe the exterior of the appliance with a damp cloth.
- Wash the cooking basket and outer pan with hot water, dish soap, and a non-abrasive sponge. Rinse thoroughly and dry completely.
- Ensure all parts are dry before assembly.
4.2 Placement
- Place the air fryer on a stable, heat-resistant, and level surface.
- Ensure there is adequate ventilation around the appliance (at least 10 cm clearance on all sides and top).
- Do not place the appliance near flammable materials or heat sources.
4.3 First Use (Burn-in)
It is recommended to run the air fryer empty for a short period before cooking food for the first time to eliminate any manufacturing odors.
- Plug the power cord into a grounded electrical outlet.
- Set the temperature to 200°C (390°F) and the timer to 10 minutes.
- Allow the appliance to run. A slight odor or smoke may be present; this is normal.
- Once complete, unplug the appliance and let it cool down completely.
5. Operating Instructions
5.1 Digital Control Panel
The Beko Air Fryer FRL 2244B features an intuitive digital control panel for easy operation.

Image 5.1: Detailed view of the digital control panel, showing various icons for preset functions, time, and temperature controls.
- Power Button: Turns the appliance on/off and starts/pauses cooking.
- Temperature Control (+/-): Adjusts the cooking temperature (35-200°C).
- Time Control (+/-): Adjusts the cooking time (0-90 minutes).
- Preset Function Icons: Selects one of the 8 pre-programmed cooking modes.
- Display: Shows current time and temperature settings.
5.2 Basic Operation
- Place the air fryer on a stable, heat-resistant surface.
- Pull out the outer pan and cooking basket using the handle.
- Place your ingredients into the cooking basket. Do not overfill.
- Slide the outer pan and basket back into the air fryer until it clicks into place.
- Plug the power cord into a grounded electrical outlet. The display will light up.
- Press the Power button to turn on the appliance.
- Manual Setting: Use the Temperature (+/-) buttons to set the desired temperature (35-200°C) and the Time (+/-) buttons to set the desired cooking time (0-90 minutes).
- Preset Function: Alternatively, press the Preset Function icon repeatedly to cycle through the 8 preset options (Defrost, French Fries, Chicken Wings, Steak, Shrimp, Fish, Cake, Air Drying). The appliance will automatically set the recommended time and temperature for the selected function.
- Press the Power button again to start the cooking process.
- During cooking, you can pull out the basket to shake or turn food. The appliance will pause automatically. Reinsert the basket to resume.
- Once the timer reaches zero, the appliance will beep and turn off.
- Carefully pull out the basket and empty the cooked food onto a plate. Use tongs for smaller items.
- Unplug the appliance after use.
5.3 Cooking Tips
- For best results, shake the basket halfway through the cooking time for evenly cooked food.
- Add a small amount of oil (1 tablespoon) to fresh ingredients for a crispier result.
- Smaller ingredients usually require a shorter cooking time than larger ingredients.
- Preheating the air fryer for 3-5 minutes can improve cooking results for some foods.
- Refer to the cooking chart below for general guidelines.
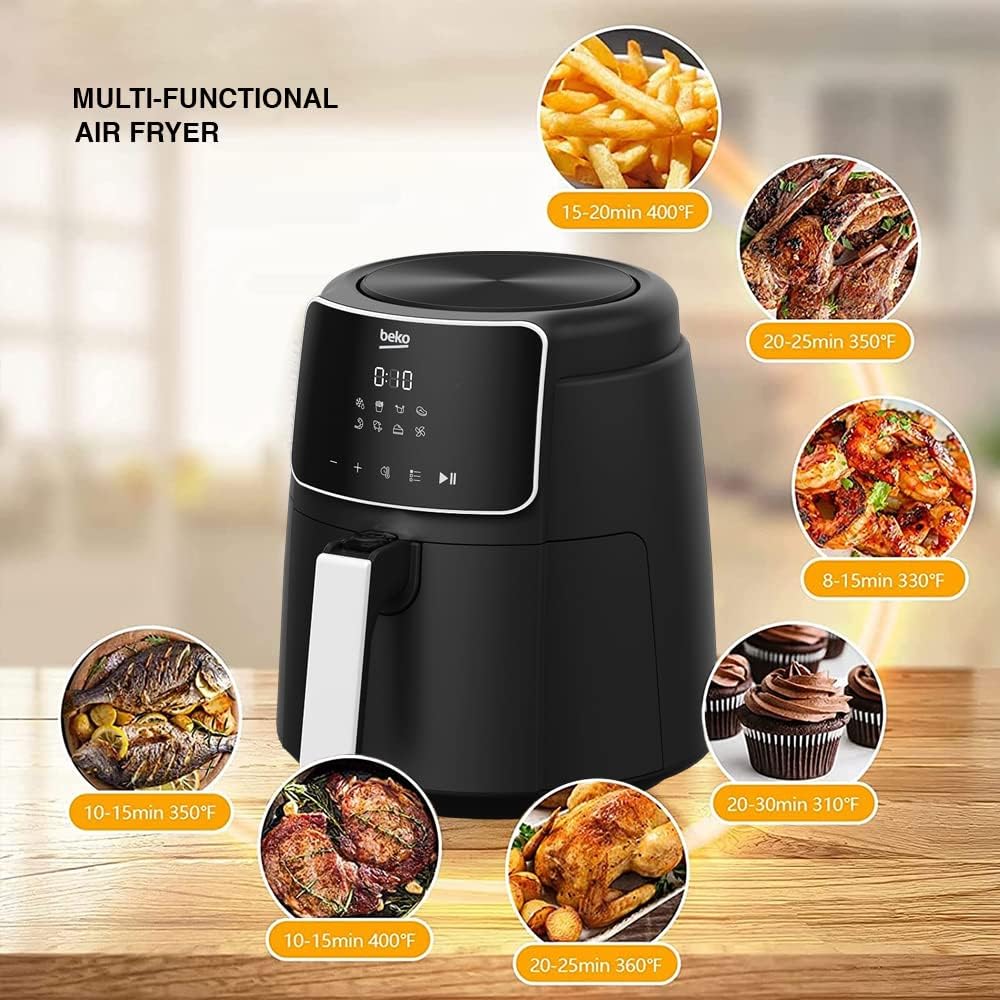
Image 5.2: Examples of food items that can be cooked in the air fryer, along with suggested temperature and time ranges for each.
The Beko Air Fryer utilizes 360° high-speed hot air circulation for efficient and even cooking, as illustrated below.

Image 5.3: Visual representation of the 360-degree hot air circulation technology, highlighting its effectiveness, thermal penetration, and thermal convection for cooking.
6. Maintenance and Cleaning
Regular cleaning ensures optimal performance and extends the lifespan of your air fryer.
6.1 Cleaning After Each Use
- Unplug the air fryer and allow it to cool down completely before cleaning.
- Wipe the exterior of the appliance with a damp cloth.
- Remove the outer pan and cooking basket. Wash them with hot water, dish soap, and a non-abrasive sponge. For stubborn residue, soak them in hot soapy water for 10-15 minutes.
- The cooking basket and outer pan are generally dishwasher safe, but hand washing is recommended to prolong their non-stick coating.
- Clean the interior of the appliance with a damp cloth. Do not use abrasive cleaners or scouring pads.
- Ensure all parts are completely dry before reassembling or storing.
6.2 Storage
- Ensure the air fryer is clean and dry before storing.
- Store the appliance in a cool, dry place, away from direct sunlight and moisture.
- Do not wrap the power cord tightly around the appliance.
7. Troubleshooting
If you encounter any issues with your air fryer, please refer to the following common problems and solutions.
| Problem | Possible Cause | Solution |
|---|---|---|
| Air fryer does not turn on. | Appliance is not plugged in. Power outlet is not working. | Ensure the power cord is securely plugged into a grounded outlet. Try plugging another appliance into the same outlet to check if it's working. |
| Food is not cooked evenly. | Basket is overfilled. Food was not shaken during cooking. | Do not overfill the basket; cook in smaller batches if necessary. Shake the basket halfway through the cooking time. |
| White smoke comes from the appliance. | Grease from previous use. Fatty ingredients. | Clean the outer pan and cooking basket thoroughly after each use. Remove excess oil from fatty ingredients before air frying. |
| Food is not crispy. | Not enough oil (for fresh ingredients). Temperature too low or time too short. | Lightly coat fresh ingredients with a small amount of oil. Increase temperature or cooking time as needed. |
8. Product Specifications
Key technical specifications for the Beko Air Fryer FRL 2244B.
| Brand | Beko |
| Model Number | FRL 2244B |
| Capacity (Net) | 3.9 Liters |
| Power / Wattage | 1500 Watts |
| Product Dimensions (L x W x H) | 34.5 x 31.5 x 34.5 cm |
| Item Weight | 5.54 Kilograms |
| Material | Aluminum, Plastic |
| Special Features | Digital Control Panel, Temperature Control, 8 Preset Functions |
| Temperature Range | 35-200 degrees Celsius |
| Time Range | 0-90 minutes |
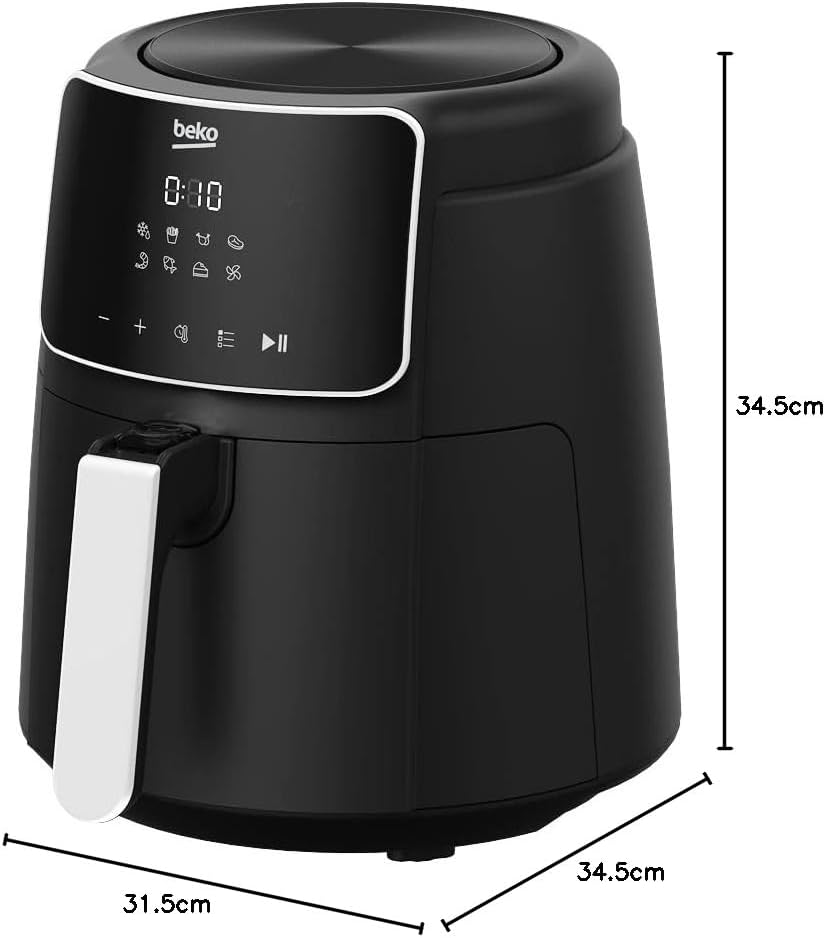
Image 8.1: Diagram illustrating the physical dimensions of the Beko Air Fryer FRL 2244B.
9. Warranty and Support
9.1 Product Warranty
This Beko Air Fryer FRL 2244B comes with a standard manufacturer's warranty. For details regarding the warranty period and terms, please refer to the warranty card included with your purchase or contact Beko customer service. Extended warranty options may also be available from authorized retailers.
- 1-Year Extended Warranty by Salama Care (E-mail delivery)
- 2-Year Extended Warranty by Salama Care (E-mail delivery)
9.2 Customer Support
For further assistance, technical support, or service inquiries, please contact Beko customer service through their official website or the contact information provided in your product documentation. When contacting support, please have your model number (FRL 2244B) and purchase details ready.
You can visit the official Beko Store for more information: Beko Store on Amazon.eg
Ask a question about this manual
Ask about setup, troubleshooting, compatibility, parts, safety, or missing instructions. Manuals+ will review the question and use this page’s manual context to help answer it.