1. Introduction
This manual provides detailed instructions for the installation, operation, and maintenance of the ArecaIoT RS485 Output Soil Temperature Humidity Moisture Sensor (Model: TH-S). This sensor is designed for accurate measurement of soil temperature and humidity (moisture) with an RS485 communication interface, making it suitable for various environmental monitoring applications.
2. Product Features
- Measuring Parameters: Soil Temperature, Soil Humidity (Moisture)
- Output Interface: RS485
- Power Supply: 5-30V DC
- Probe Type: 3-pin probes for reliable soil contact

Figure 2.1: The ArecaIoT TH-S sensor, highlighting its model number, 2-in-1 measurement capabilities (temperature and humidity/moisture), and RS485 output.
3. Product Overview and Dimensions
The ArecaIoT TH-S sensor features a robust design with stainless steel probes for direct soil insertion and an epoxy resin vacuum-sealed body for durability. The sensor's compact dimensions allow for easy integration into various setups.

Figure 3.1: Dimensions of the ArecaIoT TH-S soil sensor, showing its compact size for installation.

Figure 3.2: Internal component diagram of the sensor, illustrating the epoxy resin vacuum glue for sealing, stainless steel probes, and the waterproof cable outlet.
4. Specifications
| Parameter Category | Parameter | Value/Range |
|---|---|---|
| Basic Parameters | Power Supply | DC 5-30V |
| Max Power Consumption | 0.5W @ 24V DC | |
| Protection Class | IP68 (long-term immersion in water use) | |
| Cable Length | Default 2m (customizable) | |
| Operating Environment | -40℃ to 80℃ | |
| Measured Parameters | Temperature | Measuring range: -40℃ to 80℃ Accuracy: ±0.5℃ (25℃) Long-term stability: ≤0.1% / year Response time: ≤15s |
| Humidity (Moisture) | Measuring range: 0-100% RH Accuracy: ±2% within 0-50%, ±3% within 50-100% Long-term stability: ≤1% RH / year Response time: ≤4s |
5. Setup
5.1. Power and Communication Wiring
Connect the sensor to a 5-30V DC power supply. Ensure correct polarity. The RS485 output requires connection to a compatible RS485 communication interface on your data logger or control system. Refer to your system's documentation for specific wiring diagrams.
5.2. Physical Installation
Insert the stainless steel probes directly into the soil at the desired measurement depth. Ensure the probes are fully submerged in the soil for accurate readings. Avoid areas with large stones or air pockets that could affect contact. The sensor body should be positioned at least 7cm above the soil surface to protect the cable connection.
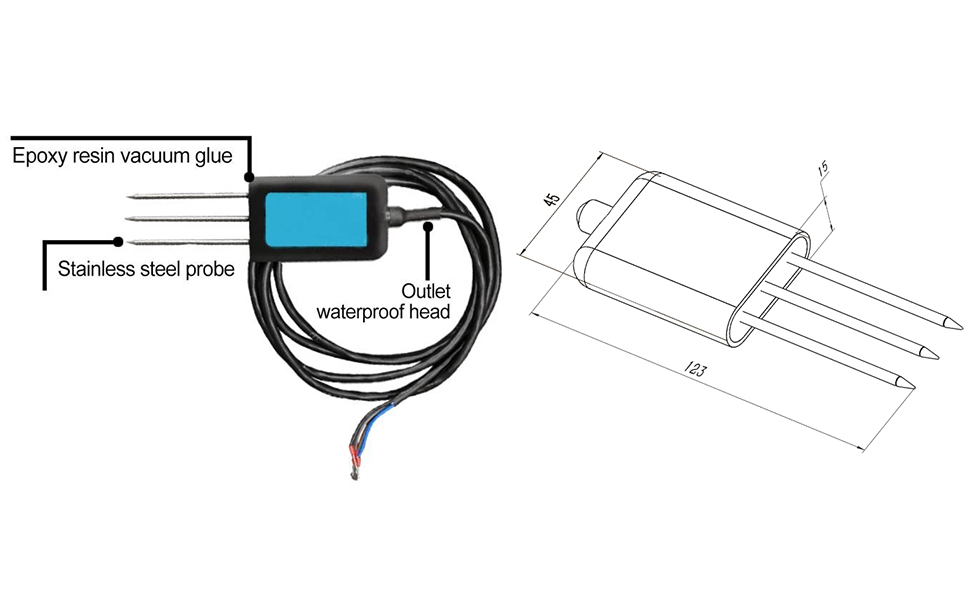
Figure 5.1: Examples of correct sensor installation in soil, showing proper depth and avoiding obstructions.
6. Operating Instructions
The sensor communicates via the RS485 protocol. Data can be read using a compatible RS485 interface and software, or an HMI touch screen display unit. The sensor provides real-time temperature and humidity/moisture data.
6.1. Data Reading with Configuration Tool
A dedicated configuration tool can be used to read sensor data and adjust settings. Connect the sensor to your computer via an RS485 to USB converter. Open the configuration software, select the appropriate COM port, and read the temperature and humidity values.

Figure 6.1: Using the configuration tool to select and read temperature and humidity data from the sensor.
6.2. Using with HMI Touch Screen Display
The sensor is compatible with HMI touch screen display units (e.g., 4.3-inch HMI Touch Screen, 480*272 resolution) for real-time monitoring, data logging, and calibration. These units typically connect directly to the sensor via RS485.
Video 6.1: Demonstration of the soil sensor connected to an HMI touch screen, showing real-time data display, data logging, and system settings for calibration and reset. This video illustrates the user interface and functionality when paired with a compatible display unit.

Figure 6.2: Features of a compatible HMI touch screen, highlighting its ability to connect with the TH-S sensor for monitoring and data management.
7. Maintenance
- Cleaning: Periodically clean the stainless steel probes to remove any accumulated soil or debris that might affect measurement accuracy. Use a soft cloth and water. Avoid abrasive materials.
- Connections: Regularly inspect all wiring and connections for signs of wear, corrosion, or damage. Ensure all connections are secure.
- Environmental Protection: While the sensor has an IP68 rating for long-term immersion, ensure the cable entry point and any external connections are properly sealed and protected from harsh environmental conditions.
8. Troubleshooting
8.1. No Data Output or Incorrect Readings
- Check Power Supply: Verify that the sensor is receiving the correct voltage (5-30V DC) and that the power supply is stable.
- Inspect Wiring: Ensure all RS485 communication wires (A, B, GND) are correctly connected and free from damage.
- RS485 Parameters: Confirm that the baud rate and other RS485 communication parameters (e.g., parity, stop bits) on your data acquisition system match the sensor's settings.
- Probe Contact: Ensure the probes are fully inserted into the soil and have good contact. Avoid air gaps or very dry soil around the probes.
- Calibration: If readings appear consistently off, consider performing a calibration if your system supports it. Refer to the operating instructions of your display unit or software for calibration procedures.
8.2. Sensor Not Responding
- Power Cycle: Disconnect and reconnect the power supply to the sensor.
- Check for Physical Damage: Inspect the sensor body and probes for any visible damage.
- Communication Line Integrity: Test the RS485 communication lines for continuity and shorts.
9. Support
For further assistance, technical support, or warranty information regarding your ArecaIoT RS485 Output Soil Temperature Humidity Moisture Sensor, please contact the manufacturer, ComWinTop, or your authorized reseller. Ensure you have your product model (TH-S) and purchase details available when seeking support.
Manufacturer: ComWinTop
Brand: ArecaIoT