1. Introduction
Thank you for choosing the FOSA ATS 20+ Portable World Band Digital Radio Receiver. This device is designed for global radio reception, offering high sensitivity and a wide range of frequency bands. This manual provides essential information for setting up, operating, and maintaining your radio receiver.
The ATS 20+ features multiple conversion and DSP digital demodulation technology for enhanced sensitivity. It supports FM stereo, AM, LW, SW, and SSB (LSB and USB) reception. Its compact and lightweight design makes it suitable for various environments, including outdoor use and home listening.
2. Package Contents
Please verify that all items listed below are included in your package:
- FOSA ATS 20+ Radio Receiver
- Telescopic Antenna
- Type-C USB Charging Cable
- Self-adhesive Foot Mats (4 pieces)

Image: The FOSA ATS 20+ radio receiver, telescopic antenna, Type-C charging cable, and foot mats are shown on a white surface.
3. Product Overview
The FOSA ATS 20+ radio receiver features a compact design with an aluminum alloy casing for durability. The front panel includes a display screen and various control buttons, while the side panel houses the antenna connection and charging port.

Image: A FOSA ATS 20+ radio receiver with its telescopic antenna extended, showing the front display and controls, and a side view of the antenna connection.
3.1 Front Panel Controls
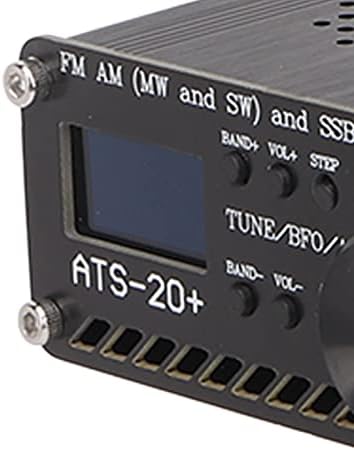
Image: A detailed view of the radio's front panel, highlighting the small display screen, tuning knob, and various function buttons labeled BAND+, VOL+, STEP, AGC, BAND-, VOL-, BW, and MODE.
- Display Screen: Shows frequency, band, mode, and other operational information.
- TUNE/BFO/ATS Knob: Used for tuning frequencies, adjusting Beat Frequency Oscillator (BFO) for SSB, and Automatic Tuning System (ATS).
- BAND+ / BAND- Buttons: Navigate through frequency bands.
- VOL+ / VOL- Buttons: Adjust volume level.
- STEP Button: Changes tuning step size.
- AGC Button: Activates/deactivates Automatic Gain Control.
- BW Button: Selects audio bandwidth filters (0.5, 1, 1.2, 2.2, 3, 4Khz).
- MODE Button: Switches between reception modes (FM, AM, LW, SW, SSB).
3.2 Side Panel Ports
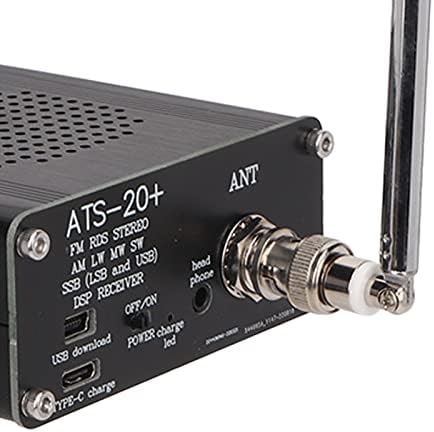
Image: A close-up of the radio's side panel, showing the BNC antenna connector labeled 'ANT', a headphone jack labeled 'head phone', an ON/OFF switch, a POWER charge LED, a USB download port, and a Type-C charge port.
- ANT (Antenna) Port: Connect the telescopic antenna or an external antenna.
- Headphone Jack: For private listening.
- ON/OFF Switch: Powers the device on or off.
- POWER Charge LED: Indicates charging status.
- USB Download Port: For firmware updates or data transfer.
- Type-C Charge Port: For charging the internal battery.
4. Setup
Follow these steps for initial setup of your FOSA ATS 20+ radio receiver:
- Apply Foot Mats: Peel and stick the four self-adhesive foot mats to the bottom corners of the radio receiver. This provides stability and protects surfaces.
- Attach Antenna: Connect the telescopic antenna to the ANT port on the side of the radio. Ensure it is securely fastened. For optimal reception, extend the antenna fully.
- Charge Battery: Connect the Type-C USB charging cable to the radio's Type-C charge port and to a compatible USB power source (e.g., computer, wall adapter). The POWER charge LED will indicate charging status.
Video: This video demonstrates the unboxing of the ATS 20+ radio receiver, showing how to attach the foot mats, connect the telescopic antenna, and handle the device.
5. Operating Instructions
5.1 Power On/Off
To power on the radio, slide the ON/OFF switch to the 'ON' position. To power off, slide it to the 'OFF' position.
5.2 Basic Tuning
- Select Band: Use the BAND+ and BAND- buttons to cycle through available frequency bands (e.g., FM, AM, LW, SW).
- Select Mode: Press the MODE button to choose the desired reception mode (FM, AM, SSB).
- Tune Frequency: Rotate the TUNE/BFO/ATS knob to adjust the frequency. A short press on the STEP button may change the tuning step size for finer adjustments.
- Adjust Volume: Use the VOL+ and VOL- buttons to set the listening volume.
5.3 Advanced Features
- Bandwidth Filters: Press the BW button to select from available audio bandwidth filters (0.5, 1, 1.2, 2.2, 3, 4Khz). This can help improve clarity by reducing interference.
- SSB Reception: When in SSB mode, use the TUNE/BFO/ATS knob to fine-tune the BFO for clear voice reception (LSB or USB).
- Automatic Gain Control (AGC): The AGC button can be used to manage signal strength fluctuations, providing a more consistent audio output.
6. Maintenance
- Cleaning: Use a soft, dry cloth to clean the radio's exterior. Avoid using liquid cleaners or solvents, as they may damage the finish or internal components.
- Storage: When not in use for extended periods, store the radio in a cool, dry place away from direct sunlight and extreme temperatures.
- Antenna Care: Handle the telescopic antenna gently to prevent bending or breaking. Retract it when not in use to protect it.
- Chip Replacement: The PCB is designed to accommodate the si4735 package, allowing users to replace the chip if necessary. This requires technical expertise and should only be attempted by qualified individuals.
7. Troubleshooting
| Problem | Possible Cause | Solution |
|---|---|---|
| No power | Battery discharged; Power switch off | Charge the radio using the Type-C cable; Ensure the ON/OFF switch is in the 'ON' position. |
| Poor reception (especially on LW/MW/SW) | Antenna not extended; Weak signal; Interference; Included whip antenna is primarily for FM. | Fully extend the telescopic antenna. For better reception on lower frequencies (AM, LW, SW), connect a longer wire antenna to the ANT port. Move away from electronic devices that may cause interference. |
| Distorted audio | Volume too high; Incorrect bandwidth filter; Strong signal overload. | Adjust the volume; Try different bandwidth filters using the BW button; If signal is too strong, consider adjusting antenna length or position. |
| Cannot receive SSB signals clearly | BFO not properly adjusted. | In SSB mode, carefully rotate the TUNE/BFO/ATS knob to fine-tune the BFO until the voice is clear. |
| Controls feel unresponsive or clunky | User unfamiliarity with interface; Minor software lag. | Familiarize yourself with the control layout and functions. If issues persist, try powering the device off and on again. |
8. Specifications
| Feature | Description |
|---|---|
| Brand | FOSA |
| Model Number | fosaibf52vdea4 |
| Item Weight | 10.8 ounces |
| Package Dimensions | 5.94 x 3.94 x 2.36 inches |
| Connectivity Technology | USB |
| Tuner Technology | AM, FM |
| Radio Bands Supported | FM, AM, LW, SW, SSB |
| Power Source | Battery Powered (Type-C charging) |
| Special Feature | Lightweight, Portable, High Sensitivity, Multiple Bandwidth Filters |
| Audio Bandwidth Filters | 0.5, 1, 1.2, 2.2, 3, 4Khz |
| Pre-configured Bands | 22 commercial and amateur radio frequency bands |
| Recommended Uses | Music, News, Global Broadcast Reception |
9. Warranty and Support
For warranty information, technical support, or service inquiries, please refer to the documentation provided with your purchase or contact the manufacturer directly. Keep your proof of purchase for warranty claims.
Manufacturer: fosa


