Introduction
Thank you for choosing the MIAOKE Portable Blender. This compact and stylish blender is designed for convenience, allowing you to prepare fresh shakes and smoothies wherever you go. Its powerful motor and durable blades ensure efficient blending, while the magnetic USB charging offers easy power-up. Please read this manual carefully to ensure safe and optimal use of your new portable blender.
Important Safety Information
To reduce the risk of injury or damage, always follow basic safety precautions when using electrical appliances. This blender features a magnetic suction safety device to prevent operation when not properly assembled.
- Ensure the cup body is securely aligned with the base before operating.
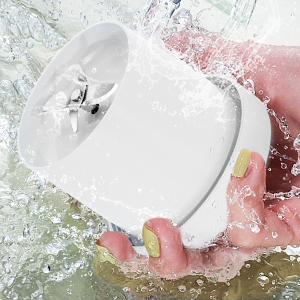
- Do not immerse the motor base in water. The cup is dishwasher safe, but the motor base should be cleaned with a damp cloth.
- Keep hands and utensils out of the blender while operating to prevent injury.
- Do not overfill the blender. Fill ingredients no more than 2/3 of the cup capacity.
- Keep out of reach of children.
- Use only the provided magnetic charging cable.
Product Overview
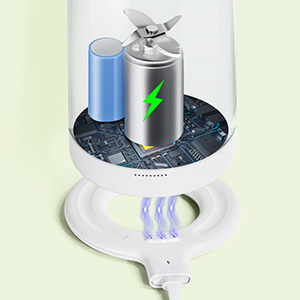
The MIAOKE Portable Blender is designed for ease of use and portability. It features a durable, BPA-free plastic cup, a powerful motor base with stainless steel blades, and a convenient magnetic charging system.

Setup
Initial Charging
Before first use, fully charge your portable blender. The built-in 1400mAh rechargeable battery takes approximately 3-5 hours for a full charge. A full charge provides enough power for 10-15 cups of juice.
- Connect the magnetic USB charging cable to a power source (e.g., power bank, laptop, car charger).
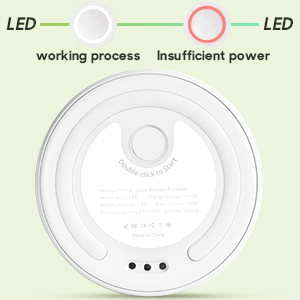
- Place the blender base onto the magnetic charging pad. The indicator lights will show charging status.

Assembly
Proper assembly is crucial for the blender to operate due to its magnetic safety device.
- Align the cup body (350ml) with the sticker on the bottom of the cup.
- Rotate the cup one turn counter-clockwise to securely attach it to the motor base. Ensure the labels on the base and cup are aligned for the on/off key to function.

Operating Instructions
Preparing Ingredients
For best results and to prevent strain on the motor, prepare your ingredients as follows:
- Cut fruits and vegetables into small pieces (approximately 1-2 cm).
- Place ingredients into the blender cup, ensuring they do not exceed half of the cup's capacity.
- Add water, milk, or other liquids. The total liquid should not exceed 2/3 of the overall capacity.

Blending Your Drink
- Ensure the blender cup is securely attached to the motor base (refer to Assembly section).
- Double-click the power button on the bottom of the base to start blending. The blender will run for approximately 30 seconds and then stop automatically.
- For thicker mixtures, gently shake the blender up and down, left and right, 6-10 times during the blending cycle to ensure all ingredients are thoroughly mixed.
- Once blending is complete, you can enjoy your drink directly from the bottle or pour it into a glass.


Maintenance and Cleaning
Regular cleaning and proper maintenance will extend the life of your MIAOKE Portable Blender.
- The blender cup is dishwasher safe.
- The motor base is waterproof and can be rinsed under running water, but avoid immersing it completely.
- For quick cleaning, add water and a drop of dish soap to the cup, reassemble, and run a short blending cycle. Rinse thoroughly.
- Ensure the charging port is dry before connecting the magnetic charger.
Troubleshooting
If you encounter issues with your blender, please refer to the following common solutions:
| Problem | Possible Cause | Solution |
|---|---|---|
| Blender does not start | 1. Cup not properly aligned. 2. Insufficient battery charge. 3. Power button not double-clicked. | 1. Ensure cup is securely twisted onto the base, aligning the labels. 2. Charge the blender fully. 3. Double-click the power button to activate. |
| Ingredients not blending smoothly | 1. Ingredients are too large. 2. Too many ingredients. 3. Not enough liquid. | 1. Cut ingredients into smaller pieces (1-2 cm). 2. Do not exceed 2/3 of the cup capacity. 3. Add more liquid to ensure proper blending. Gently shake during operation. |
| Blender stops unexpectedly | 1. Overload protection activated. 2. Low battery. | 1. Reduce ingredient load or add more liquid. Restart after a few minutes. 2. Recharge the blender. |
Specifications
| Feature | Detail |
|---|---|
| Brand | MIAOKE |
| Model | B0BVQWLMHV |
| Capacity | 350 Milliliters (11.8 Oz) |
| Product Dimensions | 1"D x 1"W x 1"H |
| Item Weight | 330 Grams |
| Power Source | Battery Powered (1400mAh) |
| Voltage | 7.4 Volts |
| Wattage | 11.1 watts |
| Number of Speeds | 1 |
| Controls Type | Push Button |
| Blade Material | Stainless Steel |
| Material Type Free | BPA Free |
| Dishwasher Safe | Yes (Cup only) |
| Special Feature | Portable |
| GTIN | 798607654718 |
Warranty and Support
Your MIAOKE Portable Blender comes with a 12-month carefree guarantee. If you experience any problems during use, please contact our 24-hour customer service team. We are committed to offering you a satisfactory solution.