1. Introduction and Overview
This manual provides essential information for the installation, operation, and maintenance of your new hotend. Please read it carefully before use.
2. Package Contents
Verify that all components listed below are present in your package:
- 1x Aluminum heatsink with buckles
- 1x Bimetal heatbreak
- 1x Heater block installed with ceramic heater and thermistor
- 1x Brass nozzle 0.4mm
- 1x Silicone cover (sock)
- 2x Cables (Heater and Thermistor extension cables)
- Accessories bag (includes wrench, hex key)

Figure 2.1: Exploded view of the CHC Pro Hotend components, including the V6 heat sink, bi-metal heatbreak, volcanic heatblock, V6 volcanic nozzle, silicone sock, heater extension cable, thermistor extension cable, and accessories bag.
3. Key Features
- Power: 24V 115W for rapid heating.
- High Temperature Capability: Designed for long-term printing up to 300°C, with a thermistor capable of sensing up to 320°C.
- Accurate Temperature Reading: Thermistor directly installed in the block for precise temperature monitoring.
- Bimetal Heatbreak: Features a copper alloy and Titanium Alloy TC4 construction for efficient heat dissipation and reduced heat creep. Inner wall roughness Ra0.4.
- Ceramic Heating Ring: Built-in copper plated heating loop ensures uniform and fast heating, reaching 360°C loop heating (though printing temperature should remain below 300°C for longevity).

Figure 3.1: Detailed view of the heatbreak and heatblock, highlighting the 0.25mm thickness, Ra0.4 inner wall roughness, and M6 smooth threads.

Figure 3.2: Illustration of the Volcanic Ceramic heating block kit, emphasizing 360° loop heating, fast temperature heating, high accuracy, and ease of replacement.

Figure 3.3: Depiction of the ceramic heating ring with built-in copper plated heating loop, showing uniform and rapid heating up to 360° loop heating, and the integrated NTC 100K B3950 thermistor.

Figure 3.4: Performance graph illustrating the rapid temperature increase of the high temperature resistant ceramic circle ring, reaching 280°C in approximately 20 seconds and 320°C in 51 seconds.
4. Setup and Installation
This hotend is designed to be compatible with V6 Volcano Hot Ends and similar systems. Installation typically involves replacing your existing hotend assembly.
4.1 Wiring Connections
Ensure correct wiring for the heater cartridge and thermistor. The heater cartridge line is 165mm and the thermistor line is 145mm. The connectors are Micro-Fit 3.0 for the heater and XH 2.54 for the thermistor.

Figure 4.1: Cable lengths and connector types for the heater cartridge (Micro-Fit 3.0, 165mm) and thermistor (XH 2.54, 145mm).
4.2 Firmware Configuration
It is crucial to update your 3D printer's firmware to correctly recognize the new thermistor type and handle the higher power output. Failure to do so can lead to inaccurate temperature readings, thermal runaway, and potential damage to your printer.
For Klipper firmware, you will need to modify the sensor_type in your extruder configuration. The thermistor used is NTC100K B3950. An example configuration might look like:
[extruder]...sensor_type: NTC 100K MGB18-104F3950L32sensor_pin: PC1...
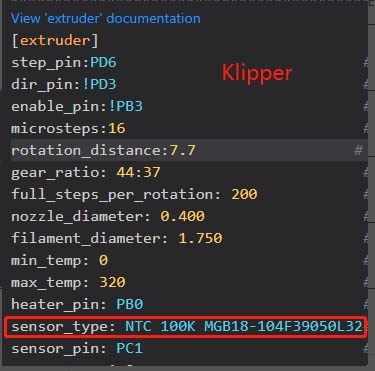
Figure 4.2: Example Klipper firmware snippet showing the sensor_type setting for the thermistor.
For Marlin firmware (V2.X), you will typically need to uncomment or define the correct thermistor type in Configuration.h. Look for TEMP_SENSOR_0 and set it to the appropriate value for a 100K B3950 thermistor. This is often option 61 for "100k Formbot / Vivedino 3950 350C thermistor 4.7k pullup".
#define TEMP_SENSOR_0 61
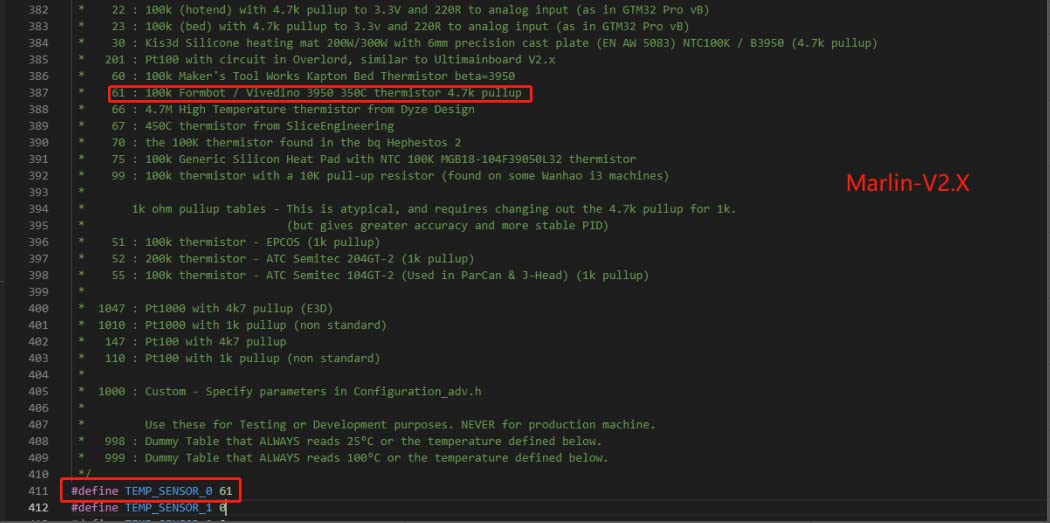
Figure 4.3: Example Marlin firmware snippet showing the TEMP_SENSOR_0 setting for the thermistor.
After updating firmware, perform a PID (Proportional-Integral-Derivative) tune for the hotend. This calibrates the heating system to maintain a stable temperature and prevents overshooting or undershooting.
5. Operating Instructions
Once installed and configured, operate the hotend as you would any standard 3D printer hotend, keeping in mind its high-temperature capabilities.
- Maximum Printing Temperature: While the hotend can reach higher temperatures, for long-term printing, it is recommended to keep the temperature under 300°C to ensure longevity of the thermistor and other components.
- Filament Compatibility: This hotend is suitable for a wide range of filaments, including those requiring higher printing temperatures.
- Nozzle Replacement: The hotend uses standard V6 Volcano nozzles. Ensure the hotend is heated to printing temperature before attempting to remove or install nozzles to prevent damage.
6. Maintenance
- Regular Cleaning: Periodically clean the nozzle and heater block to remove any accumulated filament residue. Ensure the hotend is cooled before cleaning.
- Silicone Sock: The silicone sock helps maintain temperature stability. If it becomes damaged or smokes, replace it immediately. Some users have reported issues with the included sock; consider purchasing a higher quality replacement if needed.
- Heat Tightening: Ensure all threaded connections, especially between the heatbreak, heater block, and nozzle, are properly heat-tightened to prevent filament leaks. This should be done when the hotend is at printing temperature.
- Fan Functionality: Ensure the hotend cooling fan (not included with this product, but part of your printer's setup) is functioning correctly to prevent heat creep and clogs.
7. Troubleshooting
| Problem | Possible Cause | Solution |
|---|---|---|
| Thermal Runaway / Inaccurate Temperature Readings | Incorrect thermistor configuration in firmware; faulty thermistor; loose thermistor connection. |
|
| Filament Leaking from Joints | Improperly tightened nozzle or heatbreak; gap between nozzle and heatbreak. |
|
| Hotend Clogging | Heat creep due to insufficient cooling; partial clog; incorrect retraction settings. |
|
| Silicone Sock Smoking/Damaged | Overheating; material degradation. |
|
8. Specifications
| Feature | Detail |
|---|---|
| Model | CHC Pro Hotend (Compatible with V6 Volcano Hot End) |
| Voltage | 24V |
| Power | 115W |
| Nozzle Diameter | 0.4mm (Brass, V6 Volcanic type) |
| Filament Diameter | 1.75mm |
| Thermistor Type | NTC100K B3950 (Max sensing 320°C) |
| Recommended Max Printing Temp | 300°C (for long-term printing) |
| Heatbreak Material | Copper alloy and Titanium Alloy TC4 |
| Heating Element | Ceramic heating ring with built-in copper plated heating loop |
| Package Dimensions | 4.41 x 3.23 x 1.26 inches |
| Weight | 3.53 ounces |
9. Warranty and Support
9.1 Warranty Information
Specific warranty details for this product are not provided in the available information. Please refer to the seller's or manufacturer's official website for any applicable warranty policies.
9.2 Customer Support
For technical assistance or inquiries, please contact POLISI3D customer support through their official channels or visit their Amazon store page: POLISI3D Store.