200W FM Broadcast Transmitter
200W Long Range FM Broadcast Transmitter User Manual
Model: 200W FM Broadcast Transmitter
Brand: Generic
1. Introduction
This user manual provides comprehensive instructions for the installation, operation, and maintenance of the 200W Long Range FM Broadcast Transmitter. Designed for reliable and high-quality audio transmission, this FCC-certified device is suitable for various broadcasting needs, including community radio stations, LPFM radio stations, city radio stations, and Christian church radio stations.
The transmitter features advanced DSP+DDS digital technologies, ensuring high-fidelity and stereo sound. Its robust design includes excellent heat dissipation for extended operational life. Please read this manual thoroughly before operating the device to ensure safe and optimal performance.

2. Package Contents
Upon unboxing, verify that all the following items are included in your package:
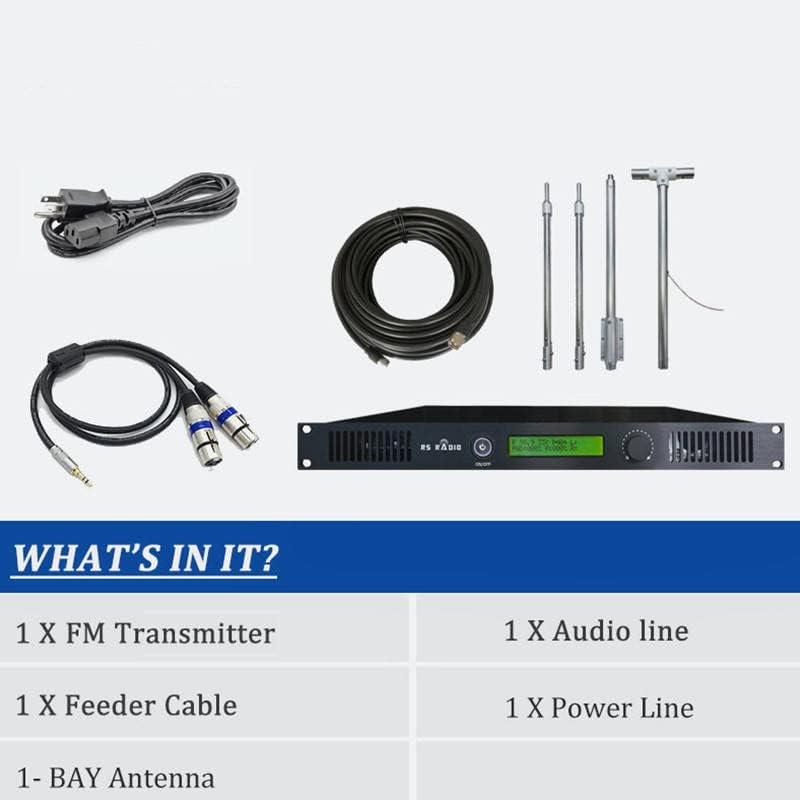
- One 200W FM Transmitter
- 1*Audio line
- 1*Power line
- 1*English manual
- 1*Feeder cable
- 1*1-bay antenna

3. Technical Specifications
| Specification | Value |
|---|---|
| Working Voltage | AC100V-AC260V |
| Working Current | ≤1A |
| Frequency Stability | ±10PPM |
| Frequency Stepping | 100KHz |
| Environment Temperature | -10℃~45℃ |
| Output Impedance | 50Ω |
| RF Output Power | 0W~200W |
| Harmonic, Clutter Radiation | ≤-60dB |
| Audio Distortion | 0.5% |
| Frequency Response | 50Hz~15000Hz |
| Separation | ≥35 dB |
| Input Level | ≤15 dBV |
| Frequency Modulation | ±75KHZ |
| SNR | ≥65dB |
| Size | 345mm*480mm*45mm (13.58"L x 17.72"H) |
| Weight | 6KG |
| Material | Aluminum |
Approximate transmission range based on power output:
- 0.1W ~ 5W FM Transmitter: 100M ~1KM
- 5W ~15W FM Transmitter: 1KM ~ 3KM
- 15W ~ 80W FM Transmitter: 3KM ~15KM
- 80W ~500W FM Transmitter: 10KM ~30KM
- 500W ~1000W FM Transmitter: 30KM ~ 50KM


4. Features
- Adjustable Frequency Response: The frequency can be adjusted to set up your own channel according to your needs, ensuring you find an unused FM station for broadcasting.
- High-fidelity & Stereo Sound: Utilizes DSP (Digital Sound Processing) technology for an enjoyable sound broadcasting experience, minimizing noises or distortions.
- Excellent Heat Dissipation: Equipped with a fan heat sink and high-quality aluminum alloy material to effectively extend the device's lifespan, preventing overheating during long operation.
- Transmits Using PLL Technology: Incorporates PLL (Phase Lock Loop) technology for stable transmission signals, preventing frequency drifting.
- FCC Certified: Complies with FCC certificate (FCC ID: 2A8OX-RSF-300W).
5. Safety Information
IMPORTANT NOTE:
- Connect the antenna first, then connect the power supply. Failure to do so may result in the transmitter being burned out.
- Select an unused FM station in your area, then adjust any FM Radio to the signal that you are broadcasting on.
6. Setup and Installation
Follow these steps to set up your FM Broadcast Transmitter:
- Unboxing: Carefully unbox all components, including the transmitter unit, feeder cable, audio line, power line, 1-bay antenna, and user manual.
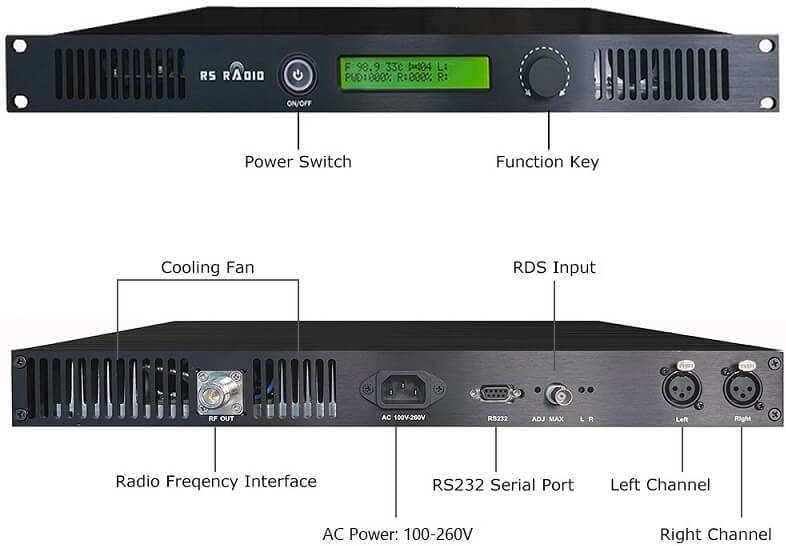
- Connect the Antenna: Securely connect the feeder cable from the antenna to the 'RF OUT' port on the back of the transmitter.
- Install the Antenna: Install the 1-bay antenna in a suitable outdoor location, ensuring it is clear of obstructions for optimal signal transmission.
- Connect Audio Line: Connect your audio source (e.g., computer, phone, mixer) to the 'Left' and 'Right' audio input channels on the back of the transmitter using the provided audio line.
- Connect Power: After all other connections are made, connect the power line to the 'AC 100V-260V' power input interface on the back of the transmitter, and then plug it into a power outlet.
Setup Video Guide
Video 1: This video demonstrates the unboxing process, identifies key components, and provides a visual guide for connecting the antenna, power, and audio lines, as well as installing the antenna.
7. Operating Instructions
Once the transmitter is set up, you can begin broadcasting. The front panel features a power switch, function key (rotary knob), and an LCD display to monitor and adjust settings.
- Power On/Off: Press the 'ON/OFF' button on the front panel to power the unit on or off.
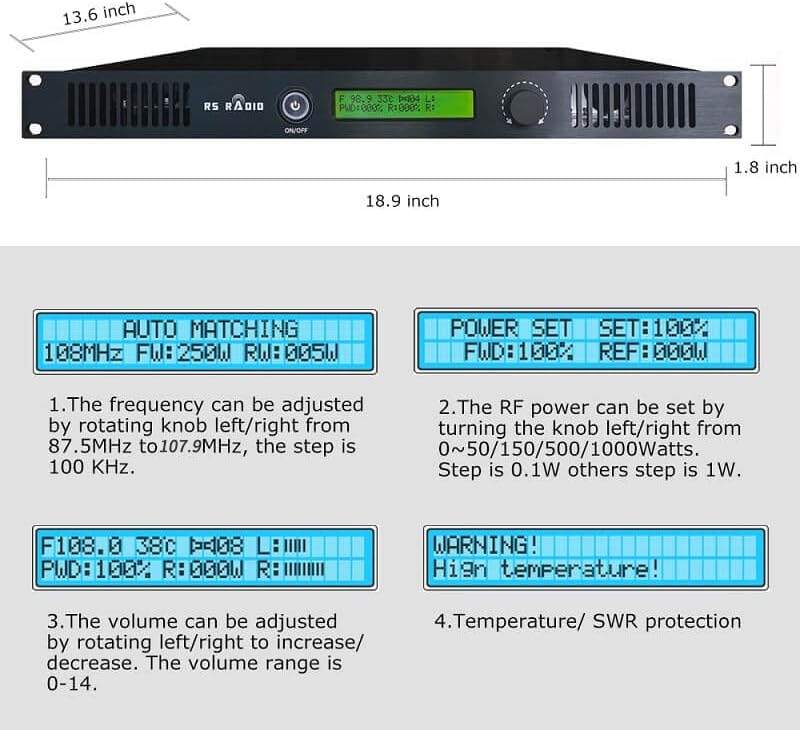
- Adjust Frequency: Rotate the function key (knob) left or right to navigate through the menu. Select the frequency setting. The frequency can be adjusted from 87.5MHz to 107.9MHz, with a step of 100 KHz.
- Set RF Power: Navigate to the 'POWER SET' option. The RF power can be set by turning the knob from 0% to 100% (corresponding to 0W to 200W). The step is 0.1W for lower powers and 1W for higher powers.
- Adjust Volume: The volume can be adjusted by rotating the knob left/right to increase/decrease. The volume range is 0-14.
- Select Stereo/Mono Mode: Access the menu to switch between Stereo or Mono audio output modes.
How the Transmitter Works
The transmitter receives audio input from various sources such as phones, computers, microphones, or mixers. It then modulates this audio onto an FM radio frequency, which can be received by any standard FM radio or car radio within the transmission range.
8. Troubleshooting
If you encounter issues with your transmitter, consider the following common problems and solutions:
- No Power: Ensure the power cable is securely connected to both the transmitter and a working power outlet. Check the power switch.
- No Signal/Weak Signal: Verify the antenna is properly connected and installed in an optimal location. Ensure the selected frequency is clear and not interfered with by other broadcasts. Check RF power settings.
- No Audio Output: Confirm the audio input cables are correctly connected to both the source and the transmitter. Check the audio input level on the transmitter and the volume on your audio source.
- Distorted Audio: Adjust the audio input level to prevent over-modulation. Ensure the audio source is providing a clean signal. Check for proper stereo/mono settings.
- Overheating Warning: Ensure the cooling fan is not obstructed and the transmitter has adequate ventilation. Operating in extreme temperatures can trigger this warning.
For persistent issues, refer to the detailed user manual included in your package or contact customer support.
9. Maintenance
To ensure the longevity and optimal performance of your FM Broadcast Transmitter, follow these maintenance guidelines:
- Cleaning: Regularly clean the exterior of the transmitter with a soft, dry cloth. Avoid using abrasive cleaners or solvents.
- Ventilation: Ensure that the ventilation openings on the transmitter are clear of dust and debris to maintain proper airflow and prevent overheating.
- Cable Inspection: Periodically inspect all cables (power, audio, feeder) for any signs of wear, damage, or loose connections.
- Storage: If storing the transmitter for an extended period, disconnect all cables and store it in a cool, dry place away from direct sunlight and extreme temperatures.
10. Warranty and Support
This professional broadcast transmitter comes with a 6-year warranty provided by the manufacturer. This warranty covers defects in materials and workmanship under normal use.
For warranty claims, technical support, or any inquiries regarding your Generic 200W FM Broadcast Transmitter, please refer to the contact information provided in the full user manual or on the manufacturer's official website.
Ask a question about this manual
Ask about setup, troubleshooting, compatibility, parts, safety, or missing instructions. Manuals+ will review the question and use this page’s manual context to help answer it.