1. Introduction
This manual provides comprehensive instructions for the assembly, operation, and maintenance of your Marada Universal Flight Simulation Cockpit and Racing Wheel Stand. Please read this manual thoroughly before assembly and use to ensure proper function and safety.
The Marada cockpit is designed to enhance your flight and racing simulation experience, offering robust construction and extensive adjustability. It is compatible with a wide range of simulation peripherals.
Note: Steering wheel, joystick, pedals, and other electronic peripherals are not included with this product.
2. Safety Information
- Ensure all bolts and fasteners are securely tightened before use. Regularly check for loose connections.
- Do not exceed the maximum weight capacity of 450 lbs (204 kg).
- Keep hands and fingers clear of moving parts during adjustment.
- Assemble on a flat, stable surface to prevent tipping.
- This product is intended for adult use. Keep small parts away from children.
- If any part is damaged or missing, do not attempt to assemble or use the product. Contact customer support.
3. Package Contents
The Marada Universal Flight Simulation Cockpit is shipped in three separate boxes. Verify all components are present before beginning assembly.

Image: Package details indicating the cockpit ships in three boxes: Racing Sim Stand, Flight Sim Stand, and Racing Flight Seat.
Refer to the included parts list in each box to confirm all components are present. If any parts are missing or damaged, contact Marada customer support.
4. Setup and Assembly
Assembly requires basic tools (often included) and can take approximately 1-2 hours. It is recommended to have a second person assist with certain steps, especially when attaching the seat.
4.1 General Assembly Steps (Refer to the detailed PDF manual for specific diagrams):
- Unpack Components: Carefully remove all parts from the packaging and lay them out. Group similar parts and hardware.
- Assemble Base Frame: Connect the main frame sections using the provided bolts and nuts. Ensure all connections are snug but do not overtighten until the frame is fully aligned.
- Attach Seat Rails: Secure the seat sliding rails to the main base frame.
- Mount Seat: Attach the racing seat to the sliding rails. This step may require careful alignment and can be challenging.
- Install Pedal Platform: Secure the pedal platform to the front section of the base frame.
- Assemble Wheel/Joystick Stands: Attach the vertical columns and mounting plates for your steering wheel, joystick, and throttle to the designated points on the frame.
- Final Tightening: Once all components are in place and aligned, systematically tighten all bolts and fasteners.
- Attach Peripherals: Mount your steering wheel, pedals, joystick, and throttle to their respective platforms.
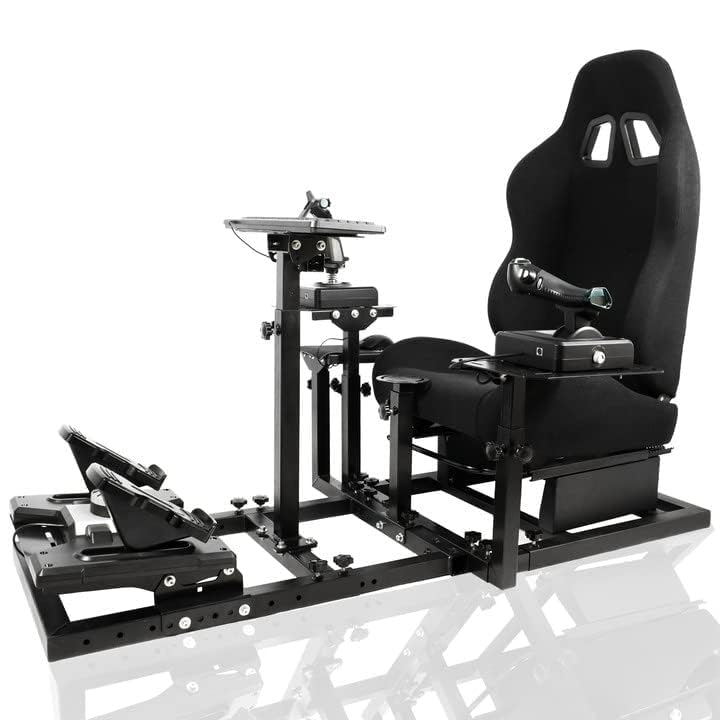
Image: Fully assembled Marada Universal Flight Simulation Cockpit, showcasing its robust design and multiple mounting options.
For detailed, step-by-step visual instructions, please refer to the official Installation Manual (PDF).
5. Operating Instructions
The Marada cockpit is designed for both racing and flight simulation. Once assembled and your peripherals are mounted, you can begin your simulation experience.
5.1 Adjusting for Optimal Comfort:
The cockpit offers extensive adjustability to suit various body types and preferences. Refer to Section 6 for detailed adjustment procedures.
5.2 Switching Between Modes:
The modular design allows for easy adaptation between flight and racing configurations. This typically involves repositioning or adding/removing specific mounting plates for different peripherals (e.g., steering wheel vs. flight stick).

Image: Equipment pillar design illustrating dual mode switching, height adjustment, and detachable columns for various setups.
6. Adjustments
The Marada cockpit features multiple adjustable components to ensure an ergonomic and immersive experience.
- Seat Position: The seat is mounted on double sliding rails, allowing for front/rear adjustment. Use the lever located under the seat to unlock and slide the seat to your desired position. The double lock mechanism ensures stability.
- Seat Backrest Angle: The backrest can be adjusted from 90° to 180°. Use the recline lever on the side of the seat to set your preferred angle.
- Pedal Platform Angle/Distance: The pedal platform can be adjusted for angle and distance to accommodate different leg lengths and pedal types. Loosen the adjustment knobs, set the desired position, and re-tighten securely.
- Gearshift/Throttle Mount Height/Angle: The mounting plates for gear shifters, throttles, and joysticks can be adjusted for height, angle, and position. Loosen the corresponding fasteners, adjust, and re-tighten.
- Steering Wheel/Flight Stick Mount Height/Angle: The main mounting plate for your steering wheel or flight stick can be adjusted vertically and for tilt.

Image: Demonstrates effortless adjustment of panel height and pedal position.

Image: Illustrates adjustments for seat sliding rails (front/rear) and seat backrest recline (up to 180 degrees).
7. Compatibility
The Marada Universal Flight Simulation Cockpit is designed for broad compatibility with major brands of racing wheels, pedals, throttles, and joysticks.
7.1 Compatible Brands and Devices:
- Racing Wheels: Logitech (G29, G920, G923, G27, G92), Thrustmaster (T150, T300RS, TX, TS-PC, TS-XW, T-GT), Fanatec, MOZA, PXN.
- Pedals: Logitech, Fanatec, Thrustmaster, MOZA.
- Flight Peripherals: Saitek, Honeycomb, Thrustmaster HOTAS Warthog.
- The mounting plates also support DIY solutions for custom setups.

Image: Compatibility chart detailing supported brands for pedal platforms and steering wheels.
Note: Always ensure your specific peripheral's mounting pattern aligns with the cockpit's pre-drilled holes or use appropriate adapters (not included).
8. Maintenance
- Cleaning: Wipe down the frame and seat with a damp cloth. Avoid abrasive cleaners or solvents. For the fabric seat, a mild fabric cleaner can be used if necessary.
- Fastener Checks: Periodically inspect all bolts, nuts, and adjustment knobs to ensure they remain tight. Re-tighten as needed to maintain stability and prevent wobbling.
- Moving Parts: Ensure sliding mechanisms for the seat and pedal platform operate smoothly. If they become stiff, a small amount of silicone lubricant can be applied to the rails.
- Storage: If storing the cockpit for an extended period, ensure it is clean and dry. Store in a stable position to prevent accidental damage.
9. Troubleshooting
- Cockpit Wobbles:
- Check all assembly bolts and nuts. Ensure they are fully tightened.
- Verify the cockpit is on a level surface.
- Seat Does Not Slide Smoothly:
- Inspect the sliding rails for obstructions or debris.
- Apply a small amount of silicone lubricant to the rails.
- Peripherals Do Not Mount Securely:
- Ensure you are using the correct bolts and washers for your specific peripheral.
- Verify the peripheral's mounting pattern is compatible with the cockpit's plates. Adapters may be required for some devices.
- Difficulty During Assembly:
- Refer to the detailed PDF installation manual for visual guidance.
- Ensure parts are oriented correctly before tightening. Some parts may only fit one way.
- Do not force components. If parts do not align, re-check the instructions and part orientation.
10. Specifications
| Feature | Detail |
|---|---|
| Model Number | flight and racing simulator |
| Product Dimensions | 23.8 x 22.9 x 5.1 inches (approximate assembled footprint) |
| Item Weight | 80 pounds (36.3 kg) |
| Material | Alloy steel frame (40mm square tube design) |
| Maximum Load Capacity | 450 lbs (204 kg) |
| Seat Adjustment | Front/rear sliding rails, 90°-180° recline |
| Compatibility | Logitech, Thrustmaster, Fanatec, MOZA, PXN, Saitek, Honeycomb (for various peripherals) |

Image: Illustrates the robust alloy steel construction and 450 lb maximum load capacity.
11. Warranty and Support
For warranty information, product support, or to order replacement parts, please contact Marada customer service through the retailer where the product was purchased or visit the official Marada store online.
Customer Service Contact: Refer to your purchase documentation or the Marada brand store for current contact details.
Online Resources:
- Official Marada Store: Marada Store
- Installation Manual (PDF): Download PDF


