Introduction
This manual provides essential instructions for the assembly, operation, maintenance, and troubleshooting of your AVASTA 14-inch Kids Bike. Please read this manual thoroughly before assembly and use to ensure safe and proper operation.

Image: The AVASTA 14-inch Kids Bike, featuring a durable frame and training wheels, in an arctic blue color.
Setup and Assembly
Your AVASTA Kids Bike arrives approximately 85% pre-assembled. The remaining assembly steps include installing the front wheel, pedals, handlebar, and saddle. All necessary assembly tools are included with your bike.
Assembly Steps Overview:

Image: A visual guide illustrating the five main assembly steps: 1) Install Front Wheel, 2) Install Training Wheels, 3) Install Handlebar, 4) Install Bike Seat, 5) Install Bicycle Pedals.
- Install Front Wheel: Carefully attach the front wheel to the fork. Ensure all fasteners are securely tightened.
- Install Training Wheels: For the 14-inch model, training wheels are included. Attach them securely to the rear axle.
- Install Handlebar: Insert the handlebar stem into the fork tube and tighten the clamp bolt. Ensure the handlebar is straight and secure.
- Install Bike Seat: Insert the seat post into the frame. Adjust the height using the quick-release clamp and tighten firmly.
- Install Pedals: The right pedal (marked "R") should be tightened clockwise. The left pedal (marked "L") should be tightened counter-clockwise. Ensure they are fully tightened to prevent stripping.
Visual Assembly Guide:
Video: A step-by-step guide demonstrating the assembly process for the AVASTA Kids Bike, including unboxing, attaching the front wheel, handlebars, and seat, and securing pedals.
Operating Instructions
Adjusting the Seat Height:
The AVASTA Kids Bike features an adjustable seat to accommodate your child's growth. Use the quick-release lever to easily adjust the saddle height. Ensure your child can comfortably touch the ground with their toes while seated.
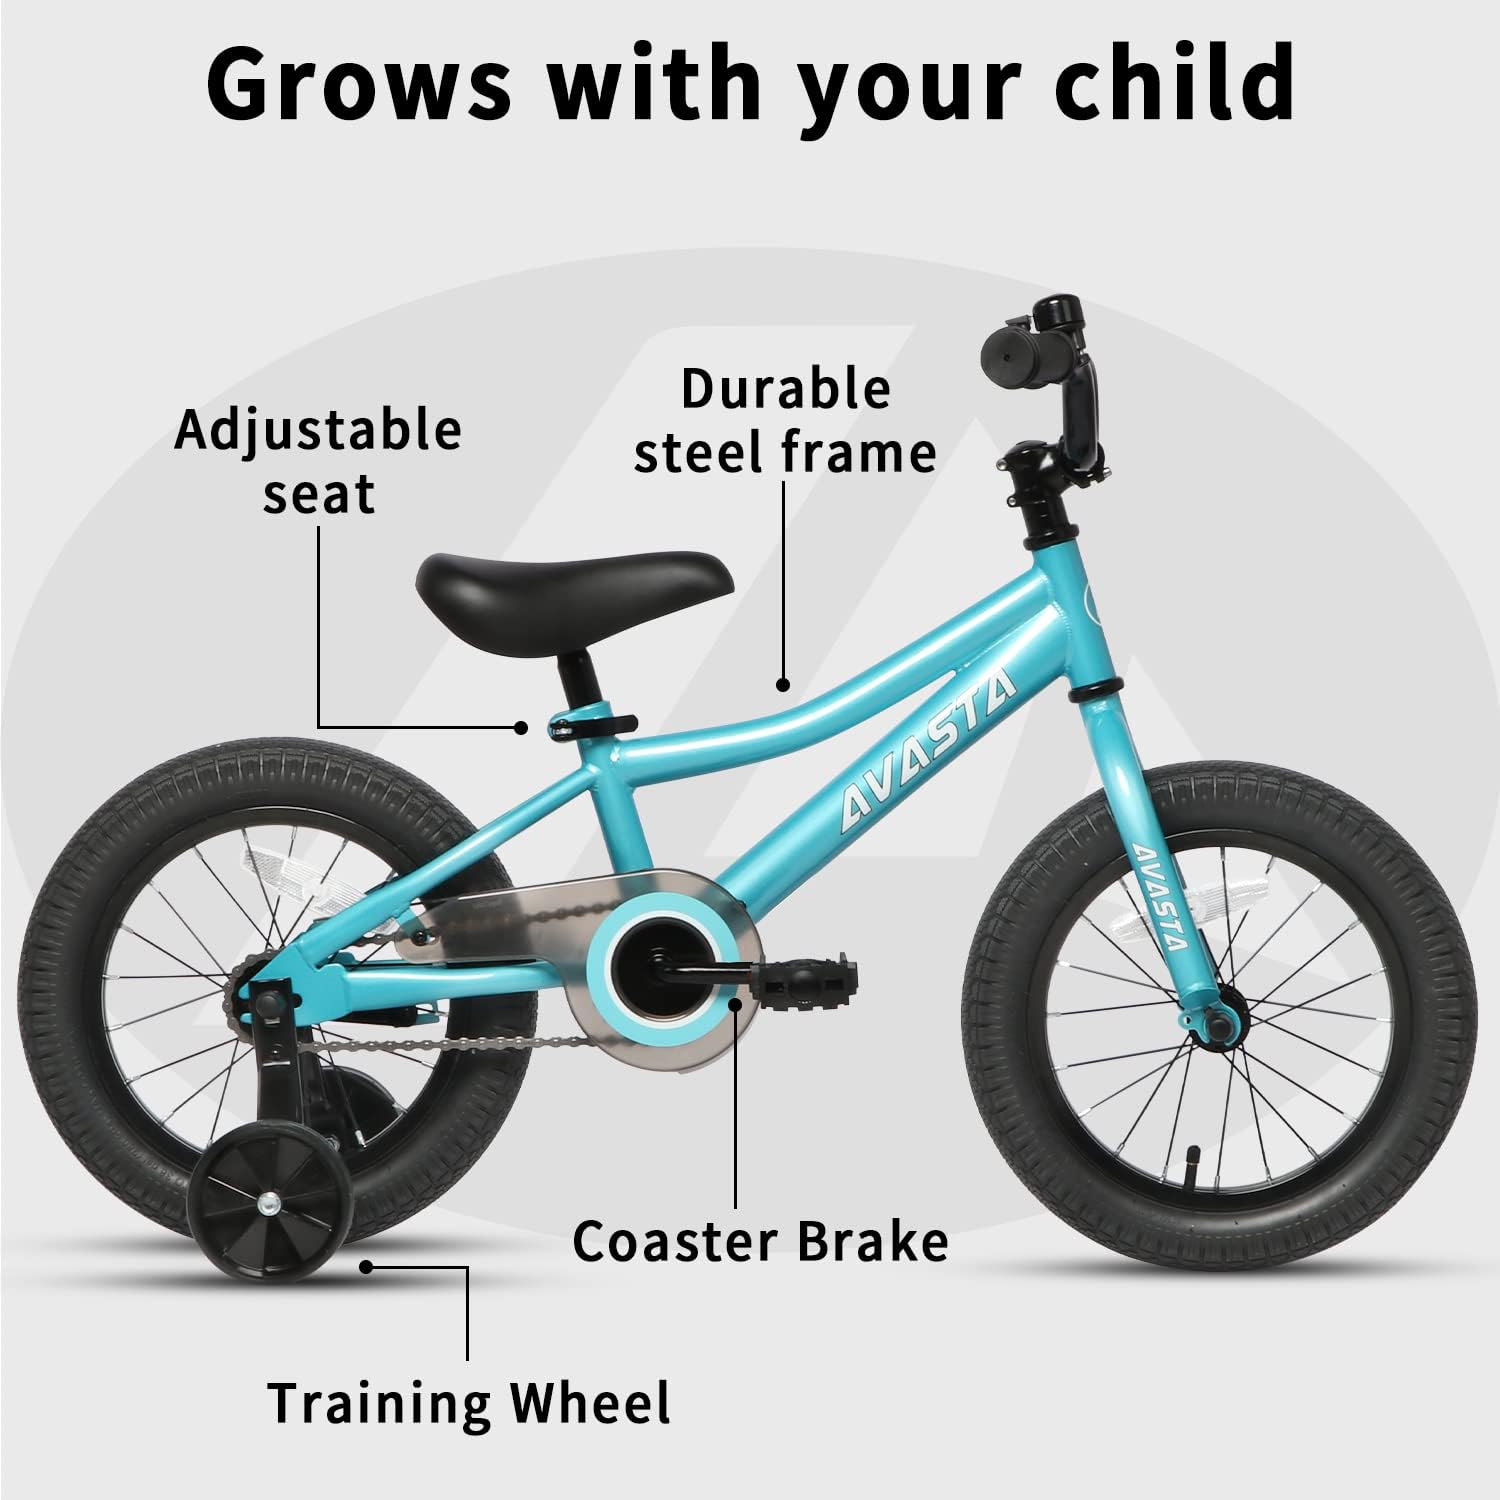
Image: The AVASTA Kids Bike with labels pointing to its adjustable seat, durable steel frame, coaster brake, and training wheels, illustrating features that allow the bike to grow with a child.
Coaster Brake System:
This bike is equipped with a coaster brake for simple and intuitive stopping. To engage the brake, pedal backward. This system is designed to help young riders learn to stop effectively.

Image: A detailed view of the bike's quick-release mechanism for saddle height adjustment and the coaster brake system, which activates by pedaling backward.
Training Wheels:
The 14-inch model includes training wheels to assist beginners in developing balance. Once your child gains confidence and balance, the training wheels can be removed.
Safety Guidelines:
- Always wear a helmet when riding.
- Ensure all bolts and quick releases are tightened before each ride.
- Ride in safe, open areas away from traffic.
- Supervise young children while they are riding.
Maintenance
Regular maintenance ensures the longevity and safe operation of your AVASTA Kids Bike.
- Tire Pressure: Check tire pressure before each ride. Maintain the recommended PSI (pounds per square inch) indicated on the tire sidewall.
- Chain Lubrication: Periodically lubricate the chain with bicycle-specific chain lubricant to ensure smooth pedaling and prevent rust.
- Brake Inspection: Regularly check the coaster brake for proper function. If the brake feels loose or ineffective, consult a bicycle mechanic.
- Bolt Tightness: Inspect all bolts and fasteners, especially on the handlebars, seat post, and wheels, to ensure they are securely tightened.
- Cleaning: Clean the bike with a damp cloth and mild soap. Avoid high-pressure washing, which can damage bearings and other components.
Troubleshooting
| Problem | Possible Cause | Solution |
|---|---|---|
| Pedals are loose or fall off. | Incorrect installation or insufficient tightening. | Ensure pedals are installed on the correct side (R for right, L for left) and tightened securely (right clockwise, left counter-clockwise). |
| Bike feels unstable or wobbly. | Loose handlebar, seat, or wheel bolts; improperly installed training wheels. | Check and tighten all visible bolts. Ensure training wheels are level and securely attached. |
| Coaster brake is not stopping effectively. | Internal mechanism issue or worn components. | This typically requires professional service. Contact AVASTA customer support or a qualified bike mechanic. |
| Tires frequently go flat. | Puncture, valve stem issue, or low tire pressure. | Inspect tires for punctures. Check valve stem for leaks. Maintain correct tire pressure. Replace inner tube if punctured. |
Specifications
- Bike Type: Kids Bike
- Brand: AVASTA
- Model Name: AVASTA (14-inch Kids Bike)
- Wheel Size: 14 Inches
- Frame Material: Carbon Steel
- Suspension Type: Rigid
- Number of Speeds: 1
- Brake Style: Coaster
- Special Features: Adjustable Seat, Chain Guard, Coaster Brake
- Included Components: Training Wheels, Bell Ring, Coaster Brake, Chain Guard, Adjustable Seat
- Assembly Required: Yes (85% pre-assembled)
- Skill Level: Beginner
- Item Package Dimensions: 34 x 18.25 x 7.25 inches
- Package Weight: 10.57 Kilograms
Size Selection Guide:

Image: A chart providing guidance on selecting the correct bike size based on wheel size, recommended saddle height, bike weight, and the child's height. Note: Kids Height is the main reference.
| Wheel Size | Saddle Height | Kids Height | Comes with |
|---|---|---|---|
| 14" | 20"~23" (51~58cm) | 35"~43" (89~109cm) | Training Wheels |
| 18" | 23"~27" (58~68cm) | 43"~55" (110~139cm) | Training Wheels & Kickstand |
| 20" | 25"~29" (63~73cm) | 48"~57" (121~145cm) | Kickstand |
Warranty and Support
For detailed warranty information and customer support, please refer to the warranty card included with your product or visit the official AVASTA website. You may also contact AVASTA customer service directly for assistance with any product-related inquiries or issues.
AVASTA Customer Service: Please refer to your product packaging or the official AVASTA website for current contact information.