1. Introduction
Welcome to the instruction manual for your HYKJ YQK-300 Hydraulic Crimping Tool. This manual provides essential information for the safe and effective operation, maintenance, and troubleshooting of your tool. Please read this manual thoroughly before use and retain it for future reference.
2. Safety Instructions
Always prioritize safety when operating any tools. Failure to follow these instructions may result in injury or damage to the tool.
- Wear Personal Protective Equipment (PPE): Always wear safety glasses and gloves to protect against potential hazards.
- Inspect Tool Before Use: Before each use, inspect the crimping tool for any signs of damage, wear, or leaks. Do not use a damaged tool.
- Select Correct Dies: Ensure you select the appropriate crimping dies for the specific cable and terminal size (AWG or mm²) to achieve a secure and reliable crimp.
- Avoid Over-Pressure: The tool is fitted with a safety valve that automatically releases pressure when the maximum crimping force is reached. Do not attempt to override this mechanism.
- Keep Hands Clear: Keep hands and fingers away from the crimping head and dies during operation to prevent pinching.
- Secure Workpiece: Ensure the cable and terminal are properly positioned and stable before initiating the crimping process.
- Non-Insulated Use: This tool is designed for crimping non-insulated terminals and connectors. Do not use on live electrical circuits.
- Proper Storage: Store the tool in its carrying case in a dry, secure location, out of reach of children.
3. Product Overview
3.1 Components
The HYKJ YQK-300 Hydraulic Crimping Tool consists of a robust main body, a hydraulic pump mechanism, a rotatable crimping head, ergonomic handles, and a set of interchangeable crimping dies.

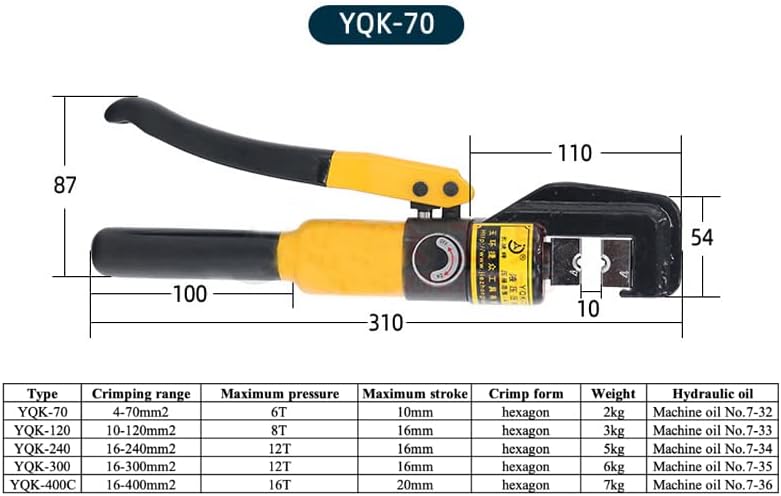
3.2 Specifications
| Specification | Value |
|---|---|
| Model | YQK-300 |
| Crimping Size Range | AWG600-12 (4-400mm²) |
| Maximum Crimping Power | 16 tons |
| Material | Steel, Carbon Steel, Hydraulic device |
| Crimp Form | Hexagon (with included dies) |
| Weight | 6 kg (approx. 13.2 lbs) |
| Included Dies | 13 pairs (sizes typically ranging from 25mm² to 300mm²) |
| Head Rotation | 180° for narrow spaces |
4. Setup
4.1 Unpacking
Carefully remove the crimping tool and its accessories from the durable black plastic carrying case. Inspect all components for any signs of damage. Ensure all 13 pairs of crimping dies are present.
4.2 Die Installation
Proper die selection and installation are crucial for effective crimping.
- Identify Die Size: Select the correct die size that matches the cross-sectional area of your cable and the terminal you intend to crimp.
- Open Crimping Head: Depending on the tool design, rotate the crimping head or release the latch mechanism to open the jaws.
- Insert Dies: Place the two halves of the selected crimping die into the designated slots within the crimping head. Ensure they are seated firmly and correctly aligned.
- Secure Dies: Close the crimping head, ensuring the dies are held securely in place.

5. Operating Instructions
5.1 Preparing for Crimping
- Strip Cable: Carefully strip the insulation from the end of the cable to the appropriate length required for your terminal.
- Insert Cable into Terminal: Insert the stripped cable fully into the terminal barrel.
- Select Dies: As described in Section 4.2, ensure the correct crimping dies are installed for the cable and terminal size.
5.2 Crimping Procedure
- Position Terminal: Place the terminal with the inserted cable into the crimping dies. Ensure it is centered and stable.
- Close Crimping Head: Close the crimping head around the terminal. The 180° rotatable head allows for easier access in confined spaces.
- Apply Pressure: Pump the handles of the tool repeatedly to build hydraulic pressure. You will feel resistance as the dies begin to crimp the terminal.
- Complete Crimp: Continue pumping until the crimp is complete. The tool's integral lock with a self-releasing mechanism ensures a precise crimp. The safety valve will automatically release pressure when the maximum crimping force is reached, preventing over-crimping and damage to the tool.
- Release Pressure: Once the crimp is complete, release the pressure by turning the pressure release knob (if applicable, typically located near the pump mechanism).
- Remove Crimped Terminal: Open the crimping head and carefully remove the newly crimped terminal.

6. Maintenance
Regular maintenance ensures the longevity and optimal performance of your hydraulic crimping tool.
- Cleaning: After each use, clean the crimping head, dies, and external surfaces of the tool to remove any dirt, debris, or metal shavings. Use a clean cloth.
- Lubrication: Periodically apply a light coat of machine oil to the moving parts of the crimping head and dies to ensure smooth operation and prevent corrosion.
- Hydraulic Oil Check: Check the hydraulic oil level periodically. If refilling is necessary, use Machine oil No.7-35 or an equivalent hydraulic oil as specified by the manufacturer. Consult the manufacturer for specific instructions on checking and refilling hydraulic fluid.
- Storage: Store the tool in its original durable plastic carrying case in a dry, cool, and secure environment to protect it from moisture, dust, and physical damage.
- Die Care: Keep dies clean and free of rust. Store them in their designated slots within the carrying case.
7. Troubleshooting
This section addresses common issues you might encounter with your hydraulic crimping tool.
| Issue | Possible Cause | Solution |
|---|---|---|
| Incomplete or weak crimp | Incorrect die size; insufficient pressure; improper cable/terminal insertion. | Ensure correct die size is used. Pump handles until the safety valve releases pressure. Verify cable and terminal are fully seated. |
| Tool not building pressure | Pressure release valve open; low hydraulic oil level; air in hydraulic system; internal leak. | Ensure the pressure release valve is fully closed. Check hydraulic oil level and refill if necessary. Consult manufacturer for bleeding air or internal repairs. |
| Dies sticking or difficult to change | Dirt or debris in die slots; lack of lubrication; minor damage to dies. | Clean die slots and dies thoroughly. Apply a light lubricant to dies. Inspect dies for damage and replace if necessary. |
| Oil leakage | Damaged seals or fittings. | Stop using the tool immediately. Contact the manufacturer for repair or replacement of seals. |
8. Warranty and Support
For warranty information, technical support, or inquiries regarding replacement parts, please contact the manufacturer, HYKJ. Keep your purchase receipt as proof of purchase for any warranty claims.
Manufacturer: HYKJ


