1. Introduction
This manual provides essential information for the safe and efficient operation of your Midea ST 3.6F wi tabletop dishwasher. Designed for compact spaces, this dishwasher offers convenience with its 6 wash programs, delayed start function, extra dry feature, and IoT control capabilities. Please read these instructions thoroughly before first use and keep them for future reference.
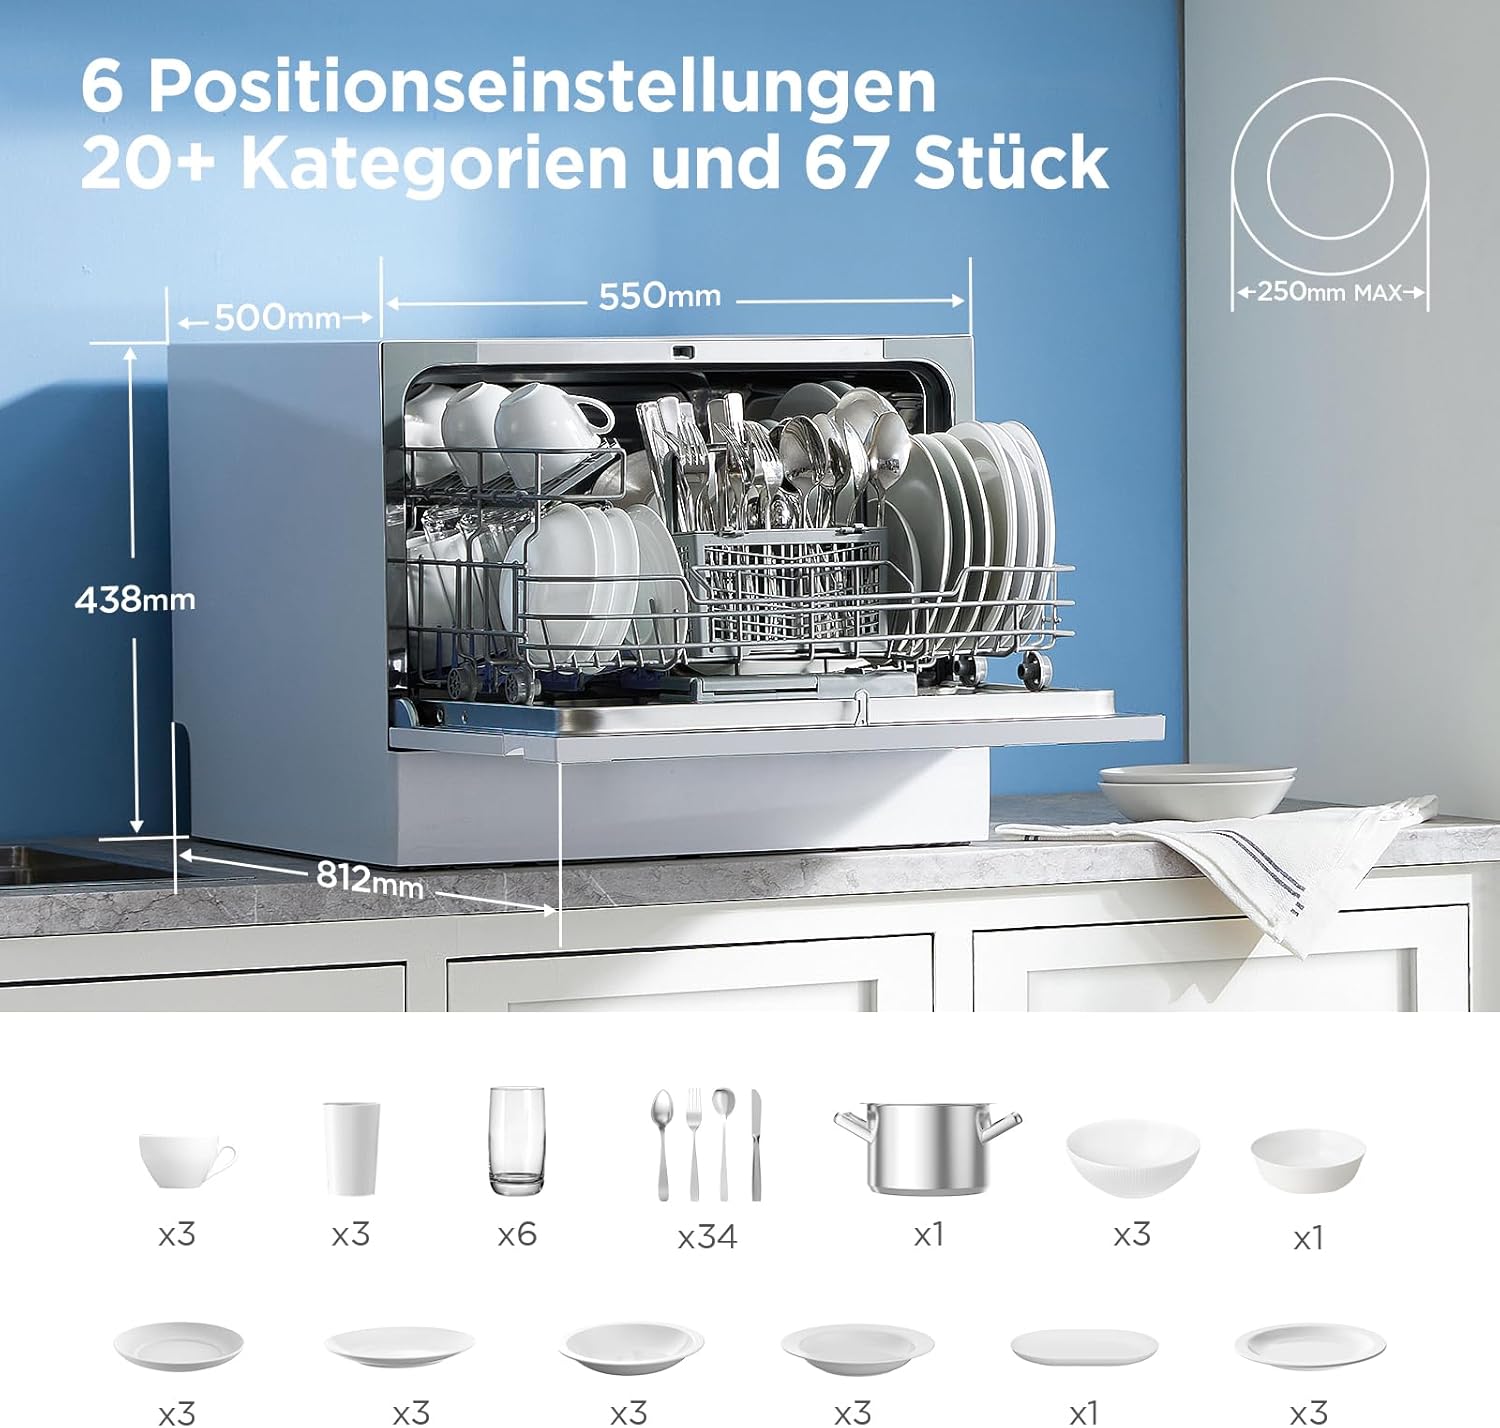
Image 1.1: The Midea ST 3.6F wi tabletop dishwasher, showcasing its compact design suitable for various kitchen layouts.
2. Safety Instructions
Always follow basic safety precautions when using electrical appliances to reduce the risk of fire, electric shock, or injury. This appliance is intended for household use only.
- Ensure the dishwasher is properly grounded.
- Do not operate the dishwasher if it is damaged or malfunctioning.
- Keep children away from the dishwasher, especially when it is operating.
- Use only detergents and rinse aids specifically designed for automatic dishwashers.
- Do not touch the heating element during or immediately after use.
- Always disconnect the appliance from the power supply before cleaning or performing maintenance.
3. Setup & Installation
3.1 Unpacking and Accessories
Carefully remove the dishwasher from its packaging. The following components are included:
- Dishwasher unit
- Cutlery basket
- Drain hose
- Inlet hose
- Salt refill funnel
- User manual
Note: All tabletop dishwashers are factory tested to ensure proper operation. Small amounts of residual water may be present inside the dishwasher.
3.2 Placement and Dimensions
The compact design allows for flexible placement in your kitchen. Ensure there is adequate space around the unit for ventilation and connections.

Image 3.1: Product dimensions and capacity. The dishwasher measures approximately 550mm (width) x 438mm (height) x 500mm (depth) and can accommodate dishes up to 250mm in diameter.
3.3 Water Connection
Connect the inlet hose to a cold water supply and the drain hose to a suitable drain. Refer to the detailed diagrams in the included user manual for specific connection points.
3.4 Initial Salt Filling (Water Softener)
The dishwasher features an integrated water softener to prevent limescale buildup, which is crucial for areas with hard water. Before first use, fill the salt dispenser with dishwasher salt using the provided funnel. Refer to the full user manual for instructions on checking water hardness and adjusting salt dosage.

Image 3.2: The water softener function protects the heating element and ensures spotless dishes by preventing limescale. A refill indicator for special salt is shown.
4. Operating Instructions
4.1 Control Panel
The dishwasher features a touch control panel for easy operation.

Image 4.1: Operating the dishwasher via its touch control panel.
4.2 Loading Dishes
The smart basket design system provides ample capacity for up to 6 place settings. Load dishes carefully, ensuring water spray can reach all surfaces. Place larger items and heavily soiled dishes in the lower rack, and smaller items, glasses, and cutlery in the upper sections or cutlery basket.

Image 4.2: Example of properly loading dishes into the dishwasher for effective cleaning.
4.3 Adding Detergent and Rinse Aid
Add the appropriate amount of dishwasher detergent to the dispenser. If using rinse aid, ensure the rinse aid dispenser is filled to improve drying performance and prevent water spots.
4.4 Selecting a Wash Program
The dishwasher offers 6 wash cycles to suit various cleaning needs:
- Intensive: For heavily soiled dishes.
- ECO: Energy-efficient program for normal soil.
- 90 min: For moderately soiled dishes requiring a quicker wash.
- Rapid: A quick wash for lightly soiled items.
- Hygiene: For items requiring thorough sanitization.
- Glass: Gentle wash for delicate glassware.

Image 4.3: Overview of the available wash cycles, their recommended temperatures, and approximate durations.
4.5 Delayed Start Function
You can program the dishwasher to start at a later time, up to 24 hours in advance. This allows you to take advantage of off-peak electricity rates or have dishes ready when you need them.

Image 4.4: The delayed start function allows scheduling wash cycles up to 24 hours in advance.
4.6 Extra Dry Function
Activate the extra dry function for enhanced drying performance, especially for plastic items or when you need dishes to be completely dry immediately after the cycle.

Image 4.5: The Extra Dry function ensures dishes are thoroughly dried, eliminating the need for manual drying.
4.7 IoT Control (Smart Functionality)
The integrated IoT function allows you to control and monitor your dishwasher remotely using the MSmartHome app on your smartphone. This includes starting wash cycles, checking status, and accessing consumption reports for water and electricity.

Image 4.6: Control your dishwasher from anywhere using the MSmartHome app, offering features like CloudWash, notifications, and consumption reports.
5. Maintenance and Care
Regular maintenance ensures optimal performance and longevity of your dishwasher.
5.1 Cleaning Filters
Periodically check and clean the filters located at the bottom of the dishwasher tub. Remove any food particles or debris to prevent blockages and ensure efficient cleaning.
5.2 Cleaning Spray Arms
Inspect the spray arms for clogged nozzles. Use a thin wire or toothpick to clear any blockages. Ensure the spray arms can rotate freely.
5.3 Water Softener and Salt Refill
Monitor the salt indicator light on the control panel. When illuminated, refill the salt dispenser with dishwasher salt to maintain the effectiveness of the water softener system.
5.4 External Cleaning
Wipe the exterior surfaces of the dishwasher with a soft, damp cloth. Avoid abrasive cleaners or solvents that could damage the finish.
6. Troubleshooting
Before contacting customer support, refer to the following table for common issues and their solutions:
| Problem | Possible Cause | Solution |
|---|---|---|
| Dishwasher does not start | Power cord not plugged in; door not closed properly; fuse blown. | Check power connection; ensure door is latched; check household fuse. |
| Dishes are not clean | Improper loading; insufficient detergent; clogged spray arms; dirty filters. | Reload dishes correctly; add more detergent; clean spray arms; clean filters. |
| Water spots or film on dishes | Low rinse aid level; hard water; incorrect salt dosage. | Refill rinse aid; check water hardness setting; adjust salt dosage. |
| Dishwasher leaks | Hose connections loose; door seal damaged; too much detergent. | Tighten hose connections; inspect and clean door seal; reduce detergent. |
7. Technical Specifications
Detailed technical information for the Midea ST 3.6F wi tabletop dishwasher.

Image 7.1: Product Information Sheet providing key technical data.
| Feature | Detail |
|---|---|
| Model Number | ST 3.6F wi |
| Product Dimensions (D x W x H) | 55D x 50B x 43.8H cm |
| Weight | 22.5 kg (approx. 49.6 lbs) |
| Capacity | 6 Place Settings |
| Noise Level | 49 Decibels |
| Water Consumption (per cycle) | 6.5 Liters (ECO program) |
| Voltage | 230 Volts |
| Control Type | Touch |
| Special Features | Integrated Water Softener, IoT Function, Start Delay, Extra Dry Function |
| Energy Efficiency Class | F (as per EU 2019/2017) |
For more detailed energy information, please refer to the EU EPREL database: https://eprel.ec.europa.eu/qr/1098164

Image 7.2: EU Energy Label for the Midea ST 3.6F wi dishwasher.

Image 7.3: Noise level comparison, indicating the dishwasher operates at a quiet 49 dB(A).
8. Warranty Information
The Midea ST 3.6F wi tabletop dishwasher comes with a standard manufacturer's warranty. Please refer to the warranty card included with your product for specific terms, conditions, and duration. Keep your proof of purchase for warranty claims.
9. Customer Support
For technical assistance, spare parts, or service inquiries, please contact Midea customer support. Contact details can typically be found on the Midea official website or in the warranty documentation provided with your appliance.
Manufacturer: Midea Europe GmbH, Ludwig-Erhard-Str.14, 65760 Eschborn, Germany.