VEVOR LB817
VEVOR Automatic Door Opener User Manual
Model: LB817
1. Introduction
Thank you for choosing the VEVOR Automatic Door Opener. This device is designed to provide convenient and reliable automatic operation for swing doors in various settings, including commercial and residential environments. Its robust construction and adjustable features make it suitable for a wide range of applications, enhancing accessibility and ease of use.
This manual provides essential information for the safe installation, operation, and maintenance of your automatic door opener. Please read it thoroughly before installation and keep it for future reference.
2. Important Safety Instructions
To ensure safe operation and prevent damage, always adhere to the following safety guidelines:
- Read all instructions carefully before installation and use.
- Installation must be performed by qualified personnel in accordance with local electrical codes and building regulations.
- Disconnect power to the unit before performing any maintenance, cleaning, or troubleshooting.
- Keep hands, clothing, and other objects clear of the door and moving parts during operation.
- Do not allow children to play with or operate the door opener controls.
- Ensure all safety sensors and emergency stop mechanisms are properly installed and functioning before regular use.
- Do not modify the door opener or its components. Use only genuine VEVOR replacement parts.
- This product is designed for swing doors. Do not attempt to use it for other door types.
3. Package Contents
Carefully unpack the box and verify that all items listed below are present and undamaged. If any items are missing or damaged, please contact VEVOR customer support.

Image: Complete set of VEVOR Automatic Door Opener components and accessories.
- Automatic Door Opener Main Unit
- Pull Arm Assembly (for inswinging and outswinging doors)
- Multi-function Remote Controls (x2)
- RFID Access Control Keypad
- Exit Push Buttons (x2)
- RFID Cards (x5)
- Motion Sensor
- Power Cable
- Mounting Hardware (screws, anchors)
4. Product Overview
Key Features
- Adjustable Opening Angle: Supports up to 120 degrees for flexible door movement.
- Durable Construction: Made from aluminum alloy and stainless steel for longevity.
- Multiple Access Methods: Operates via remote control, keypad, push button, and motion sensor.
- Wide Application: Suitable for various environments including supermarkets, hospitals, offices, and residential homes.
- Safety Compliance: CE certified for safety standards.
Main Components

Image: Detail of the door opener's aluminum alloy construction and ABS switch.
The main unit houses the motor and control board, encased in a robust aluminum alloy. An integrated ABS switch allows for manual control or power cutoff.

Image: Examples of the door opener's versatile application in various settings.
5. Setup and Installation
Proper installation is crucial for the performance and safety of your automatic door opener. Refer to the detailed diagrams and instructions provided in the separate installation guide for specific mounting and wiring steps.
5.1 Mounting the Opener
The door opener can be mounted for both inswinging and outswinging doors using the appropriate pull arm configuration.
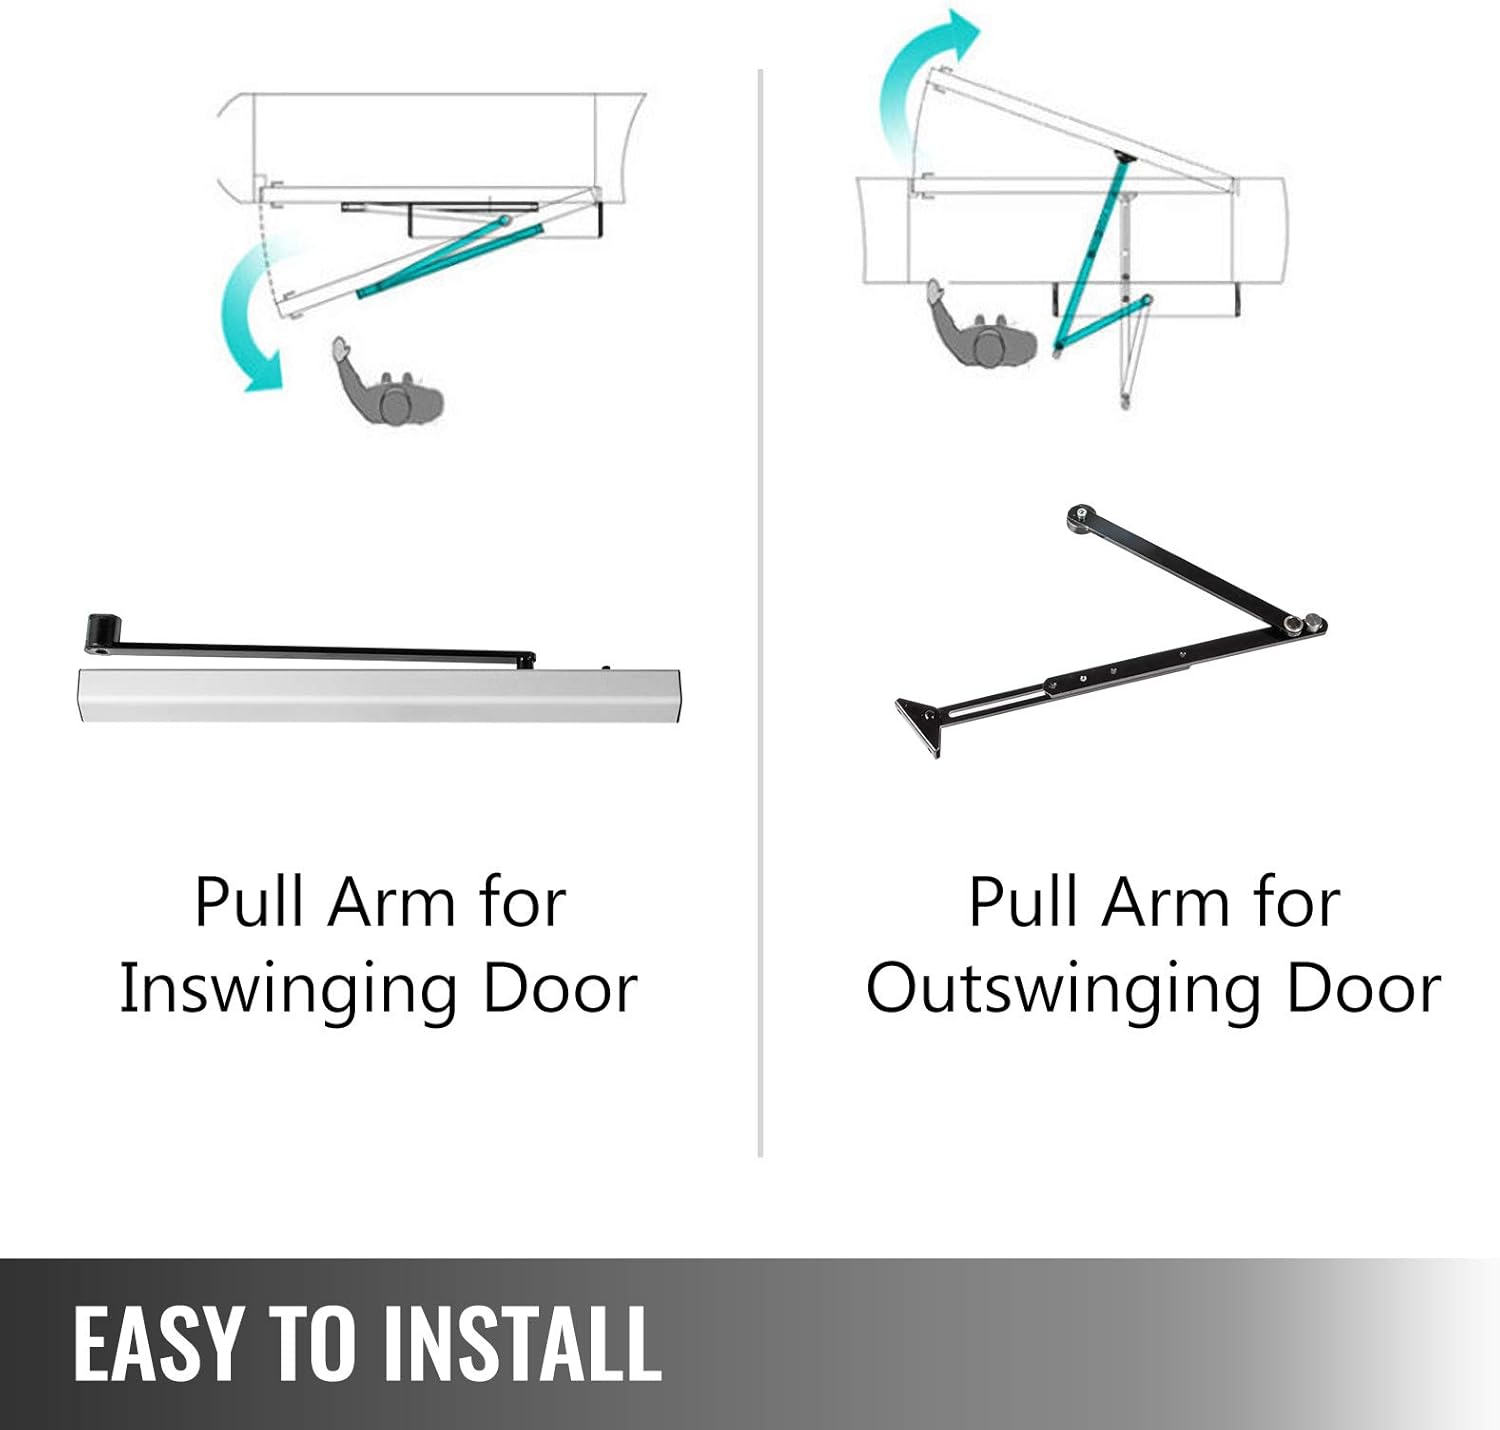
Image: Pull arm configurations for inswinging and outswinging doors.
- Inswinging Door: The pull arm extends from the main unit to the door, pulling it inward to open.
- Outswinging Door: The pull arm extends from the main unit to the door, pushing it outward to open.
Ensure the mounting surface is sturdy and level. Use the provided mounting hardware suitable for your wall material.
5.2 Wiring Connections
The door opener requires a 110-240V power supply. All wiring should be done by a certified electrician. The system typically requires a 3-wire cable for remote switches and sensors. Refer to the wiring diagram in the separate installation manual for precise connections of power, sensors, keypad, and push buttons.
5.3 Initial Configuration
After physical installation and wiring, perform initial setup steps, which may include:
- Powering on the unit and observing indicator lights.
- Programming remote controls and RFID cards with the keypad.
- Adjusting door opening/closing speeds and force settings.
- Testing all connected access devices (remotes, keypad, push buttons, sensor).
6. Operating Instructions
6.1 Remote Control Operation
The included remote controls provide convenient wireless operation of the door opener.

Image: Multi-function remote control for the door opener.
- Press button 'A' to open the door.
- Press button 'B' to close the door.
- Other buttons may be programmable for specific functions (e.g., partial open, hold open). Refer to the keypad programming section for details.
6.2 Keypad and Push Button Access
The RFID access control keypad and push buttons offer secure and direct access.

Image: Push button and RFID access control keypad.
- Push Button: Press the 'DOOR EXIT' button to activate the door opener.
- Keypad: Enter your programmed access code or present a registered RFID card to the keypad to open the door.
- Refer to the keypad's specific manual for programming user codes and RFID cards.
6.3 Sensor Functionality
The motion sensor detects approaching individuals and automatically opens the door.

Image: High-sensitivity motion sensor.
- Ensure the sensor is positioned correctly to cover the desired detection area without false triggers.
- Adjust sensor sensitivity as needed to prevent unintended activations.
7. Maintenance
Regular maintenance ensures the longevity and optimal performance of your VEVOR Automatic Door Opener.
- Monthly Inspection: Check all mounting bolts and screws for tightness. Inspect the pull arm and hinges for any signs of wear or damage.
- Cleaning: Keep the main unit and sensors clean and free of dust and debris. Use a soft, dry cloth. Do not use abrasive cleaners or solvents.
- Lubrication: Periodically apply a small amount of silicone-based lubricant to the moving joints of the pull arm to ensure smooth operation.
- Sensor Check: Verify that all safety sensors are clear and functioning correctly. Test their detection range and response.
- Power Supply: Ensure the power cable is not damaged and connections are secure.
If you notice any unusual noises, erratic operation, or damage, discontinue use and consult the troubleshooting section or contact customer support.
8. Troubleshooting
This section addresses common issues you might encounter. For problems not listed here, please contact customer support.
| Problem | Possible Cause | Solution |
|---|---|---|
| Door does not open/close. | No power; remote/keypad not programmed; safety sensor obstructed; motor issue. | Check power connection; reprogram remote/keypad; clear sensor path; contact support if motor fails. |
| Door opens partially or erratically. | Obstruction; incorrect force/speed settings; mechanical binding. | Remove obstructions; adjust settings (refer to installation manual); check for binding in door hinges/track. |
| Remote control/keypad not responding. | Low battery (remote); incorrect code; not programmed. | Replace remote battery; verify code; ensure device is properly programmed. |
| Sensor triggers door unexpectedly. | High sensitivity; incorrect positioning; environmental factors. | Adjust sensor sensitivity; reposition sensor; ensure no external factors (e.g., pets, wind) are causing triggers. |
| Unusual noises during operation. | Lack of lubrication; loose components; worn parts. | Lubricate moving parts; tighten loose screws; inspect for worn components and replace if necessary. |
Note: Some users have reported challenges with setup and troubleshooting due to translation nuances in documentation. If issues persist, direct communication with VEVOR support is recommended.
9. Specifications
Detailed technical specifications for the VEVOR Automatic Door Opener, Model LB817.

Image: Dimensions of the VEVOR Automatic Door Opener main unit.
| Attribute | Value |
|---|---|
| Model Number | LB817 |
| Part Number | Automatic Door Opener |
| Manufacturer | VEVOR |
| Installation Type | Screw-In |
| Voltage | 110-240V |
| Power | 50 W |
| Max Door Weight | 22 Lbs (approx. 10 kg) |
| Adjustable Opening Angle | Up to 120 Degrees |
| Material | Aluminum Alloy and Stainless Steel |
| Color | Stainless Steel |
| Product Dimensions | 20.51 x 3.7 x 3.19 inches (52.1 x 9.4 x 8.1 cm) |
| Item Weight | 18.8 pounds (approx. 8.5 kg) |
| Item Package Quantity | 1 |
| Batteries Required? | No (for main unit) |
| Specification Met | CE |
| UPC | 840349913735 |
10. Warranty and Customer Support
Warranty Information
Specific warranty details for the VEVOR Automatic Door Opener are not provided in this manual. Please refer to your purchase documentation or contact the seller directly for information regarding warranty coverage and terms.
Customer Support
For technical assistance, troubleshooting beyond this manual, or inquiries about parts and service, please contact VEVOR customer support. You can often find contact information on the official VEVOR website or through the retailer where you purchased the product.
Visit the official VEVOR store for more information: VEVOR Store on Amazon
Related Documents - LB817
 |
VEVOR Wall Corner Protector - BXGHJ/LHJHJ Series | Durable Stainless Steel & Aluminum Protect and enhance your walls with VEVOR's high-quality Wall Corner Protectors. Made from durable 304 stainless steel and aluminum, available in various sizes for easy installation. Ideal for homes, offices, and commercial spaces. |
 |
VEVOR 2243B Stair Climbing Cart - User Manual & Assembly Guide Comprehensive user manual and assembly guide for the VEVOR 2243B Stair Climbing Cart. Includes safety instructions, model parameters, component list, step-by-step assembly, troubleshooting, and maintenance tips. |
 |
VEVOR Greenhouse Card Slot Installation Guide - Models LD6-LD10 Comprehensive installation guide for VEVOR Greenhouse Card Slot models LD6, LD7, LD8, LD9, and LD10. Includes product details, parameters, component lists, and step-by-step assembly instructions. |
 |
VEVOR Greenhouse Spring Wire and Lock Channel YMCT-2011 Installation Guide Installation guide for the VEVOR Greenhouse Spring Wire and Lock Channel (Model: YMCT-2011). Details components, specifications, and assembly steps for this aluminum alloy greenhouse accessory. |
 |
VEVOR Swing Gate Opener MK1102M/MK1302M Installation and Operation Manual Comprehensive guide from VEVOR detailing the installation, operation, and maintenance of the MK1102M and MK1302M Swing Gate Openers. Includes safety instructions, parts lists, and troubleshooting tips. |
 |
VEVOR MK1102M/MK1302M Swing Gate Opener: User Manual & Installation Guide Comprehensive guide for VEVOR MK1102M and MK1302M Swing Gate Openers. Includes installation, safety, features, and troubleshooting for automated gate systems. |
Ask a question about this manual
Ask about setup, troubleshooting, compatibility, parts, safety, or missing instructions. Manuals+ will review the question and use this page’s manual context to help answer it.