
Introduction
Thank you for choosing the Anthter Automatic Pet Feeder HS-802. This device is designed to provide scheduled meals for your cats and dogs, ensuring they receive consistent nutrition even when you are away. With its 9-liter capacity, customizable feeding schedules, voice recording feature, and dual power options, this feeder offers convenience and peace of mind for pet owners.
Product Overview
The Anthter Automatic Pet Feeder consists of a food storage tank, a base with a control panel, and a removable stainless steel food bowl. Key features include a secure twist-lock lid, a desiccant bag compartment to keep food fresh, and a patent rotor design for smooth food dispensing.

Image: Feeder Components. This image displays an exploded view of the feeder, highlighting its main components: the secure twist-lock lid, desiccant bag compartment, patent rotor design, and the discharge port. These elements work together to ensure food freshness and reliable dispensing.

Image: 9L Capacity. This image illustrates the large 9-liter capacity of the Anthter feeder, shown alongside a smaller 4-liter feeder for comparison. The 9L capacity is designed to meet the feeding needs of small dogs for approximately 15 days.
Setup
1. Unpacking and Assembly
- Remove all components from the packaging.
- Place the base of the feeder on a flat, stable surface.
- Attach the food storage tank securely to the base.
- Place the stainless steel food bowl in front of the dispenser outlet.
2. Power Supply
The feeder can be powered by either a DC 5V adapter or three D-cell batteries (not included). It is recommended to use both for uninterrupted operation, especially during power outages.
- DC Adapter: Plug the DC 5V adapter into the power port on the back of the feeder and then into a wall outlet.
- Batteries: Open the battery compartment on the bottom of the feeder and insert three D-cell batteries, ensuring correct polarity.
The feeder is equipped with setting memory to prevent sudden power failure from erasing your programmed schedule.
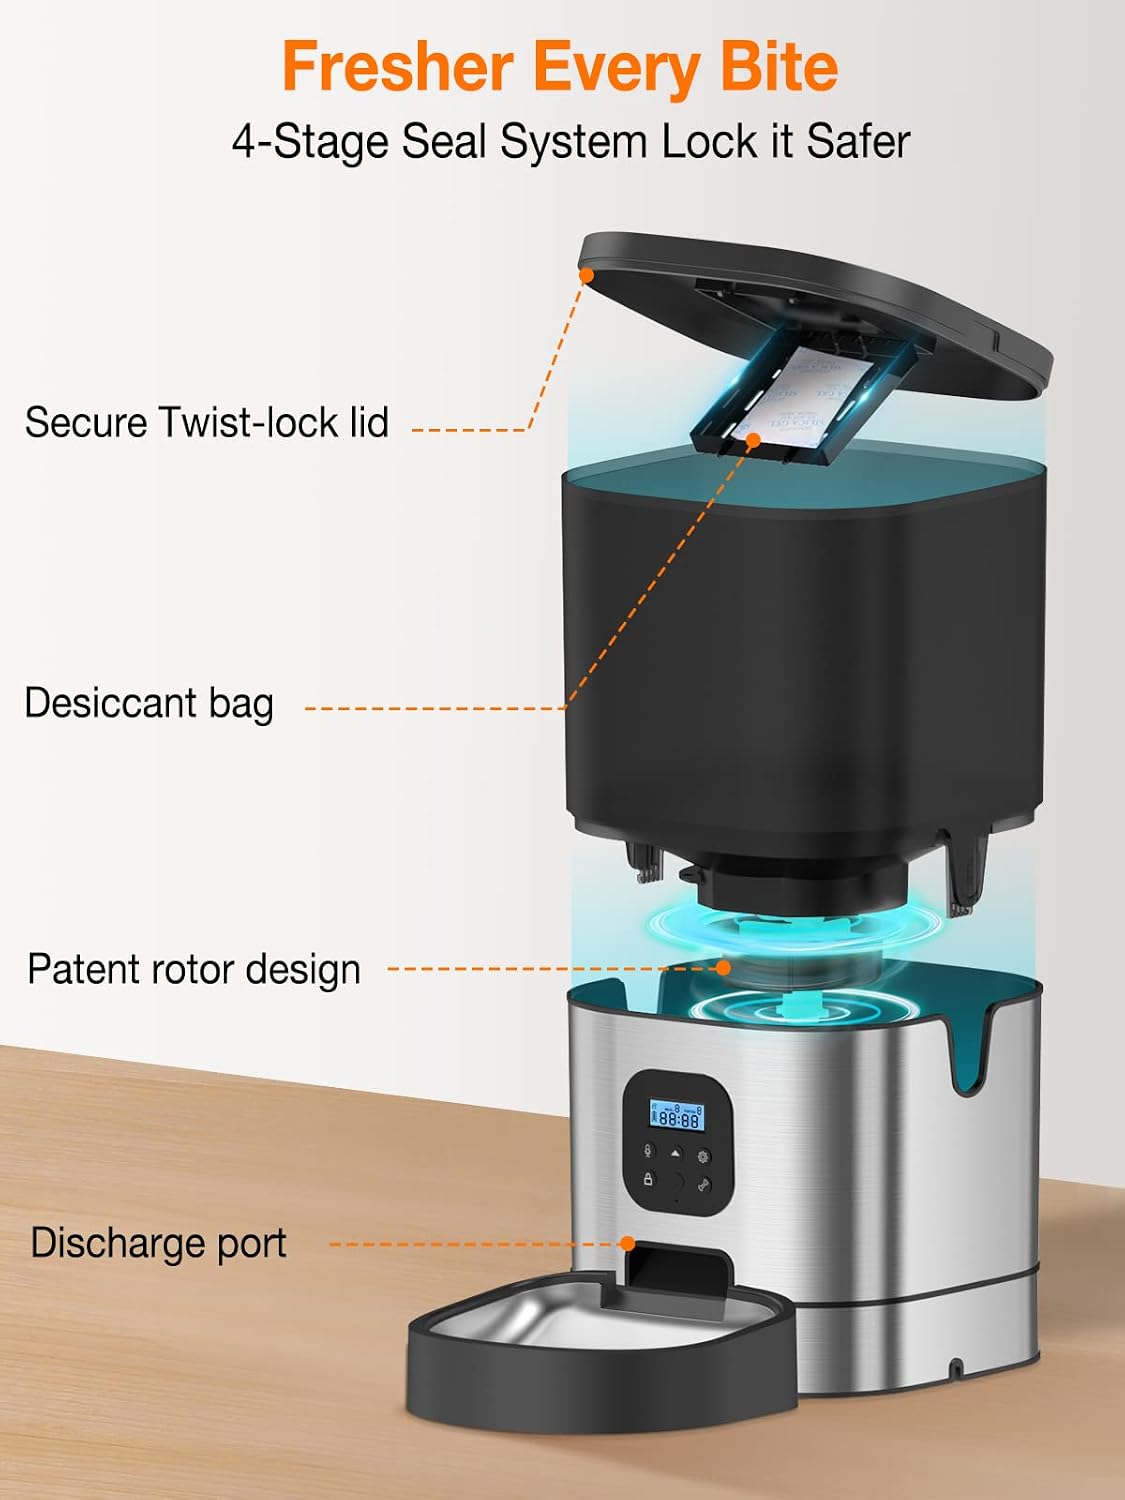
Image: Dual Power Options. This image shows the battery compartment for three D-cell batteries (not included) and the DC adapter input, illustrating the dual power supply capability of the feeder for continuous operation.
3. Filling the Food Tank
- Open the secure twist-lock lid on top of the feeder.
- Pour dry pet kibble into the food tank. Ensure the kibble size is suitable (up to 0.8 inches) to prevent blockages.
- Close the lid securely by twisting it until it locks into place. This helps keep the food fresh and prevents pets from accessing it.
- Consider placing a desiccant bag (not included) in the designated compartment under the lid to maintain food freshness.
Operating Instructions
Control Panel Overview
The control panel features a digital display and several buttons for programming:
- SET Button: Enters programming mode and confirms settings.
- UP/DOWN Buttons: Adjust values (time, meal number, portion size).
- REC Button: Records or plays back your voice message.
- MANUAL Button: Dispenses one portion of food instantly.
- LOCK Button: Locks/unlocks the control panel to prevent accidental changes. Press and hold for a few seconds to activate/deactivate.
1. Setting the Current Time
- Press and hold the LOCK button for a few seconds to unlock the panel.
- Press the SET button once. The hour digit will flash.
- Use the UP/DOWN buttons to set the current hour.
- Press SET again. The minute digit will flash.
- Use the UP/DOWN buttons to set the current minute.
- Press SET to confirm the time.
2. Customizing Feeding Schedule
You can program up to 4 meals per day, with 1 to 9 portions per meal.

Image: Customized Programming. This image illustrates the feeder's ability to set a desired feeding routine, showing options for up to 4 meals daily and 1-9 portions per meal, with example times like 06:00, 09:00, 12:00, 15:00, 18:00, and 21:00.
- Ensure the panel is unlocked.
- Press the SET button repeatedly until 'Meal 1' appears on the display.
- Use UP/DOWN to set the desired feeding time for Meal 1 (hour then minute, confirming with SET after each).
- After setting the time, the portion size will flash. Use UP/DOWN to select the number of portions (1-9) for Meal 1.
- Press SET to confirm.
- Repeat steps 2-5 for 'Meal 2', 'Meal 3', and 'Meal 4' as needed. If a meal is not required, set its time to '00:00' or simply skip it by pressing SET until you exit programming mode.
- After setting all desired meals, press the LOCK button to prevent accidental changes.
3. Recording Your Voice Message
You can record a 10-second voice message that will play before each scheduled meal, helping to call your pet to eat.

Image: Voice Feeding Reminder. This image shows a cat near the feeder, with a speech bubble indicating a recorded voice message, demonstrating the voice feeding reminder feature.
- Ensure the panel is unlocked.
- Press and hold the REC button. The display may show a recording indicator.
- Speak your message clearly into the microphone for up to 10 seconds.
- Release the REC button to stop recording.
- Press the REC button once to play back your recorded message.
4. Manual Feeding
To dispense a single portion of food instantly:
- Ensure the panel is unlocked.
- Press the MANUAL button once. One portion of food will be dispensed.
Maintenance
1. Cleaning
Regular cleaning ensures hygiene and proper functioning of the feeder.
- Food Bowl: The stainless steel food bowl is removable and can be washed with soap and water. Rinse thoroughly and dry completely before reattaching.
- Food Tank: The food tank can be detached and wiped clean with a damp cloth. Ensure it is completely dry before refilling with kibble. Do not immerse the base unit in water.
- Base Unit: Wipe the exterior of the base unit with a soft, dry cloth. Avoid using abrasive cleaners or getting water into the electronic components.
2. Desiccant Bag Replacement
If using a desiccant bag, replace it periodically (e.g., every 1-2 months) to maintain optimal food freshness.
3. Kibble Compatibility
The feeder is designed for dry kibble up to 0.8 inches (2 cm) in diameter. Using kibble outside this size range may lead to blockages or improper dispensing.

Image: Kibble Compatibility. This image demonstrates that the feeder is suitable for most kibbles up to 0.8 inches, showing various kibble shapes and sizes that can be dispensed without getting stuck.
Troubleshooting
- Feeder not dispensing food:
- Check if the food tank is empty.
- Ensure the kibble size is appropriate (up to 0.8 inches) and not causing a blockage in the dispensing mechanism.
- Verify that the feeder is powered correctly (DC adapter or charged batteries).
- Check if the control panel is locked. Unlock it and try manual feeding.
- Feeder not turning on:
- Ensure the DC adapter is securely plugged into both the feeder and the wall outlet.
- If using batteries, check if they are inserted correctly and have sufficient charge. Replace if necessary.
- Settings are lost after power interruption:
- The feeder is designed with setting memory. If settings are lost, ensure both the DC adapter and fresh D-cell batteries are installed to provide redundant power.
- Voice recording not playing:
- Ensure a voice message has been successfully recorded. Try re-recording.
- Check the volume settings if available (though this model typically has fixed volume).
Specifications
- Model Number: HS-802
- Brand: Anthter
- Capacity: 9 Liters
- Dimensions: 26.49 x 25.5 x 45.01 cm
- Weight: 2.95 kg
- Material: Stainless Steel (bowl)
- Power Source: DC 5V adapter, 3 x D-cell batteries (not included)
- Target Species: Cat, Dog
- Feeding Schedule: Up to 4 meals per day
- Portion Size: 1-9 portions per meal
- Special Features: Voice Recording, Setting Memory
Warranty and Support
For warranty information and customer support, please refer to the documentation provided with your purchase or contact the retailer/manufacturer directly. Keep your proof of purchase for any warranty claims.