1. Important Safety Information
Please read all instructions carefully before attempting installation. Improper installation can damage the unit or the CD player.
- Always disconnect the CD player from the power source before beginning any installation or maintenance.
- Handle the optical pickup unit by its edges to avoid touching the laser lens or internal components.
- Static electricity can damage sensitive electronic components. Use appropriate anti-static precautions (e.g., anti-static wrist strap) during installation.
- The laser diode emits invisible laser radiation. Do not stare into the beam or view directly with optical instruments.
- If you are unsure about any step, seek assistance from a qualified technician.
2. Setup and Installation
This section guides you through the process of replacing the optical pickup unit in your AIWA XP-V421 CD player.
2.1 Pre-Installation Checks
- Ensure the replacement unit matches the original part for your AIWA XP-V421 CD player.
- Gather necessary tools: small Phillips head screwdriver, soldering iron, desoldering braid/pump (if needed), anti-static mat/wrist strap.
2.2 Removing the Protective Solder Bridge
Crucial Step: New optical pickup units often come with a protective solder bridge to prevent electrostatic discharge (ESD) damage during shipping. This bridge must be removed before installation for the unit to function correctly.
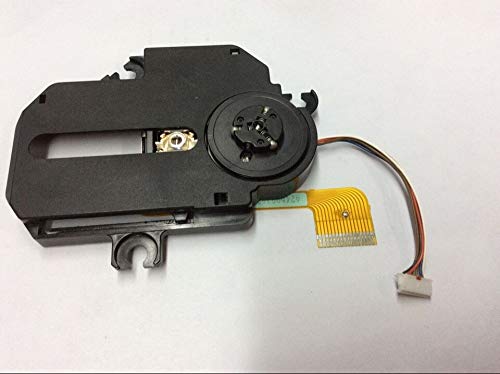
This image displays the EEEONE replacement optical pickup unit. A red arrow points to a small solder bridge on the flexible flat cable, which must be carefully removed before installation to enable proper function and prevent damage.
- Locate the small solder point on the flexible flat cable, as indicated in the image above.
- Using a fine-tipped soldering iron, carefully heat the solder point and remove the solder bridge. Ensure no residual solder remains to short other traces.
- Allow the area to cool completely before proceeding.
2.3 Installation Steps
- Disassemble CD Player: Carefully open the AIWA XP-V421 CD player casing according to its service manual or general disassembly procedures for similar devices.
- Disconnect Old Unit: Gently disconnect the flexible flat cable and any other connectors from the old optical pickup unit. Note their orientation.
- Remove Old Unit: Unscrew and remove the old optical pickup unit from its rails or mounting points.
- Install New Unit: Place the new EEEONE optical pickup unit into position, ensuring it slides smoothly onto the rails. Secure it with the screws removed earlier.
- Connect Cables: Reconnect the flexible flat cable and any other connectors to the new unit, ensuring correct orientation and secure connections.
- Reassemble CD Player: Carefully reassemble the CD player casing. Do not force any parts.
3. Operating the CD Player After Installation
After successful installation, the CD player should function as intended. Follow the original AIWA XP-V421 user manual for general operation.
- Insert a clean, scratch-free audio CD.
- Power on the CD player.
- Press the Play button. The unit should read the disc and begin playback.
4. Maintenance
Proper maintenance ensures the longevity and optimal performance of your optical pickup unit and CD player.
- Keep Discs Clean: Always use clean, dust-free CDs. Dust and fingerprints can accumulate on the laser lens, affecting performance.
- Clean the Lens (If Necessary): If playback issues occur due to a dirty lens, use a specialized CD lens cleaning disc or a soft, lint-free cloth with a small amount of isopropyl alcohol. Exercise extreme caution when cleaning the lens directly.
- Environment: Operate the CD player in a clean, dust-free environment away from direct sunlight and extreme temperatures.
5. Troubleshooting
If you encounter issues after installing the replacement optical pickup unit, refer to the following common troubleshooting steps:
| Problem | Possible Cause | Solution |
|---|---|---|
| CD player does not read discs or shows "No Disc". |
|
|
| Skipping or intermittent playback. |
|
|
| No power to the CD player. |
|
|
6. Specifications
- Product Type: Replacement Optical Pickup Unit (Laser Lens Assembly)
- Compatibility: AIWA XP-V421 CD Player
- Manufacturer: Gomost (as per product data)
- Item Weight: 230 Grams
- ASIN: B0BV37XPH1
7. Warranty and Support
For warranty information or technical support regarding this replacement part, please contact your original point of purchase or the manufacturer, EEEONE. Keep your purchase receipt as proof of purchase.