ASIAIR-Mini
ZWO ASIAIR Mini Wi-Fi Smart Camera Controller
Model: ASIAIR-Mini
1. Introduction
The ASIAIR Mini is a compact and powerful smart device designed to streamline astrophotography workflows. It serves as a central control unit for your telescope rig, enabling wireless management of various astronomical equipment.
This device simplifies complex tasks such as GoTo equatorial mount pointing, power distribution to cameras and other accessories, and control of compatible ZWO components including Electronic Automatic Focusers (EAF), filter wheels, and guide cameras.
Product Overview
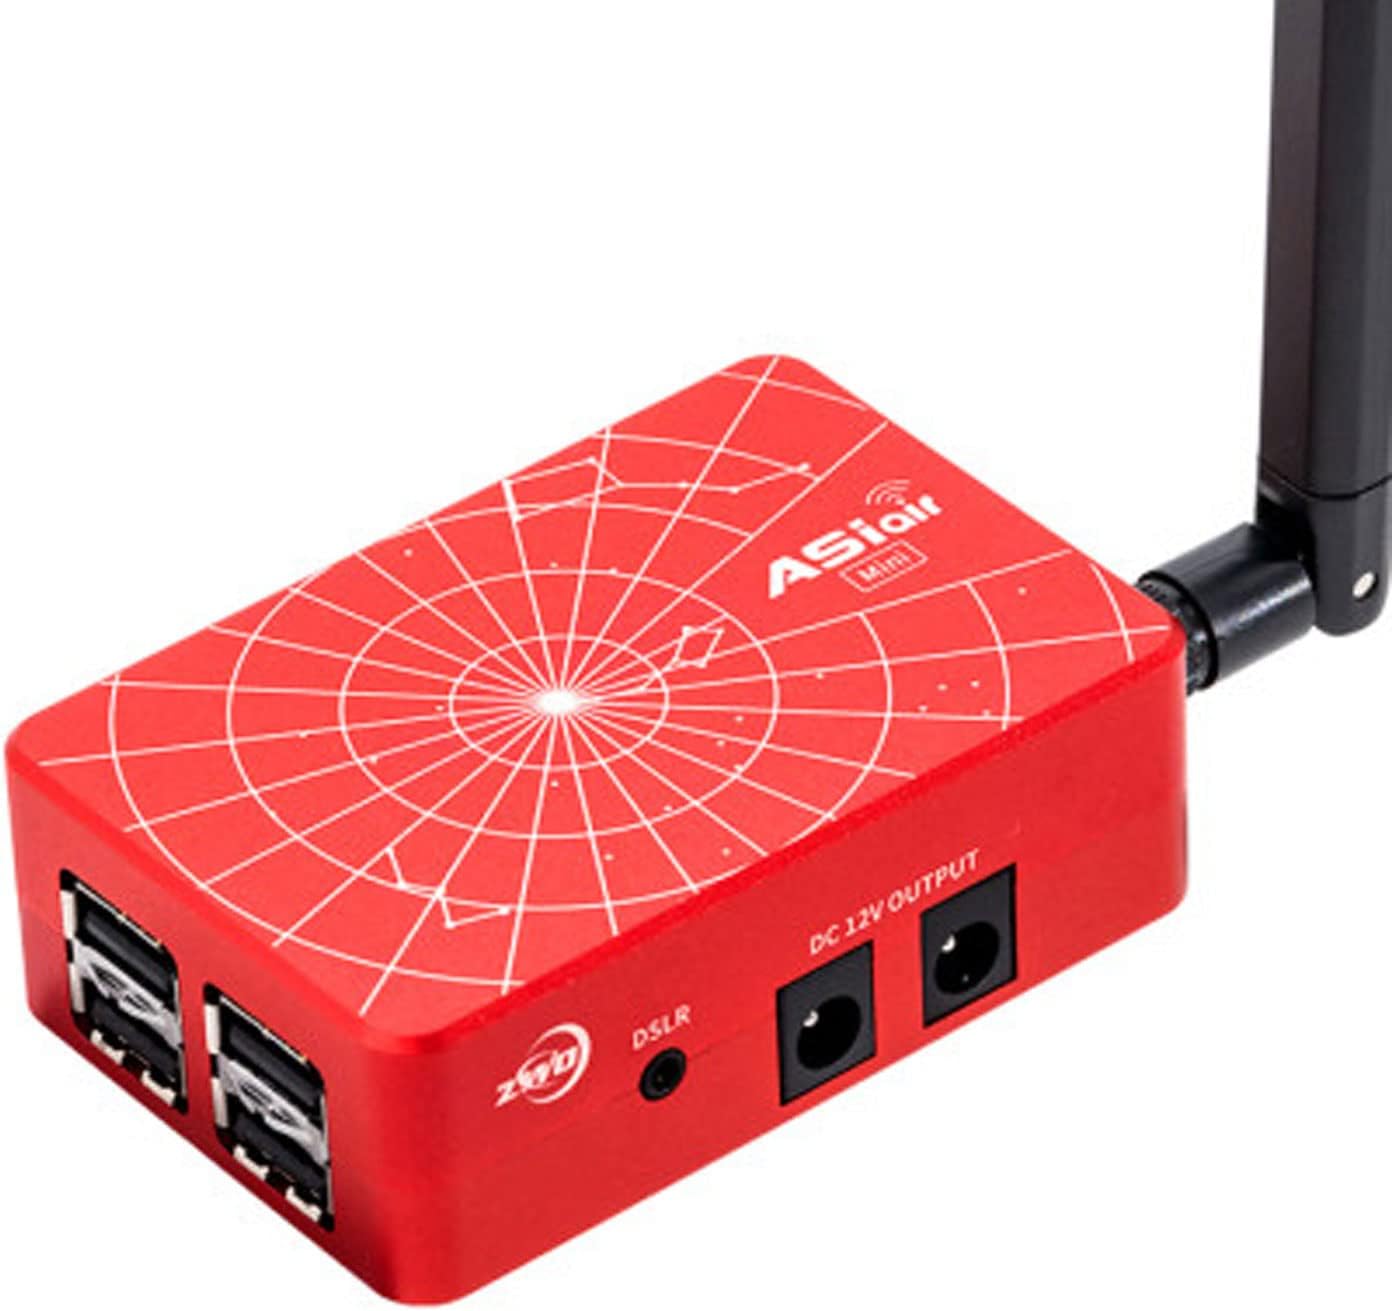
Figure 1: ZWO ASIAIR Mini device.
The ASIAIR Mini is engineered for portability and efficiency. Its compact design allows for easy integration into existing astrophotography setups, providing robust control capabilities in a smaller form factor.

Figure 2: Size comparison between ASIAIR Mini and ASIAIR Plus, highlighting the Mini's reduced footprint and weight.
2. Physical Components and Interfaces
The ASIAIR Mini features a range of ports and indicators designed for comprehensive control and monitoring of your astrophotography equipment.

Figure 3: ASIAIR Mini Multi-Interfaces and Indicators.
- DSLR Shutter Release: Port for connecting a DSLR camera's shutter release cable, enabling remote control of exposures.
- DC 12V Outputs (x4): Four dedicated 12V DC power outputs to supply power to cameras, mounts, dew heater strips, and other accessories.
- USB Type-C Port: Used for connecting directly to a laptop/PC to export files. This port can also power the ASIAIR Mini with a 5V@0.5A power supply.
- USB 2.0 Ports (x4): Four USB 2.0 ports for connecting guide cameras, Electronic Automatic Focusers (EAF), and other USB devices, including USB drives for data storage.
- Multiple Power Indicators:
- PWR: Indicates input power status.
- WiFi: Indicates wireless network status.
- SYS: Indicates system I/O status.
Power Monitoring Capabilities
The ASIAIR Mini integrates a monitoring unit to track its operational status, providing real-time data on power consumption and environmental conditions.

Figure 4: ASIAIR Mini Power Monitoring Features.
- Current Monitor: Displays the current draw of connected devices.
- Real-time Temperature: Monitors the internal temperature of the ASIAIR Mini.
- Voltage Monitor: Shows the input voltage and output voltage to connected devices.
- Devices Connected: Provides an overview of all currently connected equipment.
- WiFi Setting: Allows configuration and monitoring of the Wi-Fi connection.
- Total Power Consumption: Displays the aggregate power usage of the system.
3. Setup
Setting up your ASIAIR Mini involves connecting your astronomical equipment and establishing a wireless connection for control.
3.1 Initial Connections
- Power Input: Connect a 12V DC power supply to the ASIAIR Mini's DC 12V INPUT port. Ensure the power supply meets the required specifications.
- Connect Devices: Utilize the available ports to connect your equipment:
- Connect your main camera, mount, and dew heaters to the DC 12V OUTPUT ports.
- Connect your guide camera, EAF, and other USB accessories to the USB 2.0 ports.
- If using a DSLR, connect its shutter release cable to the DSLR port.
- Power On: Once all connections are secure, power on the ASIAIR Mini. Observe the PWR, WiFi, and SYS indicators for proper boot-up.
3.2 Software Installation and Wi-Fi Connection
- Download ASIAIR App: Download and install the official ASIAIR application on your iOS or Android device from the respective app store.
- Connect to ASIAIR Wi-Fi: On your mobile device, go to Wi-Fi settings and connect to the ASIAIR Mini's Wi-Fi network. The network name typically starts with "ASIAIR_".
- Launch App: Open the ASIAIR app. It should automatically detect and connect to your ASIAIR Mini.
4. Operation
The ASIAIR Mini provides an integrated and user-friendly workflow for various astrophotography tasks, all controlled from your mobile device.

Figure 5: ASIAIR Mini One-station Design for integrated control.
4.1 Core Functions
- Mount Control: Remotely control your GoTo equatorial mount for precise pointing and tracking.
- Camera Control: Manage exposure settings, capture sequences, and download images from your main camera.
- Guide Control: Utilize a guide camera and the integrated guiding software for accurate autoguiding, ensuring sharp long-exposure images.
- EAF Control: Control compatible Electronic Automatic Focusers for precise and automated focusing.
- EFW Control: Manage Electronic Filter Wheels for automated filter changes during imaging sessions.
- Polar Alignment: Utilize built-in tools for accurate polar alignment of your mount.
- Plate Solving: Automatically identify the exact celestial coordinates of your telescope's field of view.
- Live Stacking: Observe real-time stacked images for immediate feedback during imaging sessions (Note: ASIAIR Mini does not support cameras over 26MP pixels, including ASI6200 and ASI461, and other DSLRs for live stacking. It works fine with ASI6200 for image capture).
5. Compatibility
5.1 Minimum System Requirements for ASIAIR App
To ensure optimal performance, verify that your mobile device meets the following minimum requirements for running the ASIAAIR application:
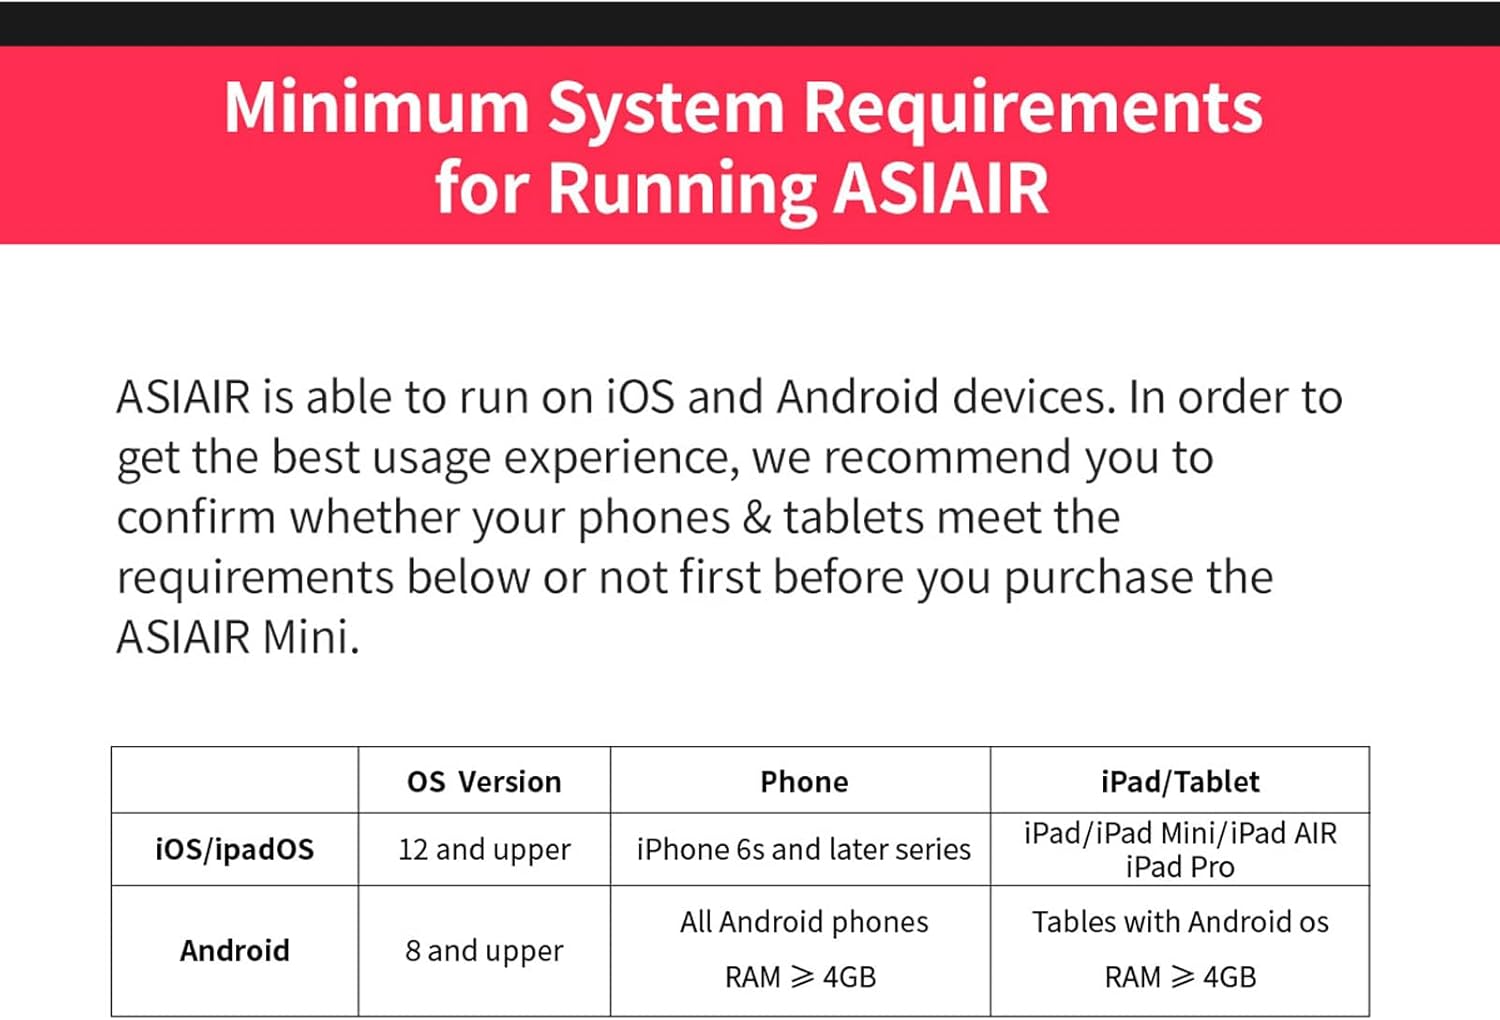
Figure 6: Minimum System Requirements for ASIAIR App.
| OS Version | Phone | iPad/Tablet | |
|---|---|---|---|
| iOS/iPadOS | 12 and upper | iPhone 6s and later series | iPad/iPad Mini/iPad Air/iPad Pro |
| Android | 8 and upper | All Android phones RAM ≥ 4GB | Tables with Android OS RAM ≥ 4GB |
5.2 Supported DSLR List
The ASIAIR Mini supports a wide range of Canon and Nikon DSLR cameras. Refer to the table below for a comprehensive list of tested models and their compatibility with Live Mode and cable shutter release.

Figure 7: ASIAIR Mini Supported DSLR List.
Note: ① indicates Untested. ② indicates it means you need to use cable shutter release with ASIAIR Mini. ③ indicates Live Mode is not supported. Live stack mode requires the DSLR/mirrorless camera equipping with a total pixel number less than 26M.
5.3 ASIAIR Mini vs. ASIAIR Plus Feature Comparison
Understand the differences between the ASIAIR Mini and its predecessor, the ASIAIR Plus, to better utilize its capabilities.

Figure 8: Feature Comparison: ASIAIR Mini vs. ASIAIR Plus.
| Feature | ASIAIR Plus | ASIAIR Mini |
|---|---|---|
| Live stack | Support | Support (except ASI6200) |
| Video mode | Support (except DSLR) | Support (except DSLR) |
| Multi-target mode | Support | Support |
| New plate solving algorithm | Support | Support |
| Monitor unit | Support | Support |
| FOV for plate solve | 0.2° ~ 33° | 0.2° ~ 33° |
| Wired LAN | Support | – |
| Dual band Antenna 2.4G/5G | Support | Support |
| 20M WiFi coverage | Support | Support |
| Power ON/OFF switch | Support | – |
| Input current & voltage monitor | Support | Support |
| Output voltage monitor | Support | – |
| Power consumption monitor | Support | Support |
| High temperature/low voltage warning | Support | Support |
| SD card | Support | – |
| USB drives | Support | Support |
| eMMC | Support | Support |
| ASI6200 series | Support | Support |
| DSLR shutter release | Support | Support |
| Power external devices | Support | Support |
| USB ports | USB 3.0*2/USB2.0*2 | USB 2.0*4 |
| Type-C port | Support | Support |
| Installation method | via finder shoe | via finder shoe |
6. Maintenance
Proper maintenance ensures the longevity and optimal performance of your ASIAIR Mini.
- Cleaning: Use a soft, dry cloth to clean the exterior of the device. Avoid using liquid cleaners or solvents, as they may damage the casing or internal components.
- Storage: When not in use, store the ASIAIR Mini in a cool, dry place, away from direct sunlight and extreme temperatures. Protect it from dust and moisture.
- Cable Management: Ensure all cables are connected securely and are not under undue strain. Avoid sharp bends or kinks in cables, which can lead to damage.
- Firmware Updates: Regularly check for and install firmware updates for the ASIAIR Mini via the app. Updates often include performance improvements, bug fixes, and new features.
7. Troubleshooting
This section provides general guidance for common issues you might encounter with your ASIAIR Mini.
- Device Not Powering On:
- Verify that the 12V DC power supply is correctly connected and providing power.
- Ensure the power adapter is functional and plugged into a live outlet.
- Cannot Connect to ASIAIR Wi-Fi:
- Ensure the ASIAIR Mini is powered on and the WiFi indicator light is active.
- Restart both the ASIAIR Mini and your mobile device.
- Check that your mobile device's Wi-Fi is enabled and you are selecting the correct ASIAIR network.
- Try resetting the ASIAIR Mini's network settings if issues persist (refer to advanced settings in the app or device manual for specific reset procedures).
- Connected Devices Not Recognized:
- Ensure all cables (USB, DC 12V) are securely connected to both the ASIAIR Mini and the peripheral device.
- Verify that the peripheral device is powered on and functioning independently.
- Check the ASIAIR app for device recognition status. If a device is not listed, try reconnecting it or restarting the ASIAIR Mini.
- Confirm compatibility of your devices with the ASIAIR Mini (refer to compatibility sections).
- App Freezes or Crashes:
- Ensure your mobile device meets the minimum system requirements.
- Close and restart the ASIAIR app.
- Clear the app's cache or reinstall the app if necessary.
- Ensure your ASIAIR Mini firmware and app are updated to the latest versions.
8. Specifications
Detailed technical specifications for the ZWO ASIAIR Mini.

Figure 9: Structural Dimension Diagram of ASIAIR Mini.
| Specification | Value |
|---|---|
| Model | ASIAIR-Mini |
| Package Dimensions | 9.84 x 7.87 x 5.91 inches |
| Item Weight | 2.2 pounds |
| ASIN | B0BV2BCV44 |
| Date First Available | February 7, 2023 |
| Manufacturer | Suzhou ZWO CO.,LTD |
| USB Ports | 4 x USB 2.0 |
| DC 12V Outputs | 4 |
| Wi-Fi | Dual band Antenna 2.4G/5G, 20M coverage |
| Power Input | DC 12V |
| Type-C Port | Yes (for data export and 5V@0.5A power input) |
9. Warranty Information
This product comes with a limited manufacturer's warranty. Please refer to the official product website or contact customer support for detailed warranty terms and conditions. Keep your proof of purchase for warranty claims.
10. Customer Support
For technical assistance, troubleshooting, or product inquiries, please contact the manufacturer's customer support. Support contact information can typically be found on the official brand website or within the ASIAIR application.
Manufacturer: Suzhou ZWO CO.,LTD
Please visit the official ZWO website for the most up-to-date support resources, FAQs, and contact details.