1. Introduction
Thank you for choosing the Solofish 800 Lumens Adjustable Pistol Light Laser Combo. This device integrates a powerful 800-lumen tactical flashlight with a precise blue laser, offering multiple tactical modes including steady light, strobe, laser only, and a combination of light and laser. Designed for full-size pistols with a 21±0.5mm Picatinny rail, its fiber-reinforced polymer construction ensures durability and a lightweight profile. Please read this manual thoroughly before use to ensure proper installation and operation.
Key Features:
- Adjustable Rail System: Slidable rail for optimal positioning, compatible with Glocks and other full-size pistols with a rail.
- Strobe Function: Available for both the blue laser and the flashlight. Double-press to activate strobe modes.
- Super Bright Flashlight: 800 Lumens output. Rechargeable battery provides approximately 16 hours for laser only, 75 minutes for flashlight only, and 60 minutes for light & laser combined.
- Multiple Tactical Modes: Strobe + Steady laser/flashlight modes are selectable via ambidextrous buttons.
- Shockproof Design: Constructed from fiber-reinforced polymer material for enhanced durability and ultra-lightweight at 60g.
2. Safety Information
WARNING: LASER RADIATION. AVOID DIRECT EYE EXPOSURE. This device emits laser radiation. Direct exposure to the laser beam can cause permanent eye damage. Always exercise extreme caution when operating the laser. Ensure the device is pointed in a safe direction and away from people or animals when activating the laser.
Always follow all local and federal firearm safety regulations. Treat every firearm as if it were loaded. Keep your finger off the trigger until ready to fire. Be sure of your target and what is beyond it. Wear appropriate eye and ear protection when using firearms.

Image: Safety label on the device, indicating laser radiation warnings.
3. Included Components
Your Solofish 800 Lumens Pistol Light Laser Combo package includes:
- 800 Lumens Flashlight Combo (1)
- Charging Cable (1)
- Adjust Toolings (2)
- User Manual (1)
Image: All items included in the product package.
4. Product Overview
Familiarize yourself with the various parts and controls of your Solofish Pistol Light Laser Combo:
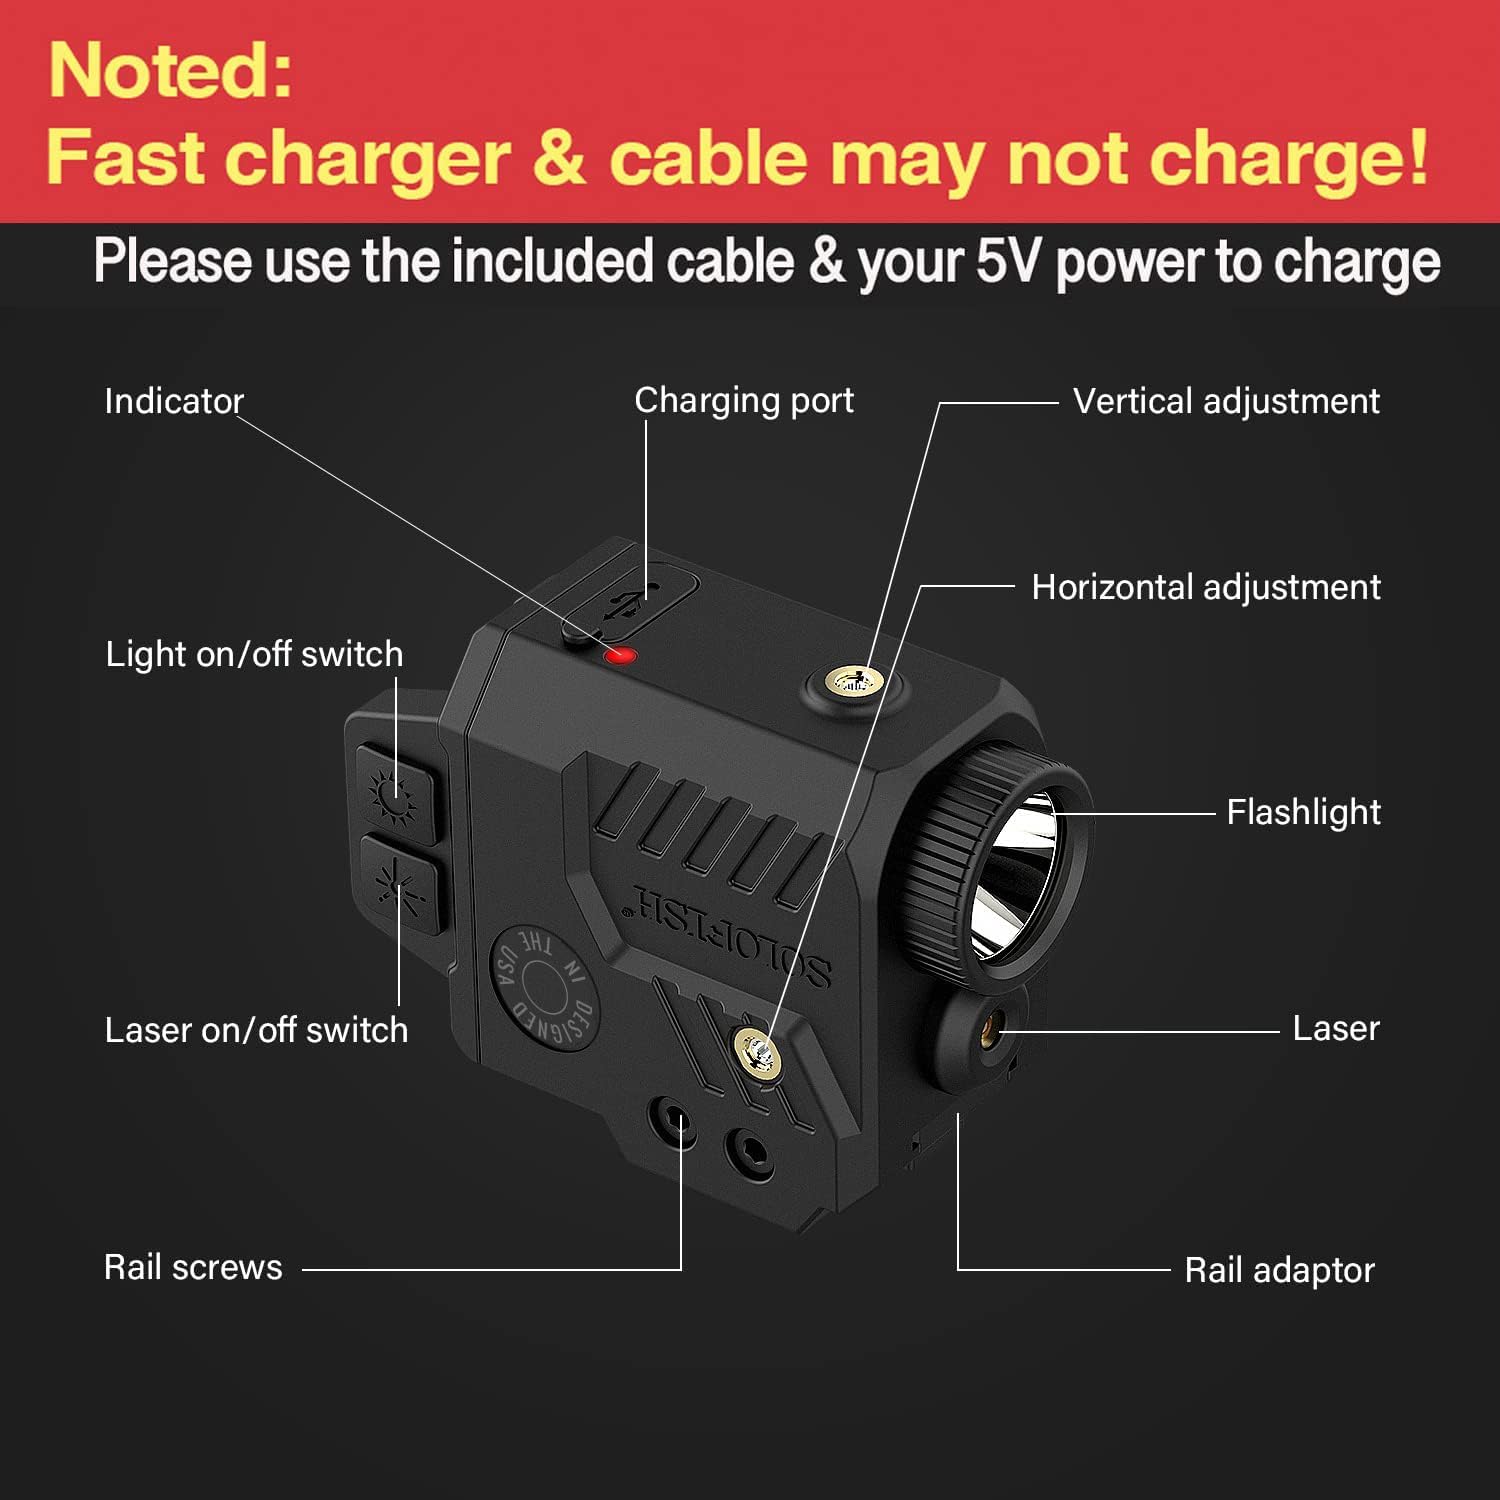
Image: Detailed diagram labeling the components of the device.
- Indicator: Shows charging status and battery level.
- Charging Port: USB-C port for recharging the internal battery.
- Vertical Adjustment: Screw for adjusting the laser's vertical aim.
- Horizontal Adjustment: Screw for adjusting the laser's horizontal aim.
- Light On/Off Switch: Activates and deactivates the flashlight.
- Laser On/Off Switch: Activates and deactivates the laser.
- Rail Screws: Secure the device to the pistol rail.
- Rail Adaptor: Allows for compatibility with various rail lengths.
- Flashlight: 800 Lumens LED light source.
- Laser: Blue laser emitter.
5. Setup and Installation
The Solofish Pistol Light Laser Combo is designed for full-size pistols with a 21±0.5mm Picatinny rail. It is not compatible with sub-compact pistols.

Image: Compatibility guide for the adjustable rail system.
Installation Steps:
- Loosen the rail screws on the device using the provided adjustment tool.
- Slide the device onto the Picatinny rail of your full-size pistol.
- Adjust the slidable rail system forward or backward to achieve your preferred fit and alignment with the pistol's trigger guard.
- Once positioned, tighten the rail screws securely to prevent movement during use.
- Ensure the device is firmly attached and does not interfere with the safe operation of your firearm.
Video: Demonstrates the mounting and removal procedure, highlighting that the device is not suitable for sub-compact pistols.
Video: Short clip addressing pistol compatibility, specifically noting it is not for sub-compact models.
6. Operating Instructions
The device features ambidextrous buttons for easy access to all functions. The buttons are located on both sides of the unit.

Image: Overview of the multiple tactical modes available.
Mode Selection:
- Flashlight (Steady): Single-press the Light On/Off switch to turn the flashlight on or off.
- Flashlight (Strobe): Double-press the Light On/Off switch to activate the strobe function. Double-press again to return to steady mode or single-press to turn off.
- Laser: Single-press the Laser On/Off switch to turn the blue laser on or off.
- Laser (Strobe): Double-press the Laser On/Off switch to activate the laser strobe function. Double-press again to return to steady laser mode or single-press to turn off.
- Light & Laser Combo: Activate both the flashlight and laser independently to use them simultaneously.
- Momentary On: Press and hold either the Light or Laser switch for momentary activation. Release to turn off.
Video: Shows the blue laser and white LED flashlight in action, including the strobe function.
7. Laser Adjustment (Zeroing)
To ensure accuracy, the laser can be adjusted for both windage (horizontal) and elevation (vertical) using the provided adjustment tools.

Image: Instructions for vertical and horizontal laser adjustments.
Adjustment Procedure:
- Mount the device securely to your pistol.
- Turn on the laser.
- Using the smaller hex wrench, carefully turn the Horizontal Adjustment screw (located on the side) to move the laser dot left or right until it aligns with your point of aim.
- Using the smaller hex wrench, carefully turn the Vertical Adjustment screw (located on the top) to move the laser dot up or down until it aligns with your point of aim.
- Test the zeroing at a safe range and make further fine adjustments as needed.
8. Charging the Device
The Solofish Pistol Light Laser Combo features a rechargeable Lithium Polymer battery. Use the included USB-C charging cable and a 5V power source for optimal charging. Fast chargers and cables may not be compatible.
Image: Location of the charging port and indicator.
Charging Procedure:
- Locate the USB-C charging port on the device.
- Connect the included USB-C cable to the device and to a 5V power source (e.g., a computer USB port or a standard 5V wall adapter).
- The indicator light will show charging status. It will typically turn red while charging and green when fully charged.
- Once fully charged, disconnect the charging cable.
9. Maintenance
Proper maintenance will ensure the longevity and optimal performance of your device.
- Cleaning: Use a soft, dry cloth to clean the exterior of the device. Do not use abrasive cleaners or solvents. For the lens, use a lens cleaning cloth and solution.
- Storage: Store the device in a cool, dry place away from direct sunlight and extreme temperatures. Ensure the battery is charged periodically if stored for extended periods.
- Water Resistance: The device is waterproof. However, avoid prolonged submersion or exposure to high-pressure water jets.
10. Troubleshooting
If you encounter any issues with your Solofish Pistol Light Laser Combo, refer to the following common solutions:
- Device Not Turning On: Ensure the battery is fully charged. Connect the device to the charging cable and check the indicator light.
- Laser Not Visible/Weak: Check battery level. Ensure the laser emitter is clean and free from obstructions.
- Light Not Bright/Weak: Check battery level. Ensure the flashlight lens is clean.
- Device Loose on Rail: Re-tighten the rail screws using the provided adjustment tool.
- Laser Not Accurate: Perform the zeroing procedure as described in Section 7.
If the issue persists, please contact Solofish customer support for further assistance.
11. Specifications
| Feature | Detail |
|---|---|
| Model Number | SL-1091BL/RL |
| Light Output Maximum | 800 Lumens |
| Laser Output | <5mW, Class IIIA (Blue Laser) |
| Laser Beam Distance | 200 meters (day); 2000 meters (night) |
| Battery Type | Rechargeable Lithium Polymer (1 included) |
| Runtime (Laser Only) | Approx. 16 hours |
| Runtime (Flashlight Only) | Approx. 75 minutes |
| Runtime (Light & Laser) | Approx. 60 minutes |
| Material | Fiber-reinforced Polymer |
| Item Weight | 60 Grams |
| Item Dimensions (L x W x H) | 2.35"L x 1.15"W x 1.8"H |
| Water Resistance Level | Waterproof |
| Mounting Type | Compatible with Picatinny (21±0.5mm width rail required) |

Image: Dimensions and key performance specifications.
12. Warranty and Support
The Solofish 800 Lumens Adjustable Pistol Light Laser Combo comes with a 1-year limited warranty from the manufacturer. For warranty claims, technical support, or any product-related inquiries, please contact Solofish customer service through the retailer where the product was purchased or visit the official Solofish website for contact information.


