
Introduction
This manual provides detailed instructions for the installation, operation, and maintenance of your WOSTOKE Tesla Style 12.1" IPS Touchscreen Headunit. This device is designed to enhance your driving experience with features like CarPlay, Android Auto, GPS navigation, and multimedia playback. Please read this manual thoroughly before installation and use to ensure proper function and safety.
Safety Information
- Always ensure the vehicle is parked safely before operating the headunit's advanced features.
- Do not attempt to install or repair the unit if you are not qualified. Improper installation can lead to damage to the unit or vehicle, and may void the warranty. Professional installation is recommended.
- Keep the screen clean and free from obstructions to maintain clear visibility.
- Avoid exposing the unit to extreme temperatures, direct sunlight for prolonged periods, or excessive moisture.
- Ensure all cables are securely connected and routed to prevent interference with vehicle controls or passenger movement.
Package Contents
Verify that all items listed below are included in your package. If any items are missing or damaged, please contact customer support.
- 1x WOSTOKE Tesla Style 12.1" Headunit
- 1x GPS Antenna
- 1x Power Cable
- 2x USB Port Cables
- 1x RCA Expand Cable
- 1x RCA Connector for Reverse Camera
- 1x Install Kit
- 1x External Microphone
- 1x AHD 720 Reverse Camera

Compatibility and Pre-Installation Check
This headunit is specifically designed for Toyota Highlander models from 2008 to 2013. Before proceeding with installation, it is crucial to verify your vehicle's original radio matches the compatible configurations shown below. Important: If your vehicle has a JBL audio system (indicated by a JBL logo anywhere in your car), this unit is NOT compatible.

Setup and Installation
Installation of this headunit requires technical knowledge and experience with car electronics. It is highly recommended to seek professional assistance for installation to prevent damage to the unit or your vehicle's electrical system.
General Installation Steps (Professional Installation Recommended):
- Disconnect Battery: Before starting, disconnect the vehicle's negative battery terminal to prevent electrical shorts.
- Remove OEM Radio: Carefully remove the existing factory radio and trim panels. Refer to your vehicle's service manual for specific instructions.
- Connect Wiring Harness: Connect the provided power cable and other wiring harnesses to the vehicle's existing connectors. Ensure all connections are secure.
- Install GPS Antenna: Mount the GPS antenna in a location with a clear view of the sky, typically on the dashboard or under the windshield.
- Connect USB Cables: Route the USB cables to a convenient location, such as the glove compartment or center console.
- Install Reverse Camera (Optional): If installing the reverse camera, route its cable from the rear of the vehicle to the headunit and connect it to the RCA connector.
- Mount Headunit: Secure the WOSTOKE headunit into the dashboard opening.
- Reconnect Battery: Reconnect the vehicle's negative battery terminal.
- Test Functionality: Turn on the vehicle and test all functions of the headunit, including audio, navigation, CarPlay/Android Auto, and reverse camera.


Operating Instructions
1. CarPlay and Android Auto
The headunit supports both Apple CarPlay and Android Auto for seamless smartphone integration. Wireless CarPlay is available for iOS devices, while Android Auto typically requires a wired connection. Mirror Link functionality is also supported.
- Connecting: Connect your smartphone via USB cable or Bluetooth (for wireless CarPlay). Follow the on-screen prompts to establish the connection.
- Voice Assistant: Utilize voice commands (Siri for CarPlay, Google Assistant for Android Auto) to navigate, play music, make calls, and send messages, minimizing driver distraction.

2. GPS Navigation and Wi-Fi
The unit features built-in GPS for navigation and supports online and offline maps. Connect to a Wi-Fi hotspot to access online maps, download apps, and browse the internet.
- Navigation: Access pre-installed navigation apps or download your preferred ones from the app store.
- Wi-Fi Connection: Go to Settings > Network & Internet > Wi-Fi to connect to an available network.

3. Multimedia (Music & Radio)
Enjoy your favorite music and radio stations through the headunit. The system supports multiple audio formats and features a multi-band equalizer for sound customization.
- Music Playback: Play music from USB drives, Bluetooth-connected devices, or streaming apps.
- Radio: Tune into FM radio stations.
- Equalizer: Adjust audio settings to your preference using the built-in equalizer.

4. Steering Wheel Control (SWC)
The headunit supports integration with your vehicle's existing steering wheel controls, allowing you to manage audio, calls, and other functions without taking your hands off the wheel.
- Configuration: Access the SWC settings in the headunit's menu to map your steering wheel buttons to specific functions.

5. Rear View Camera
The included AHD 720 reverse camera provides a clear view of the area behind your vehicle when reversing, enhancing safety and ease of parking.
- Automatic Display: The camera feed will automatically display on the headunit screen when the vehicle is shifted into reverse gear.

Maintenance
- Screen Cleaning: Use a soft, lint-free cloth to clean the touchscreen. For stubborn smudges, dampen the cloth slightly with water or a screen-safe cleaner. Avoid harsh chemicals.
- Software Updates: Periodically check for software updates to ensure optimal performance and access to new features. Updates can typically be found through the system settings or the manufacturer's website.
- Cable Connections: Occasionally check all cable connections to ensure they remain secure and free from damage.
- Environmental Care: Protect the unit from extreme heat, cold, and direct prolonged sunlight.
Troubleshooting
If you encounter issues with your headunit, refer to the following common troubleshooting steps:
- No Power: Check all power cable connections. Ensure the vehicle's battery is charged. Verify fuses are intact.
- No Sound: Check speaker connections. Ensure volume is not muted or set to zero. Verify audio output settings.
- Touchscreen Unresponsive: Try restarting the unit. If the issue persists, a factory reset might be necessary (note: this will erase all user data).
- GPS Signal Lost: Ensure the GPS antenna has a clear view of the sky. Check antenna connection.
- CarPlay/Android Auto Not Connecting: Ensure your phone's operating system is up to date. Try a different USB cable. Restart both the headunit and your phone.
- Reverse Camera Not Displaying: Check the camera's power and video signal connections. Ensure the vehicle is properly in reverse gear.
For persistent issues or problems not covered here, please contact WOSTOKE customer support.
Specifications
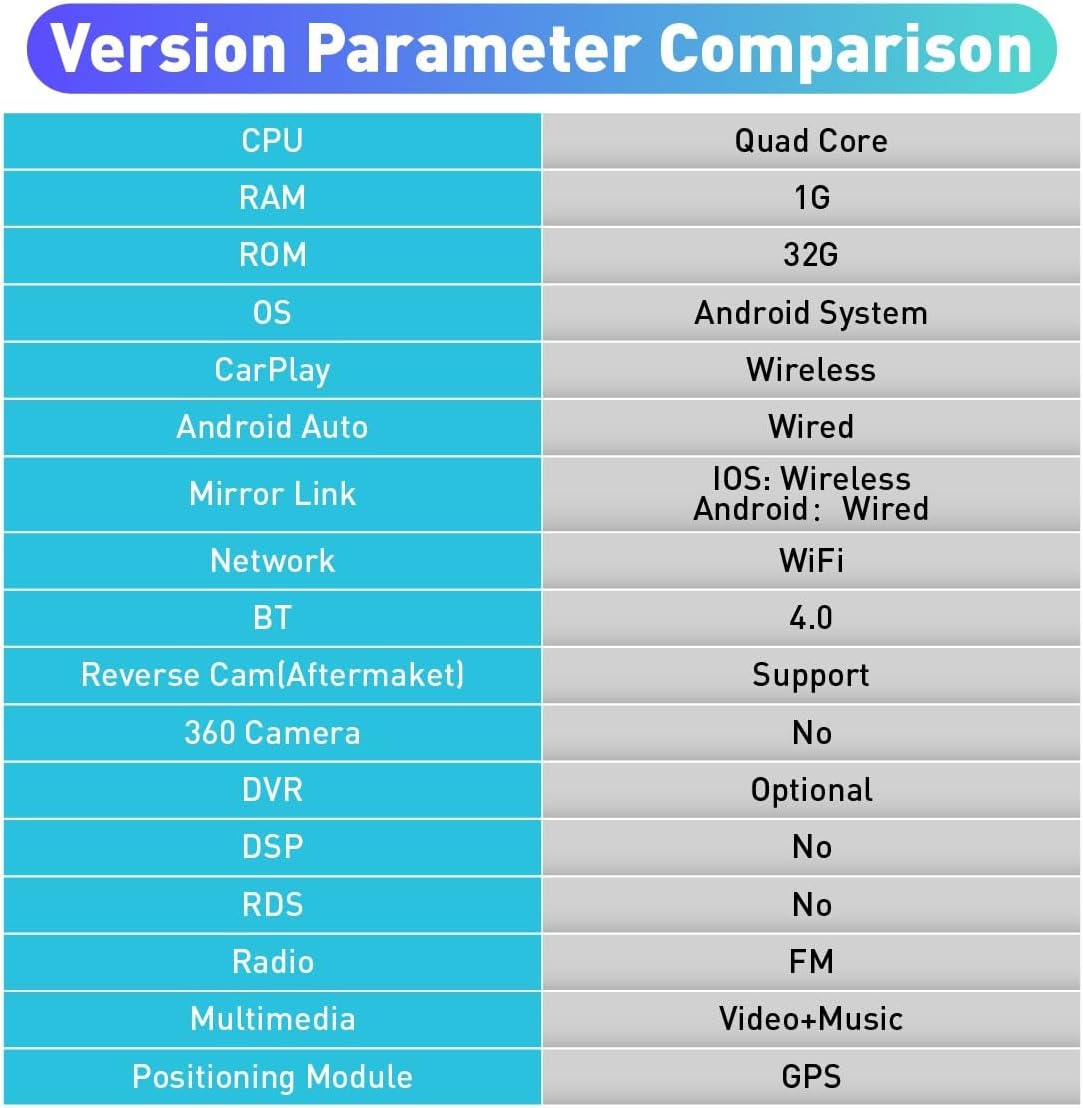
Below are the key technical specifications for the WOSTOKE Tesla Style 12.1" IPS Touchscreen Headunit:
| Feature | Specification |
|---|---|
| CPU | Quad Core |
| RAM | 1G |
| ROM | 32G |
| Operating System | Android |
| CarPlay | Wireless |
| Android Auto | Wired |
| Mirror Link | iOS: Wireless, Android: Wired |
| Network | Wi-Fi |
| Bluetooth | 4.0 |
| Reverse Camera (Aftermarket) | Support |
| 360 Camera | No |
| DVR | Optional |
| DSP | No |
| RDS | No |
| Radio | FM |
| Multimedia | Video + Music |
| Positioning Module | GPS |
| Screen Size | 12.1 Inches |
| Display Type | IPS LCD |
| Touch Screen Type | Capacitive |
Warranty and Support
Your WOSTOKE headunit comes with a one-year warranty covering non-human damage. For any questions, technical assistance, or warranty claims, please contact WOSTOKE customer support. Your consultation is always welcomed.
For support, please refer to the contact information provided with your purchase or visit the official WOSTOKE website.