1. Important Safety Instructions
Please read all instructions carefully before operating the machine. Retain this manual for future reference.
- Always connect the machine to a grounded power outlet with the correct voltage (950W).
- Do not immerse the machine, power cord, or plug in water or other liquids.
- Ensure adequate ventilation around the machine. Do not block air vents.
- Keep hands and utensils out of the tanks during operation to prevent injury.
- Unplug the machine before cleaning or performing any maintenance.
- This appliance is for commercial use only.
- Do not operate the machine with a damaged cord or plug. Contact customer support for repairs.
- Keep children away from the machine during operation.
2. Product Overview
The TECSPACE Commercial Slushie Machine is designed for efficient preparation of frozen beverages in commercial settings. It features two 12-liter tanks, a 950W motor, and a robust 304 stainless steel construction.

Image: The TECSPACE Commercial Slushie Machine with two tanks, shown in a kitchen environment, ready to prepare cold drinks.
Key Features:
- Food-Grade Materials: Constructed from 304 stainless steel and food-grade PC containers for safety and durability.
- Dual 12L Tanks: Two independent 12-liter (6.4 gallon total) tanks allow for simultaneous preparation of different beverages.
- Efficient Cooling: Features a professional Embraco compressor and copper condenser for rapid and consistent cooling, maintaining temperatures between -1℃ and -3℃ (26.6-30.2℉).
- Intelligent Control Panel: Digital display for temperature, independent controls for each tank, and settings for mixing, lighting, and operating modes (Cold Drink/Slush).
- 360° Mixing: Dual-screw design stirrers ensure thorough and consistent mixing of ingredients.
- User-Friendly Design: Includes separate lid openings, easy-flow spouts, and a detachable drip tray for convenience and easy cleaning.

Image: A detailed view highlighting the food-grade PC cylinders and the robust stainless steel body construction of the machine.
3. Setup
3.1 Unpacking
- Carefully remove the machine from its packaging.
- Inspect the machine for any signs of damage during transit. Report any damage to your supplier immediately.
- Remove all packing materials, including any protective films or tapes.
3.2 Placement
- Place the machine on a stable, level, and sturdy surface capable of supporting its weight when full.
- Ensure there is adequate space (at least 20 cm or 8 inches) around all sides of the machine for proper air circulation and heat dissipation. Do not place it against a wall or in an enclosed space.
- Avoid placing the machine in direct sunlight or near heat sources.
3.3 Initial Cleaning
Before first use, thoroughly clean all parts that will come into contact with beverages.
- Remove the tank lids, stirrers, and dispensing spouts.
- Wash these components with warm, soapy water. Rinse thoroughly and dry completely.
- Wipe down the exterior of the machine with a damp cloth.
- Reassemble all parts correctly.
3.4 Power Connection
- Ensure the power switch is in the 'OFF' position before plugging in.
- Connect the power cord to a grounded electrical outlet that matches the machine's voltage and power requirements.
- Important: After receiving the machine, allow it to stand upright for at least 24 hours before initial use to allow the refrigerant to settle.
4. Operating Instructions
4.1 Control Panel Overview

Image: The intelligent control panel, showing digital temperature displays for each tank, and buttons for mixing, cold drink mode, slush mode, lighting, and temperature adjustment.
- Digital Temperature Display: Shows the current temperature of each tank.
- Left/Right Mixing Buttons: Activates or deactivates the stirrer for the respective tank.
- Cold Drink Button: Sets the tank to a colder temperature for liquid beverages.
- Slush Button: Sets the tank to a freezing temperature for slush consistency.
- SET Button: Used to enter temperature adjustment mode.
- SUBTRACT (-) / ADD (+) Buttons: Adjusts temperature settings.
- Lighting Button: Controls the internal tank lighting.
4.2 Filling the Tanks
- Ensure the machine is plugged in and the power switch is ON.
- Lift the lid of the desired tank.
- Pour your prepared beverage mixture into the tank. Do not exceed the maximum fill line.
- Close the lid securely.
4.3 Selecting Operation Mode
- For slush beverages, press the 'Slush' button for the corresponding tank. The machine will begin the freezing process. Preparation time is typically 45-55 minutes.
- For cold liquid beverages, press the 'Cold Drink' button. The machine will cool the liquid to the set temperature.
- Press the 'Mixing' button to activate the stirrer for continuous mixing.
- Use the 'SET' and '+/-' buttons to adjust the desired temperature if needed. The recommended temperature range for cold beverages is -1℃ to -3℃ (26.6-30.2℉).
4.4 Dispensing Beverages
- Place a cup or container under the dispensing spout.
- Pull the dispensing handle towards you to release the beverage.
- Push the handle back to stop the flow.
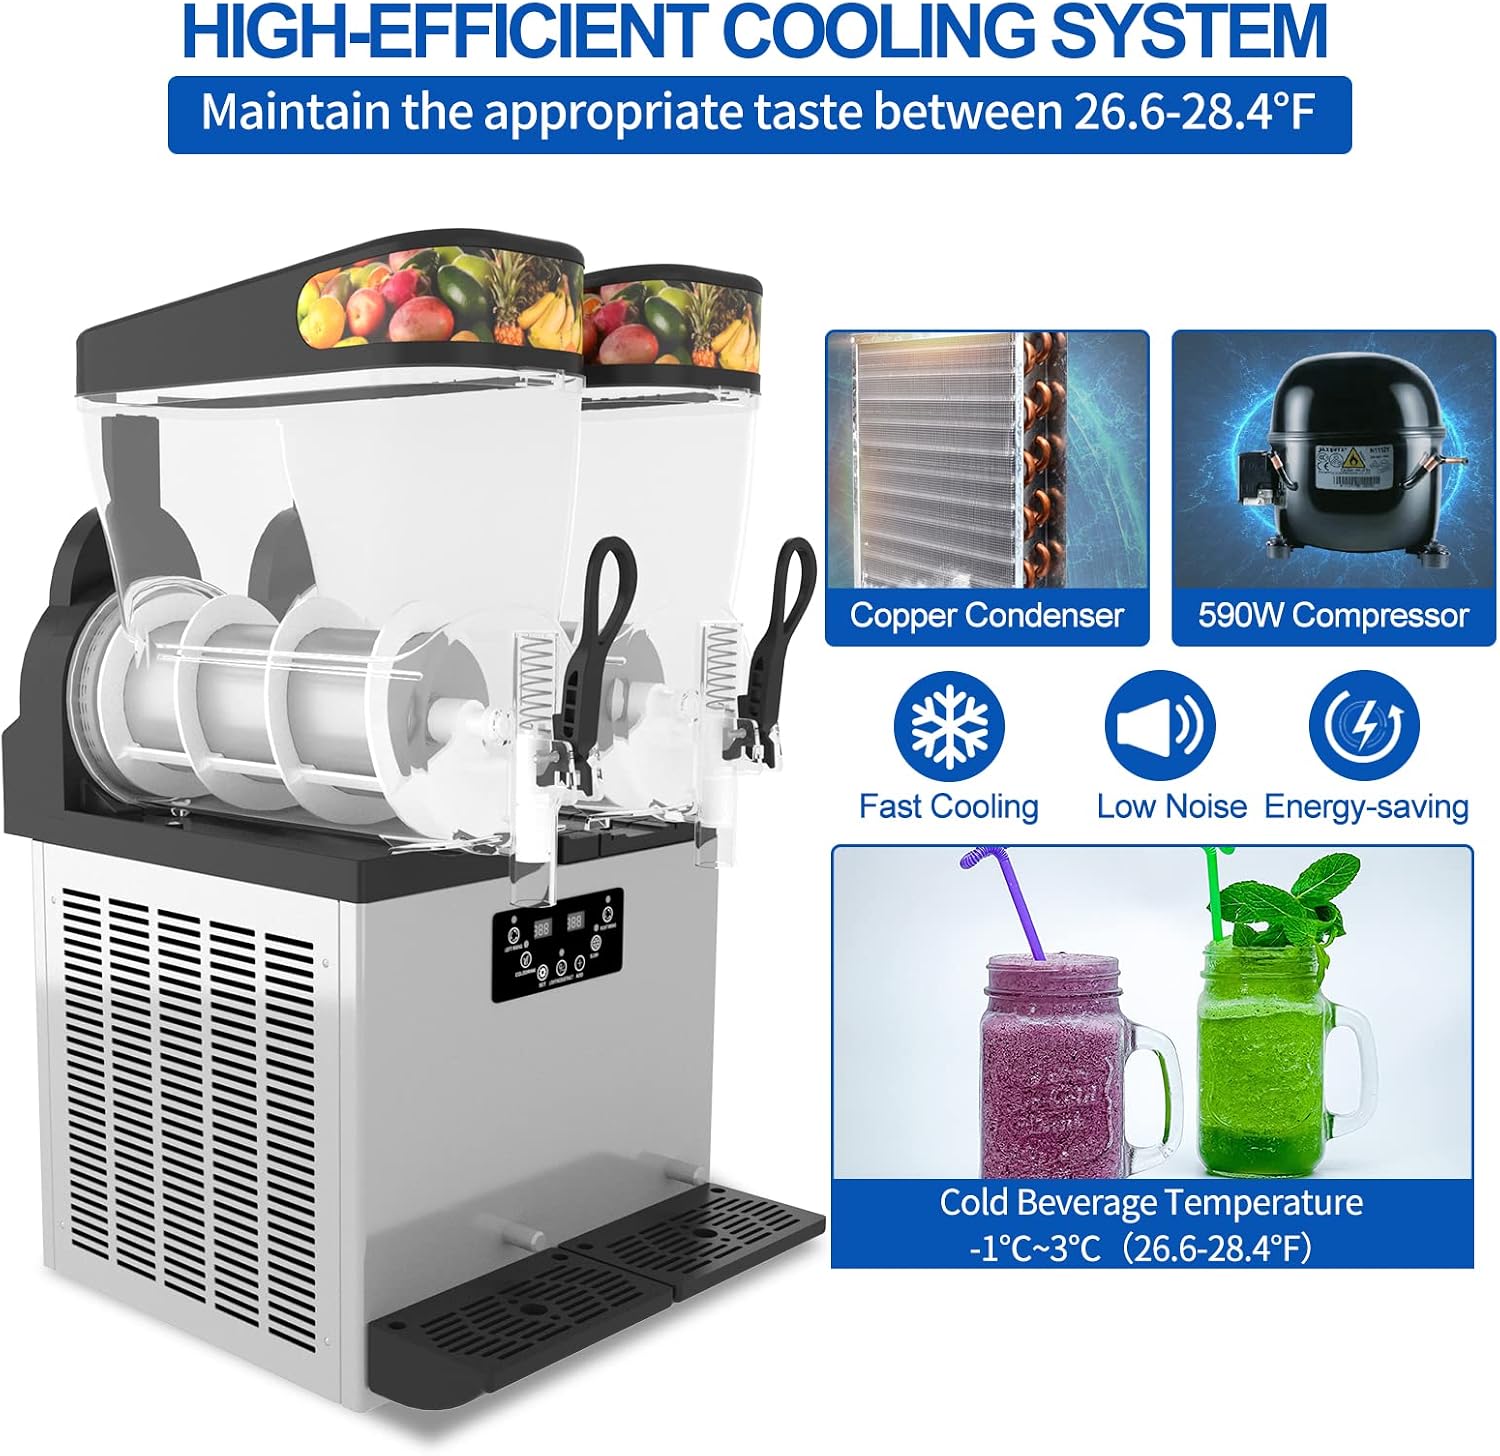
Image: An internal view of the slushie machine, illustrating the high-efficient cooling system with its copper condenser and compressor, designed to maintain optimal beverage temperature.
5. Maintenance and Cleaning
Regular cleaning and maintenance are essential to ensure the longevity and hygienic operation of your slushie machine.
5.1 Daily Cleaning
- Turn off and unplug the machine.
- Empty any remaining beverage from the tanks.
- Remove the tank lids, stirrers, and dispensing spouts.
- Wash all removable parts with warm, soapy water. Rinse thoroughly and allow to air dry.
- Wipe the inside of the tanks with a damp cloth, then dry.
- Clean the exterior of the machine and the drip tray with a damp cloth. The drip tray is detachable for easy cleanup.
- Reassemble all parts once dry.
5.2 Periodic Maintenance
- Regularly check the air vents on the sides and back of the machine for dust or debris. Clean them using a soft brush or vacuum cleaner to ensure proper airflow and cooling efficiency.
- Inspect the power cord for any signs of damage. If damaged, contact a qualified technician for replacement.
- Ensure all seals and gaskets are intact and free from cracks to prevent leaks.
6. Troubleshooting
If you encounter any issues with your TECSPACE Commercial Slushie Machine, refer to the following common problems and solutions.
| Problem | Possible Cause | Solution |
|---|---|---|
| Machine does not turn on | No power supply; Power cord not plugged in; Power switch off | Check power outlet; Ensure cord is securely plugged in; Turn power switch ON |
| Beverage not freezing/cooling | Slush/Cold Drink mode not selected; Insufficient ventilation; Ambient temperature too high; Refrigerant issue | Select correct mode; Ensure proper clearance around machine; Move to cooler area; Contact customer support |
| Stirrer not rotating | Mixing button off; Stirrer jammed; Motor fault | Press mixing button; Check for obstructions and clean; Contact customer support |
| Leaking from spout/tank | Spout not properly seated; Gasket damaged; Tank not correctly installed | Re-seat spout; Inspect and replace gasket if damaged; Ensure tank is correctly positioned |
| Unusual noise | Machine not level; Internal component issue | Ensure machine is on a level surface; Contact customer support |
If the problem persists after attempting these solutions, please contact TECSPACE customer support for further assistance.
7. Specifications

Image: The slushie machine displaying its approximate dimensions (Height: 824mm, Depth: 550mm, Width: 414mm) and examples of suitable commercial applications.
| Feature | Detail |
|---|---|
| Brand | TECSPACE |
| Model | 12Lx2 (950W) |
| Capacity | 2 x 12 Liters (24 Liters total) |
| Rated Power | 950W |
| Material | 304 Stainless Steel, Food-grade PC |
| Compressor | Embraco |
| Cold Beverage Temperature | -1℃ ~ -3℃ (26.6-30.2℉) |
| Preparation Time | 45-55 minutes (for slush) |
| Operation Mode | Automatic |
| Product Care Instructions | Hand Wash (removable parts) |
| Dimensions (Approx.) | Height: 824mm, Depth: 550mm, Width: 414mm |
| ASIN | B0BTQ4XG89 |
| UPC | 758971401226 |
8. Warranty and Support
TECSPACE products are manufactured to high-quality standards. For warranty information or technical support, please contact TECSPACE directly.
If you have any problems in using the machine, please contact our customer service team. We are committed to providing satisfactory solutions.
Please have your model number (12Lx2 (950W)) and ASIN (B0BTQ4XG89) ready when contacting support.