Masko 1
MASKO® High-Pressure Washer
Model: 1
User Manual
1. Introduction
Thank you for choosing the MASKO® High-Pressure Washer. This powerful 2200 Watt unit delivers a maximum pressure of 165 bar and a flow rate of 450 liters per hour, making it ideal for a wide range of cleaning tasks. This manual provides essential information for the safe and efficient operation, maintenance, and troubleshooting of your new high-pressure washer. Please read it thoroughly before first use and keep it for future reference.
2. Safety Information
Always observe basic safety precautions when using electrical appliances to reduce the risk of fire, electric shock, and personal injury.
- Ensure the power supply matches the voltage specified on the product label.
- Do not operate the pressure washer if the power cord or plug is damaged.
- Keep children and pets away from the operating area.
- Always wear appropriate personal protective equipment, including eye protection.
- Never direct the water jet at people, animals, or electrical equipment.
- The unit is equipped with a child safety lock to prevent accidental activation. Always engage the child safety lock when the unit is not in use or unattended.

Image: Child Safety Lock and Adjustable Nozzle. The child safety lock prevents unintended operation. The nozzle allows for various spray patterns from maximum pressure to a pinpoint stream.
3. Product Overview and Components
Your MASKO® High-Pressure Washer comes with a comprehensive set of accessories designed for various cleaning tasks.

Image: Complete MASKO® High-Pressure Washer System with Accessories. This image displays the main unit, hose reel, spray gun, soap bottle, various nozzles, and cleaning brushes.
Key Components:
- Main Unit: Houses the motor, pump, and hose reel.
- High-Pressure Hose: 10-meter hose for extended reach.
- Power Cable: 5-meter cable for electrical connection.
- High-Pressure Gun: Ergonomic handle with trigger and safety lock.
- Adjustable Nozzles: For varying spray patterns (maximum, medium, minimum, pinpoint).
- Soap Bottle/Foam Sprayer: For applying cleaning detergents.
- Wash Brushes: Includes a general wash brush and a car wash brush for gentle cleaning.
- Pipe Cleaning Hose: Specialized hose for clearing clogged pipes.
- Surface Cleaner Attachment: For efficient cleaning of large flat surfaces like patios.
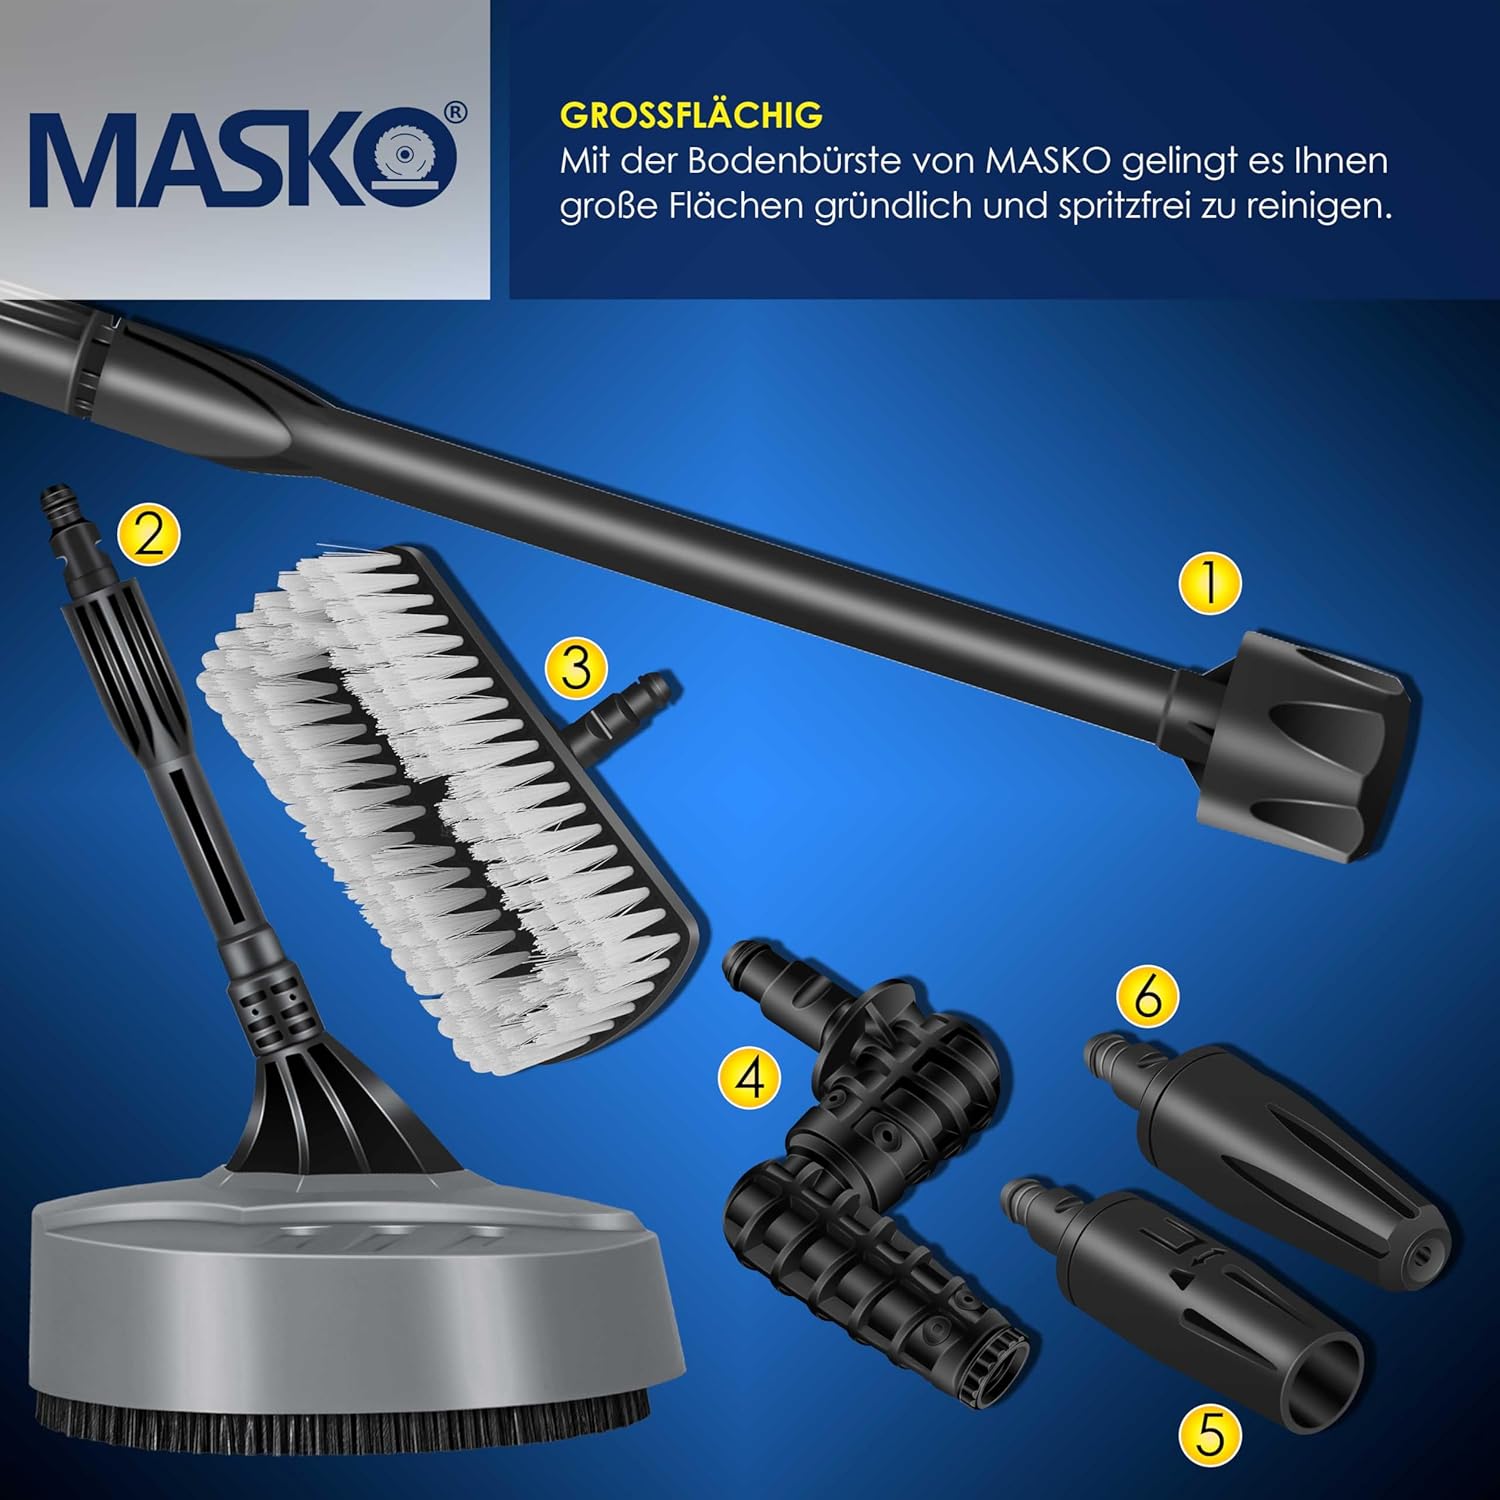
Image: Accessory Diagram. This diagram illustrates the various attachments included, such as the pressure gun, wash brushes, soap dispenser, different nozzles, pipe cleaning hose, and car wash brush.
4. Setup
Follow these steps to assemble and prepare your high-pressure washer for use:
- Unpacking: Carefully remove all components from the packaging. Check for any damage or missing parts.
- Handle Assembly: Attach the handle to the main unit. Ensure it clicks securely into place.
- Hose Reel: The 10-meter high-pressure hose is pre-installed on the integrated hose reel. Unwind the necessary length for your task.
- Water Connection: Connect a garden hose (not included) to the water inlet on the pressure washer. Ensure the water supply is clean and free of debris. Turn on the water supply fully.
- Attach High-Pressure Gun: Connect the high-pressure hose to the high-pressure gun. Ensure a secure, leak-free connection.
- Select Nozzle/Accessory: Choose the appropriate nozzle or accessory for your cleaning task and attach it to the high-pressure gun. The quick-connect system allows for fast and easy changes.
- Power Connection: Plug the 5-meter power cable into a grounded electrical outlet.
With the 10-meter high-pressure hose and 5-meter power cable, the unit provides an impressive total working radius of 30 meters, allowing you to reach distant areas without repositioning the main unit.

Image: Extended Reach. The 10-meter hose and 5-meter power cable provide a total working radius of 30 meters.
5. Operating Instructions
Once assembled and connected, you can begin operating your pressure washer.
- Priming the Pump: Before turning on the power, squeeze the trigger on the high-pressure gun to allow water to flow through the system and expel any air. Continue until a steady stream of water emerges.
- Power On: Switch on the pressure washer. The motor will start, and the pump will build pressure.
- Begin Cleaning: Direct the nozzle towards the surface to be cleaned, maintaining a safe distance. Squeeze the trigger to activate the high-pressure jet.
- Adjusting Spray: Use the adjustable nozzle to change the spray pattern from a concentrated pinpoint stream for stubborn dirt to a wide fan spray for general cleaning.
- Using Detergent (Soap Bottle): Fill the soap bottle with appropriate pressure washer detergent. Attach it to the high-pressure gun. The unit will automatically mix the detergent with water at low pressure. Apply detergent to the surface, allow it to soak, then rinse with a high-pressure jet.
- Using Brushes: Attach the desired wash brush for gentle cleaning of sensitive surfaces like vehicles or outdoor furniture.
- Pipe Cleaning: For clogged pipes, attach the pipe cleaning hose. Carefully insert it into the pipe and activate the water flow.
- Power Off: When finished, release the trigger, switch off the pressure washer, and turn off the water supply. Squeeze the trigger again to release any remaining pressure in the system before disconnecting hoses.

Image: Versatile Applications. The pressure washer is suitable for cleaning terraces, barbecues, pipes, various surfaces like tiles, metal, stone, wood, furniture, and cars with the foam sprayer.
6. Maintenance
Regular maintenance ensures the longevity and optimal performance of your pressure washer.
- Cleaning: After each use, wipe down the exterior of the unit with a damp cloth.
- Nozzle Cleaning: If the nozzle becomes clogged, use the included nozzle cleaning tool (if applicable) or a thin wire to clear any obstructions.
- Water Filter: Periodically check and clean the water inlet filter to prevent debris from entering the pump.
- Hose and Cable Inspection: Regularly inspect the high-pressure hose and power cable for any signs of wear, cuts, or damage. Replace immediately if damaged.
- Storage: Store the pressure washer in a dry, frost-free environment. Drain all water from the pump, hose, and accessories before storing to prevent freezing damage.
7. Troubleshooting
If you encounter issues with your pressure washer, refer to the following common problems and solutions:
| Problem | Possible Cause | Solution |
|---|---|---|
| No pressure or low pressure | Insufficient water supply, air in the pump, clogged nozzle, kinked hose. | Ensure water supply is fully open. Prime the pump. Clean the nozzle. Straighten the hose. |
| Motor stops or fails to start | Overheating, power supply issue, tripped circuit breaker. | Allow unit to cool down. Check power connection and circuit breaker. |
| Water leaks | Loose connections, damaged O-rings or seals. | Tighten all connections. Inspect and replace damaged O-rings or seals. |
| Pulsating pressure | Air in the pump, restricted water flow, worn valves. | Prime the pump. Check water inlet filter for clogs. Contact customer support if problem persists. |
8. Specifications
Detailed technical specifications for your MASKO® High-Pressure Washer:
- Model: 1
- Power: 2200 Watt
- Max Pressure: 165 Bar
- Max Flow Rate: 450 Liters/hour
- Hose Length: 10 Meters
- Power Cable Length: 5 Meters
- Dimensions (L x W x H): 37 cm x 43.5 cm x 132 cm
- Weight: 14.5 kg
- Water Temperature Range: 5°C - 50°C
- Ingress Protection (IP) Rating: IPX5 (Protected against low-pressure water jets from any direction)

Image: Product Specifications. This image visually summarizes the key technical data of the pressure washer.
9. Warranty and Support
Your MASKO® High-Pressure Washer is covered by a manufacturer's warranty. Please refer to the warranty card included with your purchase for specific terms and conditions. For technical support, spare parts, or warranty claims, please contact your retailer or the manufacturer's customer service department.
For further assistance, please visit our official website or contact our support team:
- Website: www.masko.com (Example link, replace with actual if available)
- Email: support@masko.com (Example email, replace with actual if available)
Ask a question about this manual
Ask about setup, troubleshooting, compatibility, parts, safety, or missing instructions. Manuals+ will review the question and use this page’s manual context to help answer it.