XLUX T10
XLUX Soil Moisture Meter User Manual
Model: T10
1. Introduction
The XLUX Soil Moisture Meter is an essential tool for any plant enthusiast, gardener, or farmer. It provides accurate, immediate readings of soil moisture levels, helping you prevent both overwatering and underwatering. This device operates without batteries, making it a reliable and low-maintenance solution for plant care.

Figure 1: XLUX Soil Moisture Meter and Packaging
2. Product Overview
The XLUX Soil Moisture Meter consists of a durable probe and an easy-to-read dial. The dial features a color-coded system to indicate moisture levels: DRY (red), MOIST (green), and WET (blue).
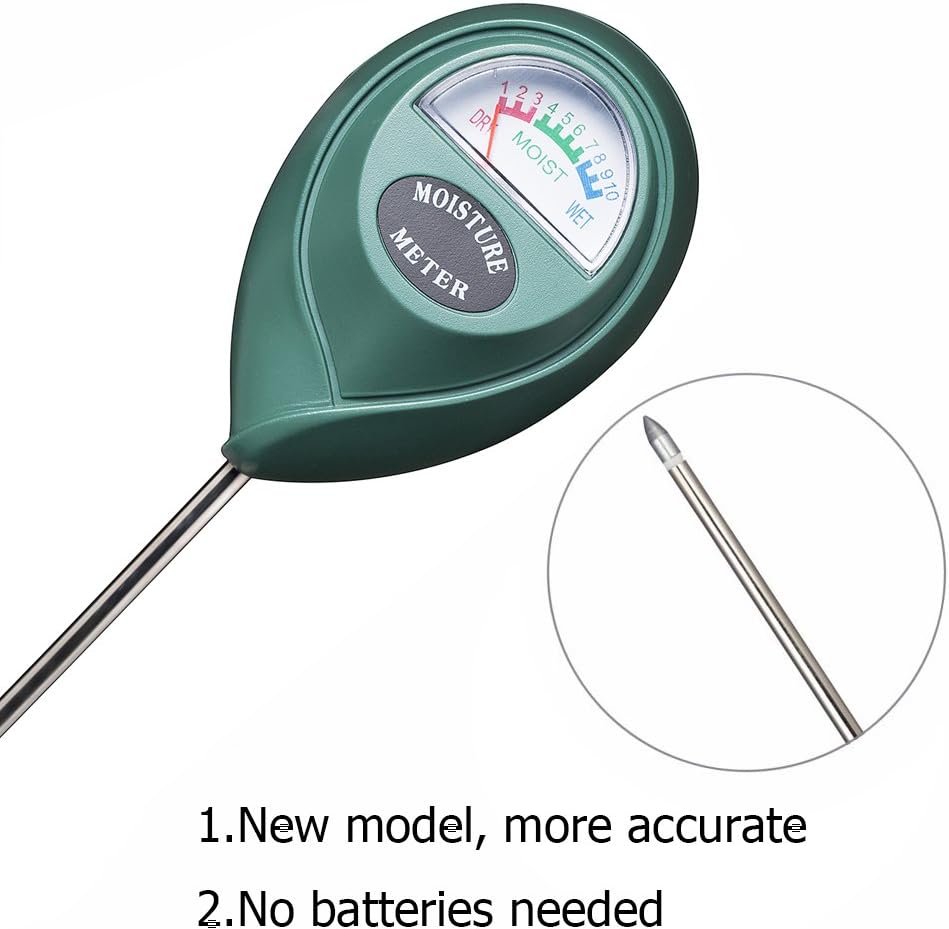
Figure 2: Close-up of Meter Dial and Probe Tip
3. Setup
The XLUX Soil Moisture Meter requires no assembly or batteries. It is ready for use directly out of the packaging.
4. Operating Instructions
Follow these simple steps to accurately measure soil moisture:
- Step 1: Insert the Probe: Gently insert the metal probe into the soil, approximately 2-5 inches deep, or about 2/3 of the probe's length. Ensure the probe is inserted into the root zone of the plant.
- Step 2: Adjust and Wait: Adjust the probe until the pointer on the dial swings slightly. The meter provides an immediate reading.
- Step 3: Read the Moisture Level: Observe the dial to determine the moisture level. The dial is divided into three zones: DRY (1-3), MOIST (4-7), and WET (8-10).
- Step 4: Remove and Clean: After taking the reading, remove the probe from the soil and wipe it clean with a cloth. Do not leave the meter in the soil for extended periods.

Figure 3: Step-by-Step Usage Guide


Figure 4: Inserting Probe and Instant Reading
5. Reading the Display
The large, easy-to-read dial provides clear moisture indications:
- DRY (Red Zone, 1-3): Indicates the soil is dry and the plant likely needs watering.
- MOIST (Green Zone, 4-7): Indicates the soil has adequate moisture. Most plants thrive in this range.
- WET (Blue Zone, 8-10): Indicates the soil is very wet. Avoid watering to prevent root rot.
6. Usage Precautions
To ensure the longevity and accuracy of your XLUX Soil Moisture Meter, please observe the following precautions:
- Do not use the meter to test water or other liquids directly. It is designed for soil moisture only.
- Avoid inserting the probe into very hard soil or striking rocks, as this can damage the probe tip.
- Do not leave the meter in the soil for more than 5 minutes after taking a reading, as prolonged exposure can lead to corrosion of the metal tip.
- The single-probe design minimizes damage to plant roots compared to multi-probe meters.

Figure 5: Important Usage Precautions
7. Maintenance
Proper maintenance will extend the life of your moisture meter:
- Always wipe the probe clean and dry after each use to prevent corrosion and ensure accurate future readings.
- Store the meter in a dry place when not in use.

Figure 6: Cleaning the Probe
8. Troubleshooting
If you encounter issues with your XLUX Soil Moisture Meter, refer to the table below:
| Problem | Possible Cause | Solution |
|---|---|---|
| Meter reading is consistently low or 'DRY' despite recent watering. | Probe not inserted deep enough; soil is too compacted; probe tip is dirty. | Ensure probe is inserted into the root zone (2-5 inches deep). Loosen compacted soil if necessary. Clean the probe tip thoroughly after each use. |
| Meter reading does not change or is stuck. | Probe not making good contact with soil; soil is extremely dry or hard; meter is damaged. | Re-insert the probe, ensuring it is firmly in the soil. If soil is too dry, water lightly and retest. If soil is too hard, do not force the probe. If issues persist after cleaning and proper insertion, the meter may be damaged. |
| Inconsistent readings. | Probe tip is not clean; air pockets in the soil; testing different spots. | Always clean the probe tip before each new test. Ensure the soil is settled around the probe. Test in multiple locations around the plant for a comprehensive understanding. |
9. Specifications
| Feature | Detail |
|---|---|
| Brand | XLUX |
| Model Number | T10 |
| Color | Green |
| Product Dimensions | 2.36"W x 10.24"H (6cm W x 26cm H) |
| Probe Length | Approx. 7 inches (17.5 cm) |
| Battery Requirement | No batteries required |
| Measurement Range | 1 (Dry) - 10 (Wet) |
| Item Weight | 2.46 ounces (approx. 70g) |
| Manufacturer | IAGtek |
| Country of Origin | China |

Figure 7: Product Dimensions
10. Warranty and Support
Specific warranty information for the XLUX Soil Moisture Meter is not provided in this manual. For details regarding warranty, returns, or technical support, please refer to the product packaging or contact XLUX customer service directly through their official website or the retailer from whom the product was purchased.
Related Documents - T10
 |
T10 3-in-1 Wireless Charger User Manual Comprehensive user manual for the T10 3-in-1 Wireless Charger, detailing setup, features, specifications, and warranty information for charging smartphones, smartwatches, and earphones. |
 |
Access Controller Use Manual V2.0 User manual for the Access Controller V2.0, detailing technical specifications, installation, programming, and operational guides for access control systems. |
 |
LSRGB-6SMD Colorful Auto Lamp Infrared Remote Control Guide Detailed information on the LSRGB-6SMD RGB LED car lamp and its 24-key infrared remote control, including static and dynamic modes, color selection, and technical specifications. |
 |
T10 Access Control System Specification and Programming Guide Detailed technical specifications, wiring diagram, and programming instructions for the T10 Access Control System, covering setup, user management, and factory reset procedures. |
 |
T10 Bluetooth Earphone Product Manual - Shenzhen Ruibochi Technology Co., Ltd Official product manual for the T10 Bluetooth Earphone by Shenzhen Ruibochi Technology Co., Ltd. This guide provides essential information on product features, safety warnings, installation instructions, compliance details, and disposal recommendations. |
 |
Eaton IQ Products Catalog: Power Management and Electrical Protection Solutions Comprehensive catalog detailing Eaton's IQ Products line, featuring power meters, protective relays, and accessories for electrical distribution systems. Includes product specifications, selection guides, and replacement information. |
Ask a question about this manual
Ask about setup, troubleshooting, compatibility, parts, safety, or missing instructions. Manuals+ will review the question and use this page’s manual context to help answer it.