Introduction
This manual provides comprehensive instructions for the installation, operation, maintenance, and troubleshooting of your CAMECHO Android 13 Car Stereo. Designed specifically for Audi A3 models from 2008 to 2012, this unit integrates advanced features such as wireless CarPlay, Android Auto, GPS navigation, Bluetooth connectivity, and a high-resolution touch screen to enhance your in-car entertainment and navigation experience.
Please read this manual thoroughly before installation and use to ensure proper functionality and to maximize the benefits of your new car stereo system.
Product Overview

Figure 1: CAMECHO Android 13 Car Stereo and included components.
This image displays the main unit of the CAMECHO Android 13 Car Stereo, featuring a 9-inch touch screen with various application icons. Below the main unit, the included accessories are shown: a Canbus decoding box, an external microphone, and a backup camera, highlighting the comprehensive package for installation and enhanced functionality.
The CAMECHO Android 13 Car Stereo is a double DIN unit featuring a 9-inch 1080P display. It operates on an Android 13 system with 2GB RAM and 64GB ROM, providing a smooth user experience. Key features include:
- Wireless/Wired CarPlay & Android Auto compatibility.
- Bluetooth for hands-free calling and music streaming.
- FM/RDS Radio with 18 preset stations.
- Integrated WIFI for internet access and app downloads.
- GPS Navigation with online and offline map support.
- Support for rear view camera input.
- Steering Wheel Control learning function.
- HiFi audio output and 15-band graphic equalizer settings.
- Split screen functionality for multi-tasking.
Setup and Installation
Proper installation is crucial for the optimal performance of your car stereo. It is recommended to have the installation performed by a qualified professional if you are not familiar with car audio system wiring.
Package Contents Verification
Before beginning installation, ensure all components are present as listed below:

Figure 2: Detailed view of all included product accessories.
This image illustrates the various cables and components included with the car stereo, such as the GPS antenna, rear camera input cable, multiple RCA cables, an installation tool, USB cables, the AHD rear camera, an external microphone, the main power cable, and the Canbus box. A user manual is also depicted.
- Main Head Unit (9-inch display)
- GPS Antenna
- Rear Camera Input Cable
- RCA Cables (multiple)
- Installation Tool
- USB Cables (2)
- AHD Rear Camera
- External Microphone
- Power Cable
- Canbus Box
- User Manual
Installation Steps
The installation process typically involves removing the original car stereo and connecting the new unit. Refer to the specific wiring diagram provided in the included user manual for your vehicle model.
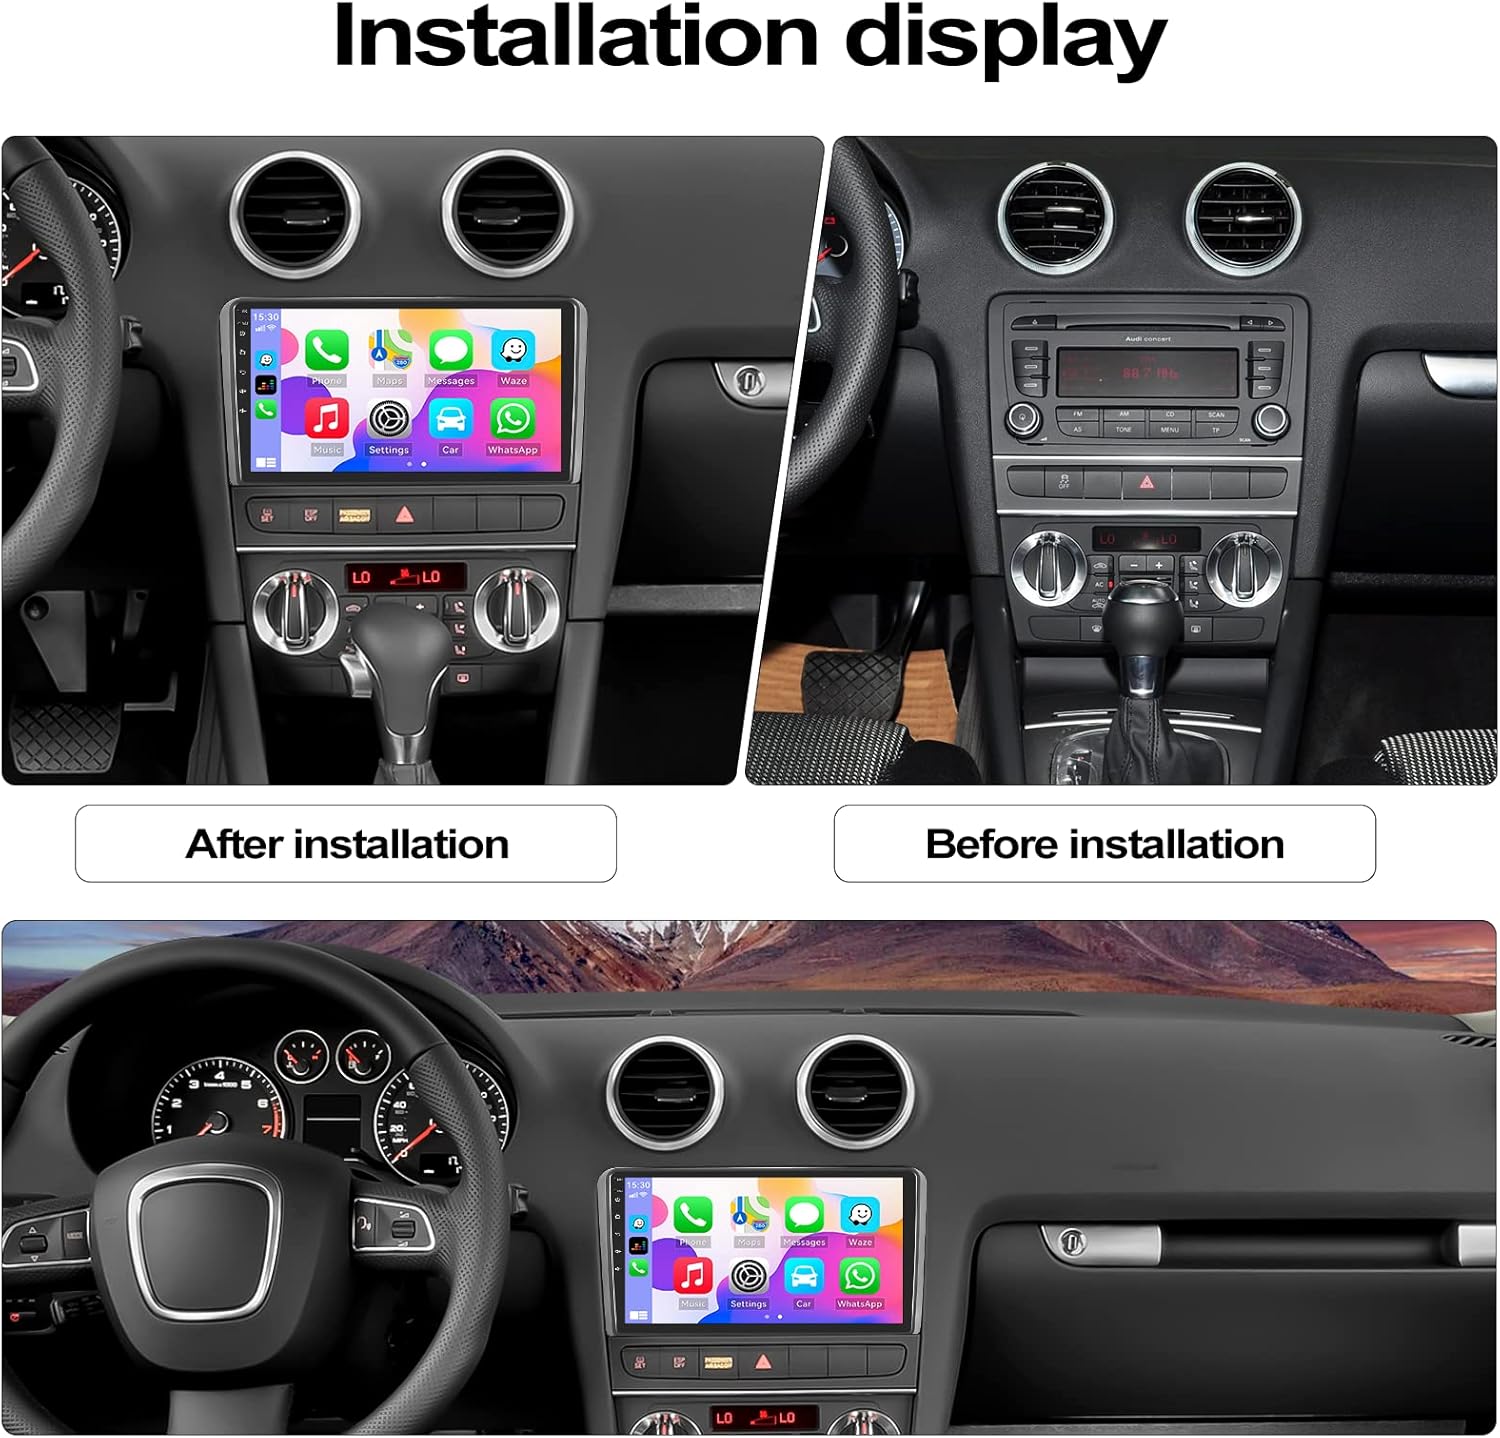
Figure 3: Visual comparison of the car dashboard before and after the stereo installation.
This image shows a split view of an Audi A3 dashboard. The left side displays the CAMECHO car stereo installed, while the right side shows the original car stereo setup. This visual aid helps users understand the appearance of the unit once installed in their vehicle.
- Disconnect Battery: Before starting, disconnect the negative terminal of your car battery to prevent electrical shorts.
- Remove Original Unit: Carefully remove the existing car stereo and trim panels.
- Connect Wiring Harness: Connect the provided power cable and Canbus box to your car's wiring harness. Ensure all connections are secure.
- Connect Peripherals: Connect the GPS antenna, USB cables, external microphone, and rear camera input cable to the corresponding ports on the new head unit.
- Test Functionality: Before fully reassembling, temporarily connect the battery and power on the unit to test basic functions like power, display, and sound.
- Secure Unit: Mount the new stereo securely into the dashboard.
- Reassemble: Reinstall all trim panels and reconnect the car battery.
Operating Instructions
Wireless/Wired CarPlay & Android Auto
This unit supports both wireless and wired connections for Apple CarPlay and Android Auto, allowing seamless integration with your smartphone for navigation, music, calls, and messages.
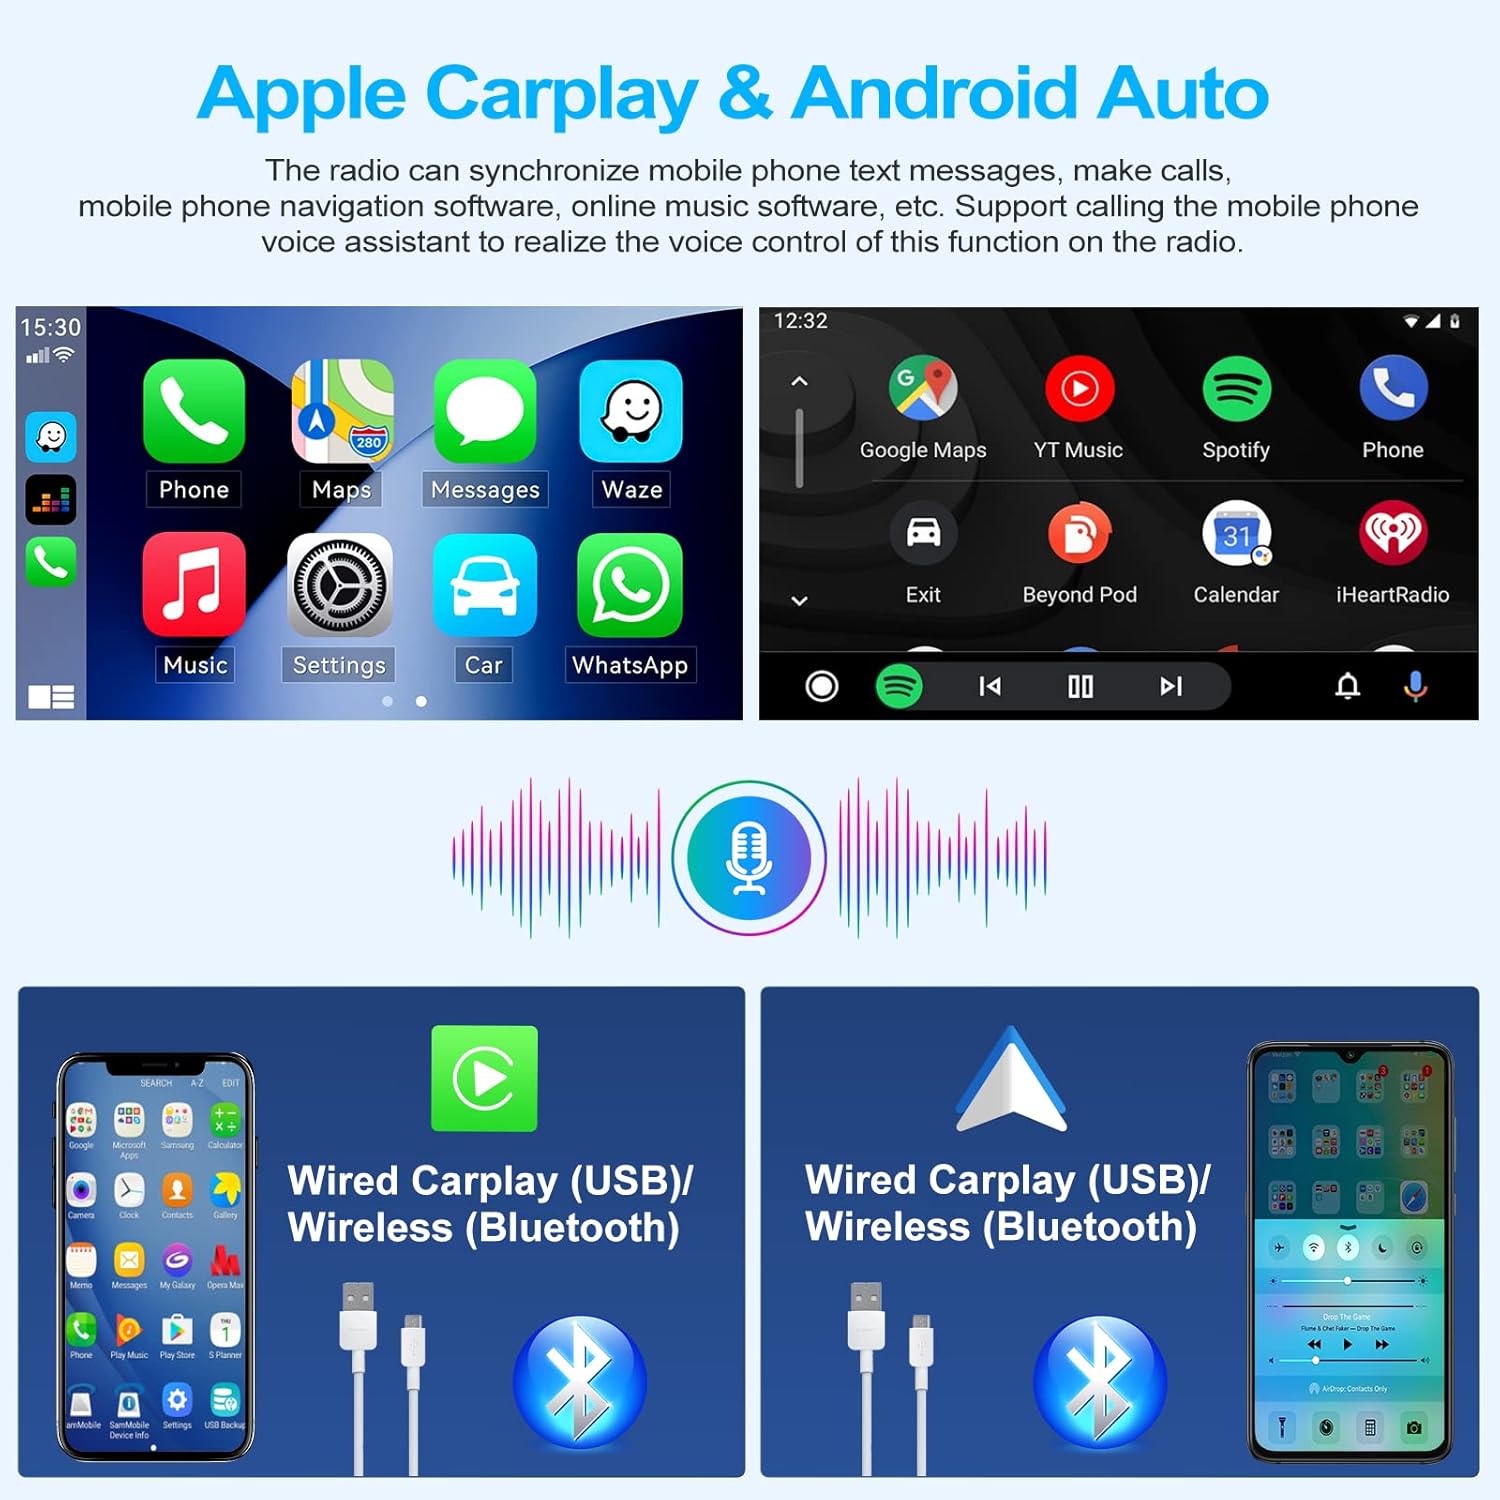
Figure 4: Apple CarPlay and Android Auto interfaces with connection methods.
This image displays the user interfaces for Apple CarPlay (left) and Android Auto (right) on the car stereo screen. It also illustrates the flexibility of connecting your smartphone via wired USB or wireless Bluetooth for both systems, enabling access to phone functions like navigation, music, and messaging.
- Wireless Connection: Enable Bluetooth and Wi-Fi on your smartphone. Pair your phone with the car stereo via Bluetooth. Once paired, the system will prompt you to activate CarPlay or Android Auto wirelessly.
- Wired Connection: Connect your smartphone to the stereo's USB port using a certified USB cable. The system will automatically detect and launch CarPlay or Android Auto.
- Voice Control: Utilize voice commands (Siri for CarPlay, Google Assistant for Android Auto) for hands-free operation.
GPS Navigation & WIFI Connection
The stereo comes with built-in GPS and supports online and offline navigation. Connect to Wi-Fi to download maps and access online services.

Figure 5: GPS Navigation and Wi-Fi Connectivity features.
This image showcases the GPS navigation interface, displaying a route on the car stereo screen. Below it, the Wi-Fi connection feature is highlighted, showing various social media and streaming application icons, indicating the ability to connect to the internet and download apps.
- GPS Navigation: Access the pre-installed navigation app or download your preferred map application from the Play Store.
- Wi-Fi Connection: Go to Settings > Network & Internet > Wi-Fi to connect to an available Wi-Fi network. This enables app downloads, online map updates, and internet browsing.
Bluetooth Function & FM/RDS Radio
Connect your phone via Bluetooth for hands-free calls and audio streaming. Enjoy high-quality FM radio with RDS support.

Figure 6: Bluetooth and FM/RDS Radio interfaces.
This image illustrates the Bluetooth functionality, showing a phone call interface and music playback via Bluetooth. It also displays the FM radio tuner screen, indicating frequency selection and preset options, along with a visual representation of sound waves.
- Bluetooth Pairing: Enable Bluetooth on your phone and the stereo. Search for the stereo's Bluetooth name (e.g., "CAMECHO BT") and pair.
- Hands-Free Calling: Once paired, you can make and receive calls directly from the stereo screen.
- Audio Streaming: Play music from your phone through the car speakers via Bluetooth.
- FM/RDS Radio: Access the Radio app to scan for stations. RDS (Radio Data System) provides station information and traffic announcements where available.
Rear View Camera & Steering Wheel Control
Enhance safety with the included rear view camera and maintain control with steering wheel button integration.

Figure 7: Rear View Camera and Steering Wheel Control features.
This image displays the display from the rear view camera, complete with parking guidelines, indicating its waterproof and night vision capabilities. Below, it illustrates the steering wheel control learning function, allowing users to map car steering wheel buttons to stereo functions for convenient and safe operation.
- Rear View Camera: When the vehicle is shifted into reverse gear, the stereo display will automatically switch to the rear camera view, providing a clear image with guidelines.
- Steering Wheel Control (SWC): Access the SWC learning function in the stereo settings. Follow the on-screen prompts to map your car's original steering wheel buttons to control stereo functions (e.g., volume, track skip, mode).
HiFi & EQ Settings and Split Screen
Customize your audio experience and multitask efficiently with split screen functionality.

Figure 8: Audio Playback, Video Playback, HiFi, and EQ Settings.
This image displays four quadrants: music playback interface, video playback interface, a visual representation of HiFi audio quality, and the equalizer (EQ) settings screen, allowing users to fine-tune their audio output.

Figure 9: Split Screen Functionality and Touch Screen Features.
This image demonstrates the split screen feature, showing navigation on one side and music playback on the other. It also highlights the responsive 2.5D touch screen, and illustrates the DVR (Digital Video Recorder) functionality, which can record driving footage.
- HiFi & EQ Settings: Navigate to the audio settings to adjust the 15-band graphic equalizer. Choose from preset modes (Pop, Rock, Jazz, Classical, Flat) or customize your own settings. Subwoofer output is also supported.
- Split Screen: This feature allows you to run two applications simultaneously on the screen, such as navigation and music playback. To activate, long-press the recent apps button or drag an app to one side of the screen.
Maintenance
To ensure the longevity and optimal performance of your CAMECHO car stereo, follow these general maintenance guidelines:
- Screen Cleaning: Use a soft, lint-free cloth slightly dampened with water or a screen cleaner specifically designed for electronic displays. Avoid abrasive cleaners or solvents.
- Dust Removal: Regularly wipe down the unit to prevent dust accumulation, especially around vents and buttons.
- Temperature Control: Avoid exposing the unit to extreme temperatures (very hot or very cold) for extended periods, as this can affect electronic components.
- Software Updates: Periodically check for software updates through the system settings or the manufacturer's website to ensure you have the latest features and bug fixes.
Troubleshooting
If you encounter issues with your car stereo, refer to the following common troubleshooting steps. If the problem persists, contact customer support.
| Problem | Possible Cause | Solution |
|---|---|---|
| Unit does not power on. | Loose power connection, blown fuse, car battery issue. | Check power cable connections. Inspect vehicle fuses. Ensure car battery is charged. |
| No sound or distorted audio. | Incorrect wiring, volume too low, EQ settings misconfigured, speaker issues. | Verify speaker wiring. Adjust volume. Reset EQ settings to default. Check speaker connections. |
| Bluetooth connection unstable or disconnects. | Interference, phone issues, stereo software glitch. | Restart both the stereo and your phone. Re-pair the Bluetooth connection. Ensure no other devices are interfering. |
| GPS signal weak or inaccurate. | GPS antenna obstruction or faulty, poor satellite reception. | Ensure GPS antenna is properly installed and has a clear view of the sky. Test in an open area. |
| Screen glare makes display unreadable. | Direct sunlight, high screen reflectivity. | Adjust screen brightness in settings. Try to adjust viewing angle if possible. Consider anti-glare screen protectors. |
| Battery drain when car is off. | Improper wiring (constant power connection), unit not entering sleep mode. | This issue may require professional inspection of the wiring to ensure the ACC (accessory) wire is correctly connected and the unit powers off with the ignition. Consult a car audio specialist. |
For more complex issues or problems not listed here, please refer to the detailed user manual included with your product or contact customer support.
Specifications
| Feature | Detail |
|---|---|
| Brand | CAMECHO |
| Model Compatibility | Audi A3 (2008-2012) |
| Operating System | Android 13 |
| RAM | 2GB |
| ROM | 64GB |
| Screen Size | 9 Inches |
| Resolution | 1024 x 600 |
| Connectivity | RCA, Bluetooth, Wi-Fi, USB |
| Special Features | Subwoofer Output, Built-in Wi-Fi, Wireless CarPlay/Android Auto, FM/RDS, GPS, Steering Wheel Control, Rear Camera Support, HiFi, EQ |
| Included Components | Rear Camera, GPS Antenna, Wiring Harness, USB Cables, Microphone, Canbus Box |
| Package Dimensions | 28.2 x 21.4 x 8.8 cm |
| Weight | 1.44 kg |
Support Information
For technical assistance, warranty inquiries, or further support, please contact CAMECHO customer service:
- Technical Support Email: CAMECHOVIP@126.com
- Please include your product model and a detailed description of the issue when contacting support.