Beko BDIS38040A
BEKO BDIS38040A Integrable Dishwasher User Manual
Model: BDIS38040A | Brand: Beko
1. Introduction
Thank you for choosing the BEKO BDIS38040A Integrable Dishwasher. This manual provides essential information for the safe and efficient operation, installation, maintenance, and troubleshooting of your new appliance. Please read this manual thoroughly before using the dishwasher and keep it for future reference.

Figure 1.1: BEKO BDIS38040A Integrable Dishwasher (Front View)
The BDIS38040A is a 45 cm integrable dishwasher designed to seamlessly blend with your kitchen cabinetry. It features a 3rd tray for cutlery, enhancing loading flexibility and capacity.
2. Safety Information
Always adhere to the following safety precautions to prevent injury or damage.
- Read all instructions before using the appliance.
- This appliance is intended for household use only.
- Do not allow children to play with the dishwasher.
- Ensure the dishwasher is properly grounded.
- Do not operate the dishwasher if it is damaged. Contact qualified service personnel.
- Use only detergents and rinse aids specifically designed for automatic dishwashers.
- Keep sharp items pointed down to avoid injury.
- Do not open the door during operation, especially during the hot wash or rinse cycle.
- Disconnect the appliance from the power supply before cleaning or maintenance.
3. Setup and Installation
The BEKO BDIS38040A is a built-in dishwasher. Professional installation is highly recommended to ensure proper functioning and safety.
3.1 Unpacking
- Carefully remove all packaging materials.
- Inspect the dishwasher for any shipping damage. Report any damage immediately to your retailer.
- Ensure all included components are present: Dishwasher unit.
3.2 Placement and Connections
Consider the product dimensions (24 x 69 x 2.5 centimetres) and weight (32.9 Kilograms) for proper cabinet integration. The dishwasher requires a 220 Volts power supply and connections for water inlet and drain.
- Ensure adequate space for ventilation and access for maintenance.
- Connect the water inlet hose to a cold water supply.
- Connect the drain hose to a suitable drain system.
- Plug the power cord into a grounded electrical outlet.
4. Operating Instructions
Follow these steps for effective and efficient dishwashing.
4.1 Loading the Dishwasher
Proper loading is crucial for optimal cleaning results.

Figure 4.1: Dishwasher Interior with Racks
Arrange dishes to allow water spray to reach all surfaces. Avoid overcrowding. Place larger items in the lower rack and smaller, delicate items in the upper rack. The 3rd tray is ideal for cutlery and small utensils.
4.2 Adding Detergent and Rinse Aid
Use only automatic dishwasher detergent.

Figure 4.2: Detergent and Rinse Aid Dispenser
Fill the detergent dispenser with the recommended amount of dishwasher detergent. Fill the rinse aid dispenser to the indicated level. The dishwasher will automatically dispense rinse aid during the cycle.
4.3 Selecting a Wash Cycle
The dishwasher offers various cycle options to suit your needs.
- Normal: For regularly soiled dishes.
- Intensive: For heavily soiled pots, pans, and dishes.
- Rinse: A quick rinse for dishes that will be washed later.
- Quick Wash: For lightly soiled dishes that need a fast wash.
Refer to the control panel for specific program selection and additional options. The dishwasher has 3 program settings and 3 option cycles.
4.4 Starting a Cycle
- Close the dishwasher door securely.
- Select your desired wash cycle.
- Press the Start button.
The dishwasher will begin operation. The noise level during operation is approximately 45 dB. Water consumption is approximately 10 litres per cycle.
5. Maintenance
Regular maintenance ensures the longevity and optimal performance of your dishwasher. Always disconnect power before performing maintenance.
5.1 Cleaning the Filters
The filter system prevents food particles from recirculating and clogging the spray arms.
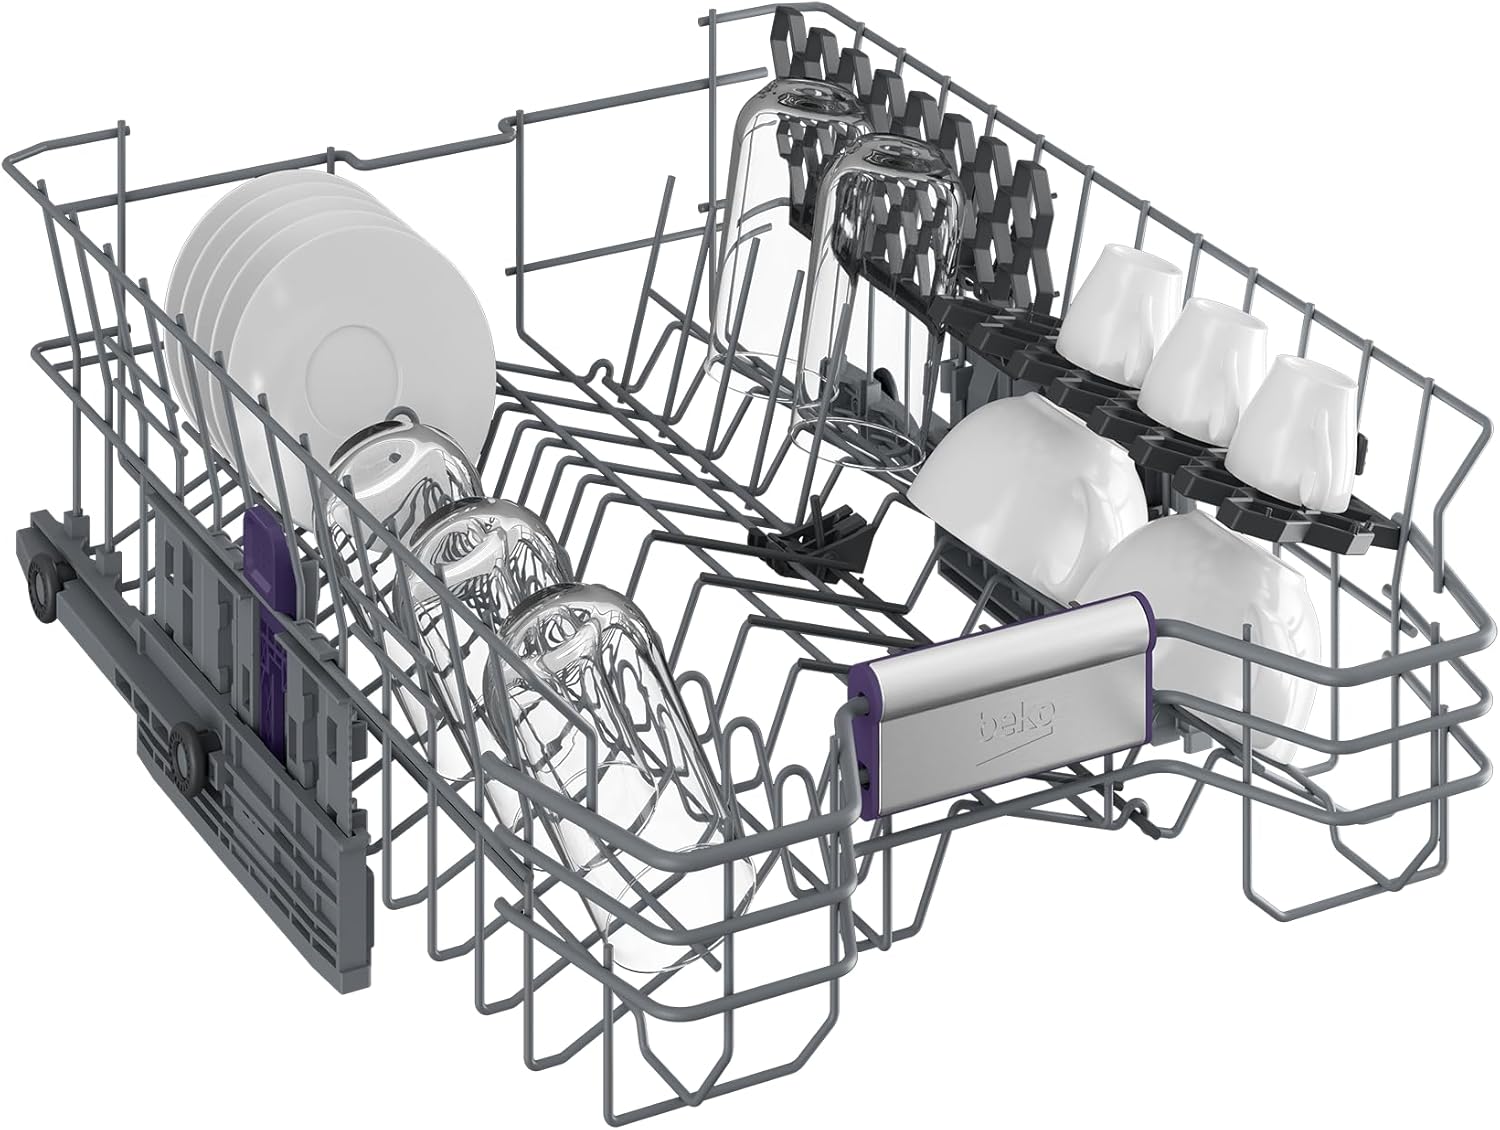
Figure 5.1: Dishwasher Filter and Spray Arm
- Locate the filter assembly at the bottom of the dishwasher tub.
- Twist and lift the filter to remove it.
- Rinse the filter under running water to remove any food debris. Use a brush if necessary.
- Reinsert the filter and twist to lock it into place.
Clean the filters regularly, especially if you notice poor cleaning performance.
5.2 Cleaning the Interior and Exterior
- Wipe the interior of the dishwasher with a damp cloth periodically.
- Clean the exterior (Stainless Steel finish) with a soft, damp cloth and mild detergent. Avoid abrasive cleaners.
- Clean the spray arms by removing them and rinsing under water to clear any clogged nozzles.
6. Troubleshooting
Before contacting service, try the following solutions for common issues.
| Problem | Possible Cause | Solution |
|---|---|---|
| Dishes are not clean | Improper loading, clogged spray arms, insufficient detergent, dirty filters. | Reload dishes correctly, clean spray arm nozzles, ensure proper detergent dosage, clean filters (refer to Section 5.1). |
| Detergent/Rinse aid dispenser issues | Dispenser blocked, sensor malfunction, incorrect product type. | Ensure dispenser is not blocked by dishes. Use only liquid or tablet dishwasher detergent and liquid rinse aid. If the issue persists, contact service. |
| Dishwasher does not start | Door not closed properly, power supply issue, cycle not selected. | Ensure door is latched, check power connection, select a wash cycle. |
| Excessive noise | Dishes rattling, foreign object in pump, improper installation. | Rearrange dishes, check for foreign objects in the bottom of the tub, ensure dishwasher is level. |
7. Specifications
| Feature | Detail |
|---|---|
| Brand | Beko |
| Model Number | BDIS38040A |
| Installation Type | Built-In |
| Dimensions (L x W x H) | 24 x 69 x 2.5 centimetres (Product) |
| Item Weight | 32.9 Kilograms |
| Material | Stainless Steel |
| Voltage | 220 Volts |
| Noise Level | 45 dB |
| Water Consumption | Approx. 10 litres (1E+1 litres) |
| Cycle Options | Normal, Intensive, Rinse, Quick Wash |
| Number of Settings | 3 |
| Included Components | Dishwasher |
| First Available Date | 13 Feb. 2023 |
8. Warranty and Support
For information regarding warranty coverage, terms, and conditions, please refer to the warranty card included with your product or contact your retailer or Beko customer service directly.
For technical support, spare parts, or service requests, please visit the official Beko website or contact their customer support line. Have your model number (BDIS38040A) and purchase date ready when contacting support.
Ask a question about this manual
Ask about setup, troubleshooting, compatibility, parts, safety, or missing instructions. Manuals+ will review the question and use this page’s manual context to help answer it.