1. Important Safety Information
Please read all instructions carefully before using the Alpina Multifunction 400W Hand Blender. Retain this manual for future reference. Incorrect operation may cause personal injury or damage to the appliance.
General Safety
- Always unplug the appliance from the power supply before assembly, disassembly, or cleaning.
- This appliance is not intended for use by persons (including children) with reduced physical, sensory or mental capabilities, or lack of experience and knowledge, unless they have been given supervision or instruction concerning use of the appliance by a person responsible for their safety.
- Children should be supervised to ensure that they do not play with the appliance.
- Do not immerse the motor unit in water or any other liquid. Clean only with a damp cloth.
- Avoid contact with moving parts.
- Do not operate any appliance with a damaged cord or plug, or after the appliance malfunctions or has been dropped or damaged in any manner.
Blade Safety
- Blades are sharp. Handle with extreme care, especially when removing, inserting, or cleaning.
- Never touch the blades with your hands while the appliance is plugged in or operating.
- Ensure attachments are securely locked in place before operating.
2. Product Overview
The Alpina Multifunction 400W Hand Blender is designed for various kitchen tasks, including blending, chopping, and whipping. It comes with several attachments to enhance its versatility.

Figure 2.1: Main components of the Alpina Hand Blender system, including the motor unit, whisk attachment, and chopper bowl.
Components
- Motor Unit: The main body containing the 400W motor and control buttons.
- Blender Arm: Detachable shaft with stainless steel blades for blending and pureeing.
- Chopper Bowl: A container with a sharp blade for chopping ingredients.
- Whisk Attachment: For whipping cream, egg whites, and light batters.
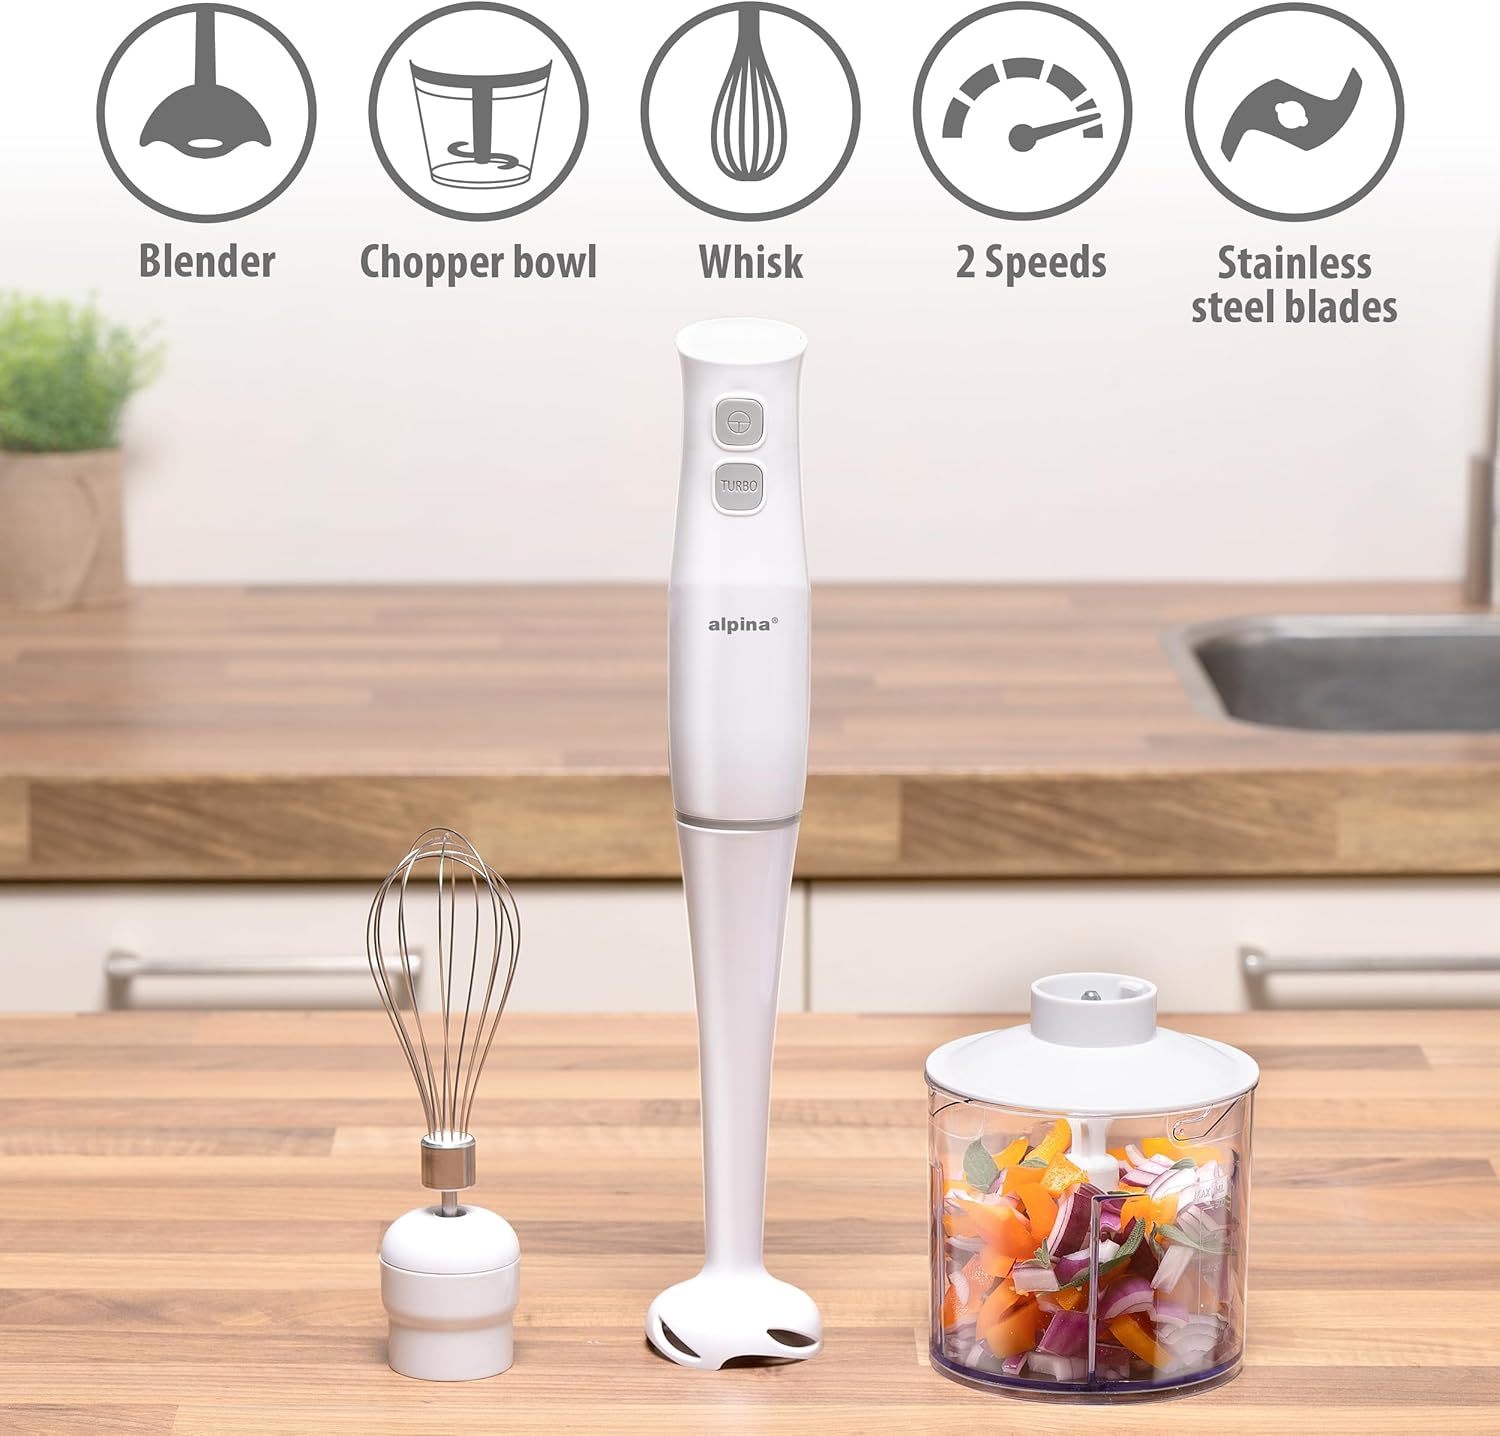
Figure 2.2: Overview of the hand blender's functions and features, including blending, chopping, whisking, two speed settings, and stainless steel blades.

Figure 2.3: Control buttons on the motor unit: Low speed and Turbo button for variable power.
3. Setup and Assembly
Before first use, wash all parts that will come into contact with food. Ensure the appliance is unplugged before assembly.
Attaching the Blender Arm
- Align the blender arm with the motor unit.
- Twist the blender arm clockwise until it locks securely into place.
Attaching the Whisk Attachment
- Insert the whisk into the whisk gear box.
- Align the whisk gear box with the motor unit.
- Twist the whisk gear box clockwise until it locks securely into place.
Assembling the Chopper
- Carefully place the chopper blade onto the central pin inside the chopper bowl.
- Add ingredients to the chopper bowl.
- Place the chopper lid onto the bowl, ensuring it is properly aligned.
- Align the motor unit with the chopper lid.
- Twist the motor unit clockwise until it locks securely into place on the chopper lid.
4. Operating Instructions
Always ensure the appliance is properly assembled and plugged into a suitable power outlet before operation.
Using the Hand Blender (Blender Arm)

Figure 4.1: Demonstrating the use of the hand blender for blending liquids and soft ingredients.
- Attach the blender arm to the motor unit.
- Place the blender arm into the ingredients in a suitable container. Ensure the liquid level is below the maximum fill line to prevent splashing.
- Press the 'Low speed' button for continuous blending or the 'Turbo' button for maximum power.
- Move the blender arm up and down gently to ensure even blending.
- Release the button to stop operation.

Figure 4.2: The stainless steel blades are designed for efficient pureeing of fruits and vegetables.
Using the Whisk Attachment

Figure 4.3: The whisk attachment is ideal for whipping egg whites or cream until fluffy.
- Attach the whisk attachment to the motor unit.
- Place the whisk into the ingredients (e.g., egg whites, cream) in a deep bowl.
- Press the 'Low speed' button for gentle whipping or the 'Turbo' button for faster results.
- Move the whisk in circular motions to incorporate air.
- Release the button to stop operation.
Using the Chopper

Figure 4.4: The chopper attachment is suitable for mincing meat or shredding onions and other vegetables.
- Assemble the chopper with the blade and ingredients.
- Attach the motor unit to the chopper lid.
- Press the 'Low speed' button for coarse chopping or the 'Turbo' button for finer results. Use short pulses for better control.
- Do not overfill the chopper bowl. Process ingredients in batches if necessary.
- Release the button to stop operation.

Figure 4.5: The Alpina Hand Blender's versatility for chopping, pureeing, blending, and mixing a variety of foods.
5. Cleaning and Maintenance
Proper cleaning and maintenance will ensure the longevity and optimal performance of your Alpina Hand Blender.
Cleaning Instructions
- Always unplug the appliance before cleaning.
- Motor Unit: Wipe the motor unit with a damp cloth. Do not immerse it in water or any other liquid.
- Blender Arm, Whisk, Chopper Bowl, and Blades: These parts are dishwasher safe. Alternatively, they can be washed by hand in warm, soapy water. Rinse thoroughly and dry immediately.
- Exercise extreme caution when handling the blades due to their sharpness.
- For stubborn food residue, soak the parts in warm soapy water before cleaning.
Storage
- Store the appliance and its attachments in a dry place, away from direct sunlight and heat.
- Keep out of reach of children.
6. Troubleshooting
If you encounter any issues with your Alpina Hand Blender, refer to the following common problems and solutions.
| Problem | Possible Cause | Solution |
|---|---|---|
| Appliance does not turn on. | Not plugged in; power outlet faulty; motor unit not properly attached to an accessory. | Check power connection; try a different outlet; ensure motor unit is securely locked onto the chosen attachment. |
| Motor runs, but blades do not move. | Attachment not properly assembled or locked. | Disassemble and reassemble the attachment, ensuring all parts are correctly aligned and locked. |
| Poor blending/chopping performance. | Too much food; food pieces too large; blades dull (unlikely for new product). | Reduce quantity of ingredients; cut food into smaller pieces; ensure blades are clean and free of obstruction. Use 'Turbo' for tougher ingredients. |
| Appliance stops during operation. | Overheating due to prolonged use or processing tough ingredients. | Unplug the appliance and let it cool down for at least 30 minutes before resuming use. Reduce processing time and load. |
If the problem persists after trying these solutions, please contact customer support.
7. Specifications
| Feature | Specification |
|---|---|
| Brand | Alpina |
| Model | Multifunction 400W |
| Power | 400 Watts |
| Voltage | 230 Volts |
| Material | Plastic (body), Stainless Steel (blades) |
| Color | White |
| Item Weight | 730 Grams |
| Special Feature | Multiple Attachments (Blender, Chopper, Whisk) |
| Controls Type | Advanced (Low Speed, Turbo) |
| Dishwasher Safe Parts | Yes (Blender arm, whisk, chopper bowl, blades) |
8. Warranty and Support
Your Alpina Multifunction 400W Hand Blender comes with a limited warranty. Please refer to the warranty card included in your product packaging for specific terms and conditions, including the duration and coverage details.
Customer Support
For technical assistance, warranty claims, or general inquiries, please contact Alpina customer support through the contact information provided on your warranty card or the official Alpina website.
When contacting support, please have your product model (Multifunction 400W) and proof of purchase readily available.