1. Introduction
This manual provides essential information for the installation, operation, and maintenance of your new compatible refrigerator icemaker. This icemaker is designed as a replacement part for various Whirlpool refrigerator models, including GI6FDRXXY07, GI6SDRXXQ06, GI6FARXXF05, GI6SARXXF06, and GZ25FSRXYY2. Please read these instructions carefully before installation and use to ensure proper function and safety.
Note: This is a compatible replacement part and is not an OEM (Original Equipment Manufacturer) product. It is not covered under any OEM manufacturer's warranty. Any use of OEM brand names or model designations is solely for demonstrating compatibility.
2. Safety Information
- Disconnect Power: Always disconnect power to the refrigerator before attempting any installation, maintenance, or repair. Failure to do so can result in serious injury or electrical shock.
- Professional Installation Recommended: If you are unsure about any step, it is recommended to seek assistance from a qualified appliance technician.
- Handle with Care: The icemaker contains delicate components. Handle it carefully to avoid damage.
- Water Supply: Ensure the refrigerator's water supply is turned off before disconnecting any water lines.
- Keep Area Clear: Keep the work area clear of obstructions and ensure adequate lighting during installation.
3. What's in the Box
Carefully unpack the contents and ensure all items are present and undamaged.
- One (1) Compatible Refrigerator Icemaker (Eight (8) Cube)
- One (1) Wiring Harness
- One (1) Metal Shut-off Arm (Bail Wire)

Image 1: View of the compatible icemaker, showing the main unit, wiring harness, and the metal shut-off arm (bail wire) detached.
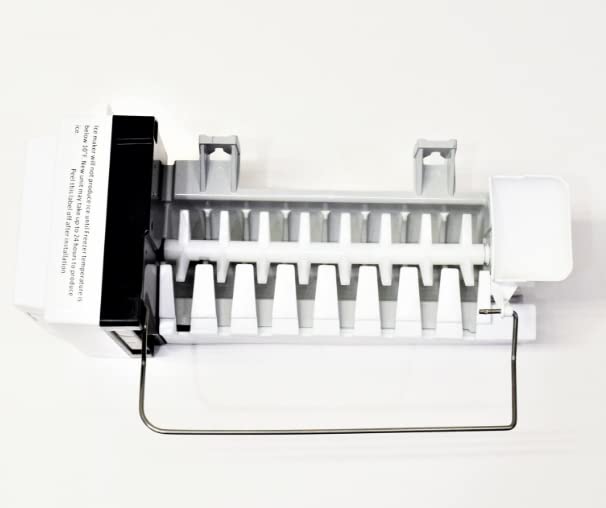
Image 2: Top-down view of the icemaker with the metal shut-off arm in place, ready for installation.
4. Installation Instructions
4.1. Before You Begin
- Ensure the refrigerator is unplugged from the power outlet.
- Turn off the water supply to the refrigerator.
- Gather necessary tools (e.g., screwdriver, pliers, flashlight).
4.2. Step-by-Step Installation
- Access the Icemaker Compartment: Open the freezer door and locate the existing icemaker. Depending on your refrigerator model, you may need to remove a cover or shelf.
- Disconnect Wiring: Carefully disconnect the wiring harness from the old icemaker. Note its orientation for reinstallation.
- Remove Old Icemaker: Unscrew any mounting screws or release clips holding the old icemaker in place. Gently slide or pull the old icemaker out of its position.
- Install New Icemaker: Position the new icemaker in the same location as the old one. Ensure it fits securely into the mounting brackets or screw holes.
- Connect Wiring Harness: Connect the provided wiring harness to the new icemaker and then to the refrigerator's electrical connector. Ensure a firm and secure connection.
- Install Shut-off Arm: Insert the metal shut-off arm (bail wire) into its designated slots on the icemaker. Ensure it can move freely up and down.
- Secure Icemaker: Fasten any mounting screws or engage clips to secure the new icemaker firmly in place.
- Restore Water and Power: Turn the water supply back on to the refrigerator. Plug the refrigerator back into the power outlet.
- Initial Check: Listen for the icemaker to fill with water. This may take a few minutes.
5. Operating Instructions
Your new icemaker operates automatically. Once installed and connected to power and water, it will begin producing ice when the freezer temperature is below 20°F (-6.7°C).
- Initial Ice Production: New ice may take up to 24 hours to produce the first batch.
- Discard First Batches: It is recommended to discard the first 3 batches of ice after installation to ensure any air or impurities from the water line are flushed out.
- Shut-off Arm: The metal shut-off arm (bail wire) controls ice production. When the ice bin is full, the arm will be pushed up by the ice, stopping production. Lowering the arm will resume ice production.
6. Maintenance
- Cleaning: Periodically clean the ice bin and the exterior of the icemaker with a mild soap and water solution. Rinse thoroughly and dry before placing back in the freezer. Do not use abrasive cleaners or harsh chemicals.
- Water Filter: Ensure your refrigerator's water filter is replaced regularly according to the manufacturer's recommendations to maintain ice quality.
- Inspect Water Line: Occasionally check the water supply line for any kinks, leaks, or damage.
7. Troubleshooting
| Problem | Possible Cause | Solution |
|---|---|---|
| Icemaker not producing ice. |
|
|
| Ice production is slow. |
|
|
| Ice has an unusual taste or odor. |
|
|
| Icemaker is making unusual noises. |
|
|
8. Specifications
| Feature | Detail |
|---|---|
| Part Number | W10882923 (replaces AP6037857, WPW10377151, WPW10377147, W10377147, W10377151, PS11769140) |
| Compatible Refrigerator Models | Whirlpool GI6FDRXXY07, GI6SDRXXQ06, GI6FARXXF05, GI6SARXXF06, GZ25FSRXYY2 |
| Ice Cube Capacity | Eight (8) Cube |
| Product Dimensions | Approximately 13"D x 6.5"W x 6.5"H |
| Material | Metal and Plastic |
| Item Weight | Approximately 3 pounds |
| UPC | 054047533281 |
9. Warranty and Support
As a compatible replacement part, this icemaker is not covered by the original equipment manufacturer's warranty. For specific warranty information, return policies, or technical support, please refer to the seller from whom you purchased this product.
Separate protection plans may be available for purchase through third-party providers. Please consult your purchase documentation for details on any such plans.


