1. Introduction
The Fisher-Price Laugh & Learn Mix & Learn DJ Table is an interactive activity center designed for infants and toddlers aged 6 months to 3 years. This toy encourages developmental play through music, lights, and various engaging activities. It features a piano with multiple play modes, fine motor skill development activities, and Smart Stages learning levels that adapt as your child grows. The DJ table can be used for sit-at floor play or with legs attached for standing play.

Image 1: The Fisher-Price Laugh & Learn Mix & Learn DJ Table in its assembled form.
2. What's Included
Your Fisher-Price Laugh & Learn Mix & Learn DJ Table package includes:
- 1 x DJ Table unit
- Legs for standing play (detachable)
- 3 x AA batteries (for demonstration purposes)

Image 2: The Fisher-Price Laugh & Learn Mix & Learn DJ Table as it appears in its retail packaging.
3. Setup
3.1 Battery Installation
- Locate the battery compartment on the underside of the DJ table.
- Using a Phillips screwdriver (not included), loosen the screw and remove the battery compartment cover.
- Insert 3 new AA (LR6) alkaline batteries, ensuring correct polarity (+/-).
- Replace the cover and tighten the screw.
Note: The included batteries are for demonstration purposes only. For optimal performance and longer life, use alkaline batteries.
3.2 Attaching/Detaching Legs
- For Sit-at Play: The DJ table can be used without the legs, placed directly on the floor.
- For Standing Play: Align the legs with the designated slots on the underside of the DJ table. Push firmly until each leg clicks securely into place. To detach, press the release buttons (if present) and pull the legs off.

Image 3: A baby engaging with the DJ table in the sitting play configuration.

Image 4: A baby interacting with the DJ table while standing, demonstrating the leg attachment.
4. Operating Instructions
4.1 Power and Volume Control
- Locate the power switch and volume control on the top panel of the DJ table.
- Slide the switch to the ON position to power on the toy.
- Adjust the volume to your preferred level using the volume control switch.
4.2 Piano Play Modes
The piano features 3 distinct play modes:
- Piano Mode: Press the piano keys to play musical notes.
- Voice Mode: Press the piano keys to hear words, colors, or shapes.
- Synth Mode: Press the piano keys to play synthesizer sounds.

Image 5: A detailed view of the piano section, highlighting the different play modes.
4.3 DJ Turntable Interaction
- Spin the light-up Puppy disc to activate sounds, music, and learning phrases.
- The turntable also features letters of the alphabet for early learning.
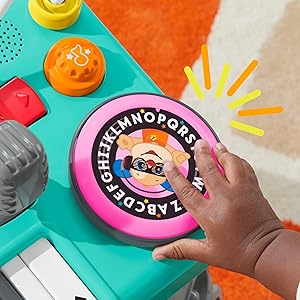
Image 6: A close-up of the interactive DJ turntable with alphabet details.
4.4 Number Pad and Sliders
- Press the light-up number pad to hear numbers and counting songs.
- Move the colorful sliders up and down to activate additional sounds and phrases.
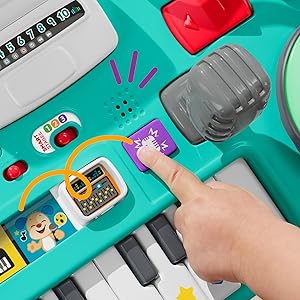
Image 7: A detailed view of the interactive sliders and the light-up number pad.
4.5 Record & Playback Feature
- Press the record button (often indicated by a microphone icon) to record a short message or sound.
- Press the playback button to hear your recording mixed into a song.
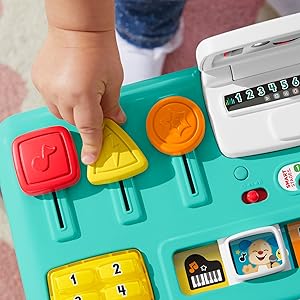
Image 8: A close-up of the microphone and record/playback controls.
5. Smart Stages Technology
The DJ Table incorporates Smart Stages technology, offering 3 levels of learning content that change as your child grows:
- Level 1 – Explore (6M+): Introduces first words and sounds to spark curiosity.
- Level 2 – Encourage (12M+): Prompts children through questions and simple directions.
- Level 3 – Pretend (18M+): Encourages imaginative play and early role-playing.
Adjust the Smart Stages level using the switch located on the top panel of the toy.

Image 9: A close-up of the Smart Stages selector switch, showing levels 1, 2, and 3.

Image 10: Diagram illustrating the three Smart Stages: Explore, Encourage, and Pretend.
6. Care and Maintenance
- To clean the toy, wipe with a damp cloth as needed.
- Do not immerse the toy in water or any other liquids.
- Avoid using harsh cleaners or abrasives.
- Store the toy in a dry place away from direct sunlight when not in use.
7. Troubleshooting
7.1 No Sound or Intermittent Sound
- Check if the power switch is in the ON position.
- Ensure the volume control is not set to the lowest setting.
- Replace the batteries with new AA (LR6) alkaline batteries, ensuring correct polarity.
- If the issue persists, try turning the toy off and on again.
7.2 Lights Not Working
- Check battery installation and replace batteries if necessary.
- Ensure the toy is powered on.
8. Specifications
| Product Dimensions | 9.25 x 15.9 x 14 inches |
| Item Weight | 4.8 pounds |
| Item Model Number | HLM43 |
| Manufacturer Recommended Age | 6 months - 3 years |
| Batteries | 3 AA batteries required (included for demo) |
| Manufacturer | Fisher-Price |
| Release Date | April 15, 2023 |
9. Safety Information
- Adult Supervision: Always supervise children during play.
- Battery Safety: Keep batteries out of reach of small children. Do not mix old and new batteries. Do not mix alkaline, standard (carbon-zinc), or rechargeable (nickel-cadmium) batteries. Remove batteries if the toy is not used for an extended period.
- Choking Hazard: This toy contains small parts (batteries) that could be a choking hazard if ingested. Ensure battery compartment is securely closed.
- Damage: Inspect the toy regularly for any damage. Discontinue use if any part is broken or detached.
10. Warranty and Support
For warranty information or customer support, please refer to the contact details provided on the product packaging or visit the official Fisher-Price website. Keep your purchase receipt for proof of purchase.