Introduction
This manual provides detailed instructions for the setup, operation, and maintenance of your Strex 120MP 4K Ultra HD WiFi Trail Camera (Model SP204). Designed for wildlife observation, outdoor monitoring, and security, this camera features high-resolution imaging, advanced night vision, motion detection, and wireless connectivity. Please read this manual thoroughly before using the camera to ensure proper function and longevity.

Image: Strex 4K Ultra HD Trail Camera. A front view of the Strex Trail Camera in its camouflage casing, with a 32GB Micro SD card shown in the foreground.
Product Overview
The Strex Trail Camera is equipped with a robust, waterproof casing and advanced features to capture high-quality images and videos in various environments.
Key Features:
- High Resolution: Captures stunning 120MP photos and 4K Ultra HD videos.

Image: 120 Megapixel Camera. This image visually compares the image quality of a standard 16MP camera to the Strex 120MP camera, demonstrating the superior detail and clarity offered by the higher resolution.
- Advanced Night Vision: Features 36 invisible 940Nm no-glow IR LEDs for clear night recordings up to 20 meters without disturbing wildlife.
- Fast Trigger Speed: Activates in just 0.2 seconds upon motion detection, capturing up to 5 photos per second.
- Durable & Waterproof: IP66 rated casing ensures protection against dust and water, suitable for all weather conditions.
- Wireless Connectivity: Built-in WiFi and Bluetooth for easy connection to your smartphone/tablet to view and transfer files via a dedicated app.
- Wide-Angle Lens: 120° wide-angle lens provides a broader field of view.
- Integrated Display: Built-in LCD screen for immediate playback and settings adjustment.
Camera Components:
Familiarize yourself with the main components of your Strex Trail Camera:

Image: Strex Trail Camera Component Diagram. This image illustrates the various parts of the camera, including the photo sensor, LED indicator, main lens, locking latches, primary PIR sensor, side PIR sensors, internal display screen, battery compartment, control buttons for settings, SD card slot, and USB port.
Setup
1. Battery Installation:
- Open the camera's casing by releasing the latches.
- Locate the battery compartment.
- Insert 4 or 8 AA batteries (not included) according to the polarity markings (+/-). Ensure all batteries are inserted correctly.
- Close the battery compartment securely.
2. SD Card Insertion:
- With the camera open, locate the SD card slot.
- Insert the included 32GB Micro SD card (or another compatible Micro SD card up to 32GB) into the slot until it clicks into place. Ensure the card is inserted in the correct orientation.
- To remove, gently push the card in until it springs out.
3. Mounting the Camera:
The camera comes with a mounting strap for easy installation.
- Thread the mounting strap through the slots on the back of the camera.
- Secure the camera to a tree, pole, or other stable surface at the desired height and angle.
- Ensure the camera is stable and pointed towards the area you wish to monitor.
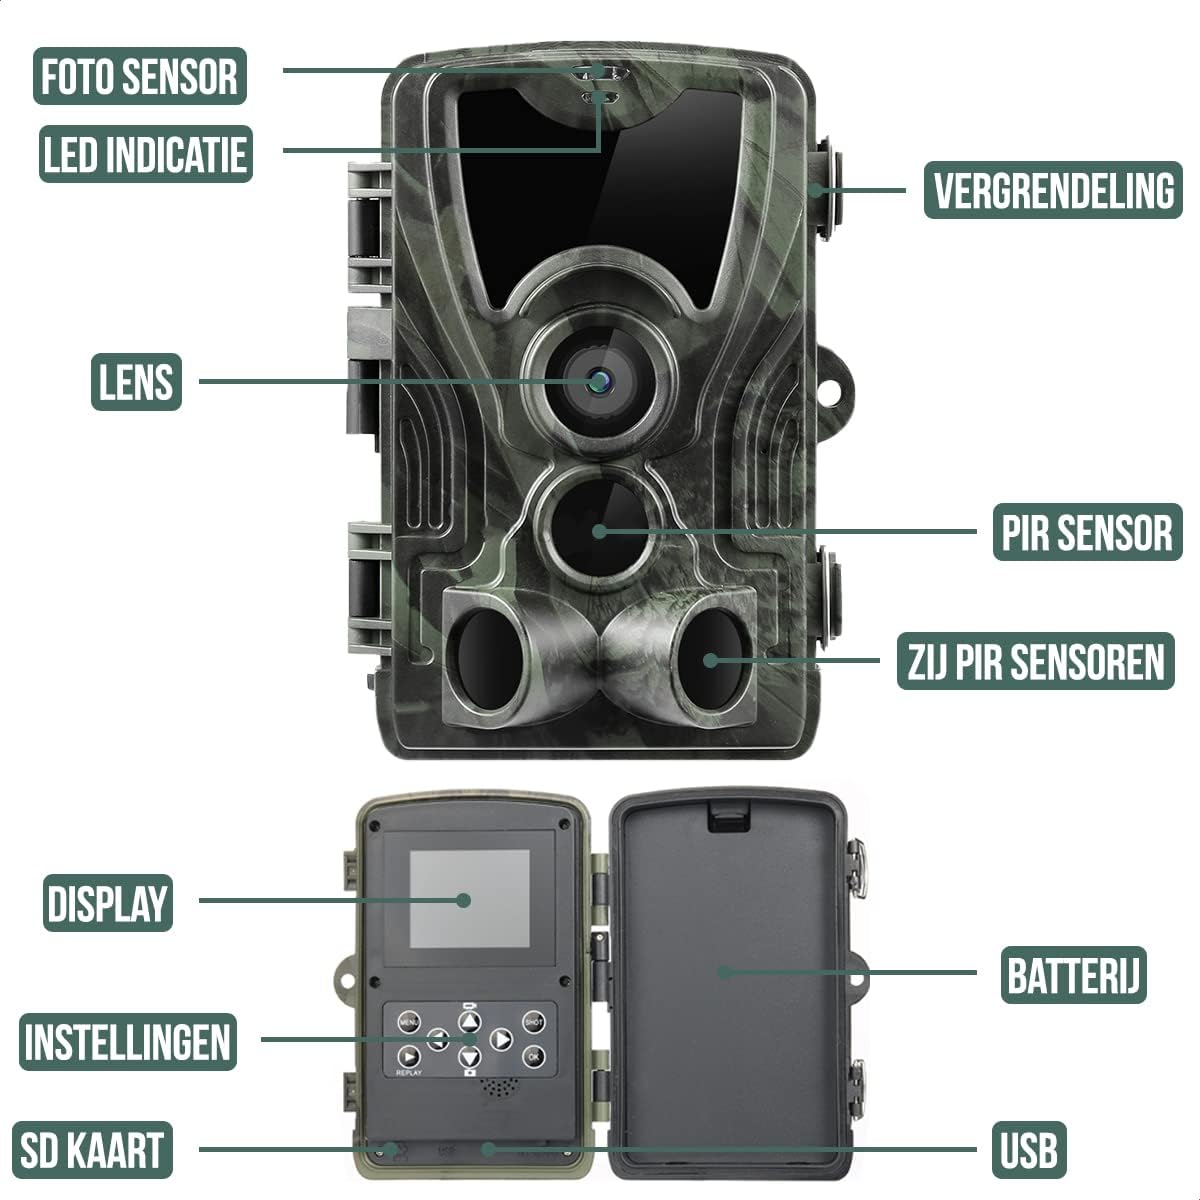
Image: IP66 Water Resistance. This image shows the Strex Trail Camera mounted on a tree, demonstrating its robust and waterproof design, suitable for outdoor use in various weather conditions.
Operating the Camera
1. Powering On and Basic Settings:
- After inserting batteries and SD card, switch the camera to the "ON" position.
- The LCD screen will power on. Use the control buttons to navigate the menu.
- Set the date and time first for accurate timestamps on your recordings.
- Adjust photo resolution (e.g., 120MP, 48MP, 24MP) and video resolution (e.g., 4K, 1080P) as desired.
- Configure the photo interval (1/5/10/30 seconds or per minute) for motion detection.
2. Motion Detection and Recording Modes:
The camera supports both motion-activated recording and time-lapse modes.
- Motion Detection: The camera will automatically capture photos or videos when motion is detected within its 25-meter range. The 0.2-second trigger speed ensures you don't miss fast-moving subjects.
- Time-Lapse: Set the camera to capture images at predefined intervals, creating a time-lapse sequence.

Image: Fast Trigger Speed. This image demonstrates the camera's ability to capture multiple photos per second (up to 5) with a rapid 0.2-second trigger time upon detecting motion.
3. Night Vision:
The camera automatically switches to night vision mode in low-light conditions. The 36 invisible 940Nm IR LEDs provide clear black-and-white images and videos up to 20 meters without emitting a visible glow, ensuring animals are not startled.

Image: Optimal Night Vision. This image compares a daytime scene with a deer (25m range) to a nighttime scene with a deer (20m range), highlighting the camera's effective 36 infrared LEDs with unique no-glow technology for clear night captures.
4. WiFi and Bluetooth Connectivity:
The camera features its own WiFi network for direct connection to your mobile device.
- Download the dedicated app for your smartphone or tablet.
- Activate the camera's WiFi function (usually via a button or menu option).
- Connect your mobile device to the camera's WiFi network (typically named "TrailCam_XXXX").
- Once connected, use the app to view live footage, browse captured photos/videos, change settings, and download files without removing the SD card.
- Note: This WiFi connection is direct between the camera and your device and cannot connect to a home router. The effective range is approximately 15-20 meters, depending on your device.

Image: Remote Viewing via App. This image shows a user accessing and viewing images from the trail camera remotely on their smartphone using the dedicated app and the camera's built-in WiFi.
5. Wide-Angle Lens:
The camera features a 120° wide-angle lens, allowing for a much broader field of view compared to standard lenses. This is ideal for capturing more of the environment or monitoring a larger area.

Image: 120° Wide-Angle Lens. This diagram illustrates the expansive 120-degree detection and viewing angle of the camera, showing how it captures a significantly wider area compared to a narrower 90-degree lens.
6. Password Function:
For added security, you can set a password for your camera through the settings menu. This prevents unauthorized access to your camera's settings and captured media.
Maintenance
1. Cleaning:
- Regularly clean the camera lens and PIR sensors with a soft, lint-free cloth to ensure clear images and accurate motion detection.
- Wipe the camera body with a damp cloth to remove dirt or debris. Do not use harsh chemicals or abrasive cleaners.
2. Battery Management:
- Check battery levels periodically, especially before long deployments.
- Replace all batteries at once to ensure consistent power. Do not mix old and new batteries.
- If the camera will not be used for an extended period, remove the batteries to prevent leakage.
3. SD Card Management:
- Format the SD card periodically through the camera's menu to maintain optimal performance and prevent data corruption.
- Regularly transfer important files to a computer and clear the SD card to ensure sufficient storage space.
Troubleshooting
- Camera not powering on:
- Ensure batteries are inserted correctly with proper polarity.
- Check if batteries are fully charged or replace them with new ones.
- Verify the power switch is in the "ON" position.
- No recordings/photos/videos:
- Check if the SD card is inserted correctly and has sufficient free space.
- Format the SD card.
- Ensure motion detection is enabled and sensitivity is set appropriately.
- Verify the camera is positioned correctly to capture motion in the desired area.
- Check the photo/video interval settings.
- WiFi connection issues:
- Ensure the camera's WiFi function is activated.
- Make sure your mobile device is within the 15-20 meter range of the camera.
- Restart both the camera and your mobile device.
- Ensure you have the correct app installed and updated.
- Remember, the camera's WiFi is a direct connection and does not connect to a home router.
- Poor image/video quality:
- Clean the camera lens.
- Check the resolution settings in the camera menu.
- Ensure there are no obstructions in front of the lens or IR LEDs.
- For night vision, ensure the subject is within the 20-meter IR range.
Specifications
| Feature | Detail |
|---|---|
| Model Number | SP204 |
| Photo Resolution | 120MP / 100MP / 80MP / 60MP / 48MP / 40MP / 36MP / 30MP / 24MP / 20MP / 16MP / 12MP (selectable) |
| Video Resolution | 4K ULTRA HD |
| Trigger Speed | 0.2 seconds |
| IR LEDs | 36 invisible 940Nm no-glow IR LEDs |
| Night Vision Range | Up to 20 meters |
| Detection Range | Up to 25 meters |
| Water/Dust Resistance | IP66 |
| Storage | Micro SD card (Max 32GB) |
| Connectivity | WiFi, Bluetooth, USB, AV |
| Power Source | 4x or 8x AA batteries (not included), External 6V/2A (not included) |
| Operating Temperature | -20°C to +60°C |
| Dimensions | Approx. 135 x 90 x 76mm |
| Weight | 315 g |
| Color | Green (Camouflage) |
Package Contents
Upon opening your Strex Trail Camera package, you should find the following items:
- 1 x 4K / 120MP Trail Camera
- 1 x Mounting Strap
- 1 x 32GB SD Card
- 1 x Micro USB Cable
- 1 x User Manual (English)

Image: Package Contents. This image displays all items included in the Strex Trail Camera package: the camera unit, a USB cable, a mounting strap, the product packaging box, the user manual, and a 32GB SD card.
Warranty and Support
For warranty information or technical support, please refer to the contact details provided with your purchase or visit the official Strex website. Keep your purchase receipt as proof of purchase.