1. Introduction
This manual provides detailed instructions for the installation, operation, and maintenance of your Vanity Art 55 x 28 Inches Freestanding Bathtub, Model VA6522-S. Please read this manual thoroughly before installation and use to ensure proper function and longevity of your product.
Key Features:
- Premium Quality: Constructed from 100% high-quality acrylic materials for durability and strength.
- Inspirational Design: Luxurious and comfortable styling with gentle sloping lines for relaxation.
- Easy Cleaning: Stain and scratch-resistant properties for long-term maintenance.
- Easy Placement: Freestanding design offers flexible placement options in your bathroom.
- Easy Installation: Includes all necessary mounting hardware and a user manual for assembly and floor mounting.

Figure 1.1: Acrylic Construction
This image illustrates the premium acrylic construction reinforced with fiberglass, ensuring the bathtub's strength and durability.

Figure 1.2: High Heat Retention Layers
The multi-layer reinforced construction, including thermal glass fiber and resin insulation, ensures high heat retention for a longer, more enjoyable bath.
2. Safety Information
Always follow local plumbing and building codes. Professional installation is recommended. Ensure the floor can support the weight of the bathtub filled with water and a person. Do not use abrasive cleaners or tools that could scratch the surface. Exercise caution when entering and exiting the tub to prevent slips and falls.
3. Pre-Installation Checklist
Tools and Materials Required:
- Adjustable Wrench
- Caulk Gun
- Silicone Sealant (Bathroom Grade)
- Spirit Level
- Measuring Tape
- Pencil/Marker
- Protective Gloves
- Soft Cloth
Product Components:
- Bathtub
- Slotted Overflow Assembly
- Pop-up Drain Assembly
- Adjustable Leveling Feet (pre-installed or separate)
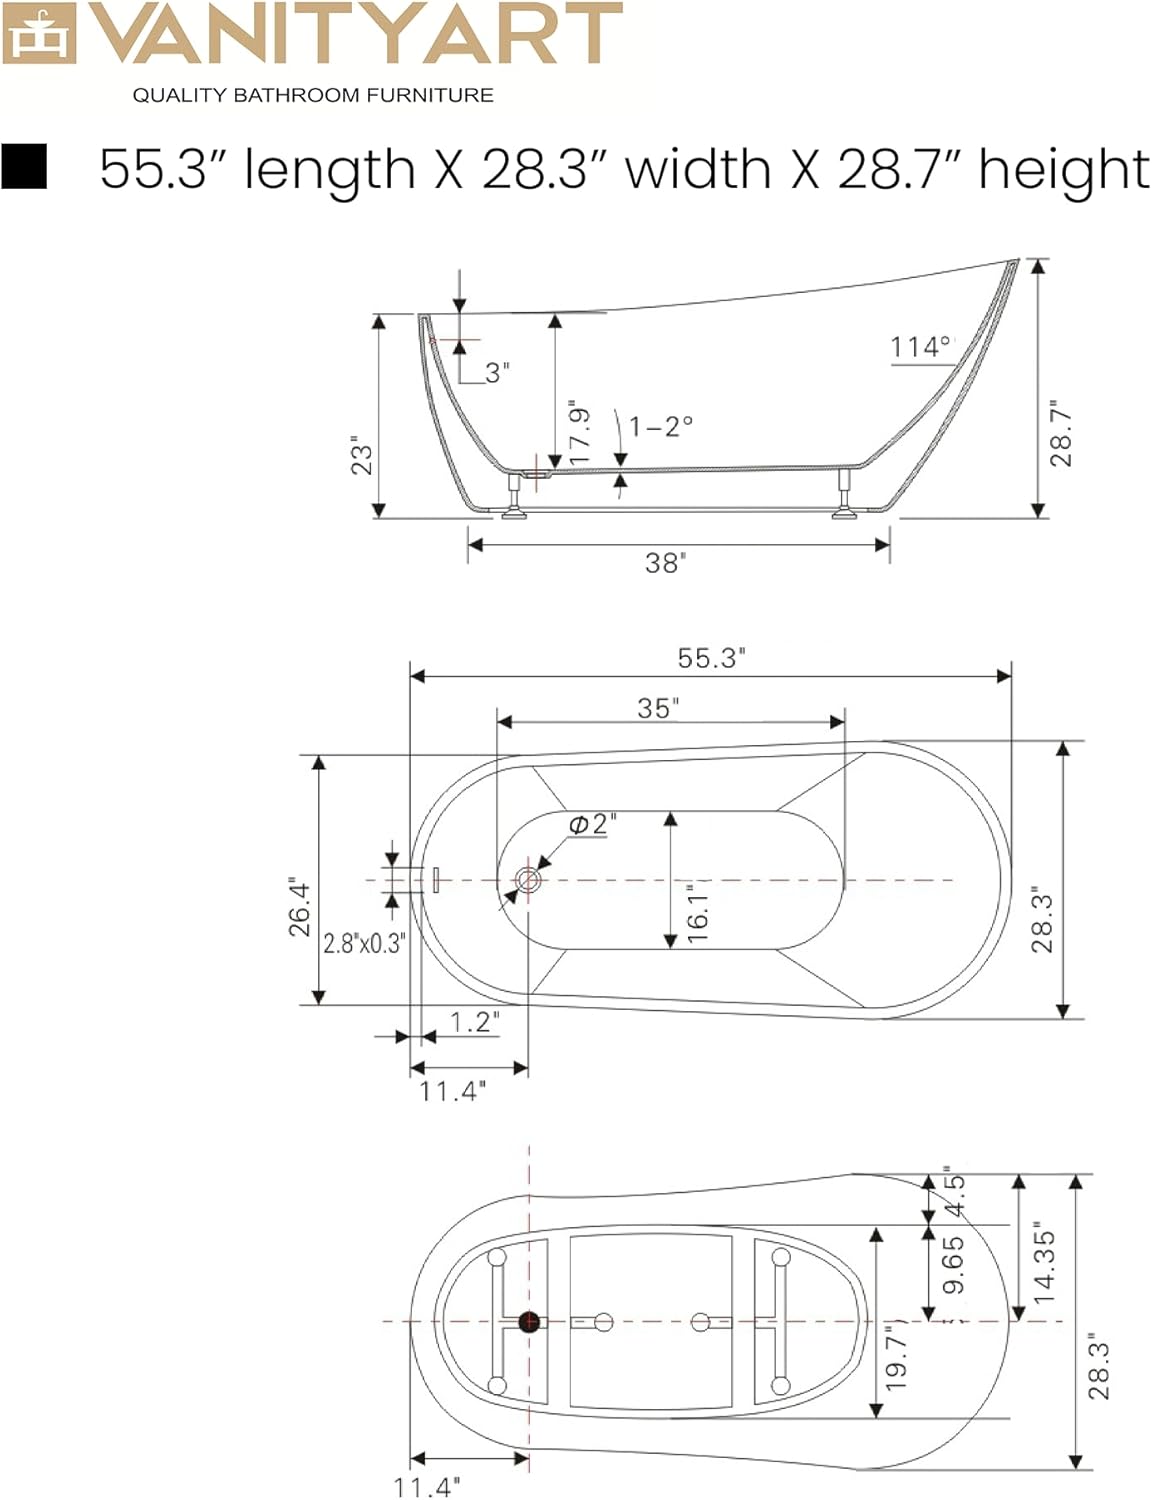
Figure 3.1: Bathtub Dimensions and Technical Drawing
This diagram illustrates the precise measurements of the bathtub, including its overall length (55.3 inches), width (28.3 inches), and height (28.7 inches), along with internal dimensions for plumbing connections and overflow placement. Refer to these measurements for accurate planning and installation.
4. Installation Instructions
Follow these steps carefully for proper installation. It is recommended to have two people for lifting and positioning the bathtub.
- Prepare the Area: Ensure the installation area is clean, level, and has access to the drain pipe.
- Unpack the Bathtub: Carefully remove the bathtub from its packaging. Inspect for any damage.
- Install the Drain Assembly:
- Apply silicone sealant around the drain opening on the underside of the bathtub.
- Insert the drain assembly from the inside of the tub, ensuring a tight seal.
- Secure the drain assembly from the underside using the provided nuts and washers. Tighten with an adjustable wrench, but do not overtighten.
- Install the Overflow Assembly:
- Connect the overflow pipe to the overflow opening on the side of the tub.
- Attach the overflow cover plate.
- Connect the overflow pipe to the main drain pipe assembly.
- Position the Bathtub: Carefully lift and place the bathtub in its desired location.
- Level the Bathtub: Use a spirit level to ensure the bathtub is perfectly level. Adjust the leveling feet on the underside of the tub as needed.
- Connect to Main Drain: Connect the bathtub's drain assembly to your floor drain system. Ensure all connections are watertight.
- Water Test: Fill the bathtub with water and check for any leaks around the drain and overflow connections. Allow the water to sit for a few minutes, then drain.
- Seal the Base: Once satisfied with the installation and leak-free operation, apply a bead of silicone sealant around the entire base of the bathtub where it meets the floor. This prevents water from seeping underneath and provides stability.
Video 4.1: Bathtub Installation Guide (Model VA6522-S)
This official video from Vanity Art demonstrates the step-by-step process for installing the VA6522-S freestanding bathtub, including unpacking, drain and overflow assembly, leveling, and sealing.

Figure 4.2: Slotted Overflow and Pop-up Drain
This image highlights the integrated slotted overflow and the pop-up drain mechanism, essential components for water management and safety during use.
5. Operating Instructions
Using your freestanding bathtub is straightforward:
- Filling the Tub: Ensure the pop-up drain is closed by pressing it down. Fill the tub with water to your desired level. The slotted overflow will prevent overfilling.
- Draining the Tub: To drain the tub, press the pop-up drain again to open it.
- Safety: Always test the water temperature before entering the tub. Do not leave children unattended in or near the bathtub.
6. Maintenance
Proper care will keep your Vanity Art bathtub looking new for years:
- Regular Cleaning: Clean the tub regularly with a soft cloth and a non-abrasive, mild bathroom cleaner. Avoid harsh chemicals, abrasive pads, or scouring powders, as these can damage the acrylic surface.
- Stain Removal: For stubborn stains, use a diluted solution of white vinegar or a specialized acrylic cleaner. Rinse thoroughly with water after cleaning.
- Avoid Scratches: Do not place sharp or heavy objects directly on the tub surface. Use a bath mat to prevent slipping and protect the tub bottom.
- Drain Maintenance: Periodically remove the pop-up drain cover and clean any hair or debris to ensure proper drainage.

Figure 6.1: Easy-to-Clean Surface
The bathtub's acrylic surface is designed for easy cleaning and resistance to common household chemicals and cosmetic products, simplifying maintenance.
7. Troubleshooting
| Problem | Possible Cause | Solution |
|---|---|---|
| Water Leakage | Loose drain/overflow connections, insufficient sealant. | Check and tighten all plumbing connections. Reapply silicone sealant if necessary. |
| Slow Drainage | Hair or debris in the drain. | Remove the pop-up drain cover and clear any obstructions. |
| Bathtub is not level | Uneven floor or improperly adjusted leveling feet. | Adjust the leveling feet on the underside of the tub until it is stable and level. |
8. Specifications
| Feature | Detail |
|---|---|
| Model Number | VA6522-S |
| Product Dimensions (L x W x H) | 54.7" x 28.3" x 28.7" |
| Material | Acrylic, Fiberglass |
| Color | White |
| Style | Modern |
| Installation Type | Freestanding |
| Capacity | 47 Gallons |
| Shape | Oval |
| UPC | 811593036013 |
| Certifications | UPC Certified, MA (Massachusetts) Approved |
9. Warranty and Support
For warranty information or technical support, please refer to the documentation included with your purchase or contact Vanity Art customer service directly. Keep your proof of purchase for warranty claims.


