1. Safety Instructions
Read and understand all safety warnings and instructions before operating this drain cleaner machine. Failure to follow the warnings and instructions may result in electric shock, fire, and/or serious injury.
- Electrical Safety: Always connect the machine to a properly grounded outlet. The machine features a built-in GFCI (Ground Fault Circuit Interrupter) for operator protection against electric shock. Test the GFCI before each use. Do not operate in wet conditions or expose to rain.
- Personal Protective Equipment: Always wear appropriate personal protective equipment, including heavy-duty gloves (a pair is included) and eye protection, when operating the machine. Loose clothing or jewelry can get caught in rotating parts.
- Work Area: Keep the work area clean and well-lit. Ensure bystanders, especially children, are kept away from the operating machine.
- Cable Handling: Never allow the cable to kink or twist. Maintain a firm grip on the cable during operation. Do not force the cable.
- Chemicals: Do not use drain cleaning chemicals in conjunction with this machine, as they can damage the cable and pose safety risks.
- Maintenance: Disconnect power before performing any maintenance or changing accessories.
2. Product Overview
The PioneerWorks DA01 Electric Drain Cleaner Machine is designed for professional and residential use to clear clogs in pipes ranging from 2 to 4 inches in diameter. It features an efficient auto-feed function and a durable, anti-twist cable for effective drain cleaning.

Image 2.1: The PioneerWorks DA01 Electric Drain Cleaner Machine with included accessories.
Key Features:
- Efficient Auto-feed Function: Provides automatic forward and backward control of the drain cable, reducing manual effort.
- Flexible Air-Activated Footswitch: Allows for hands-free operation, enhancing safety and control.
- Rocker Switch: Easily change the cable's rotation direction. A double switch control is available for left-handed users by switching the rocker to the left socket.
- Durable Cable: Equipped with a 75-foot (23m) x 1/2 inch cable made of high-quality steel (Mn65), heat-treated for resistance against breakage, tangling, kinking, and corrosion. It can navigate multiple 90-degree bends.
- Heavy-Duty Wheels: 8-inch durable wheels designed for easy movement across various surfaces and up stairs.
- Ergonomic Handle: Designed for comfortable gripping and machine transport.
- Versatile Cutters: Includes 6 different cutters for various types of clogs.
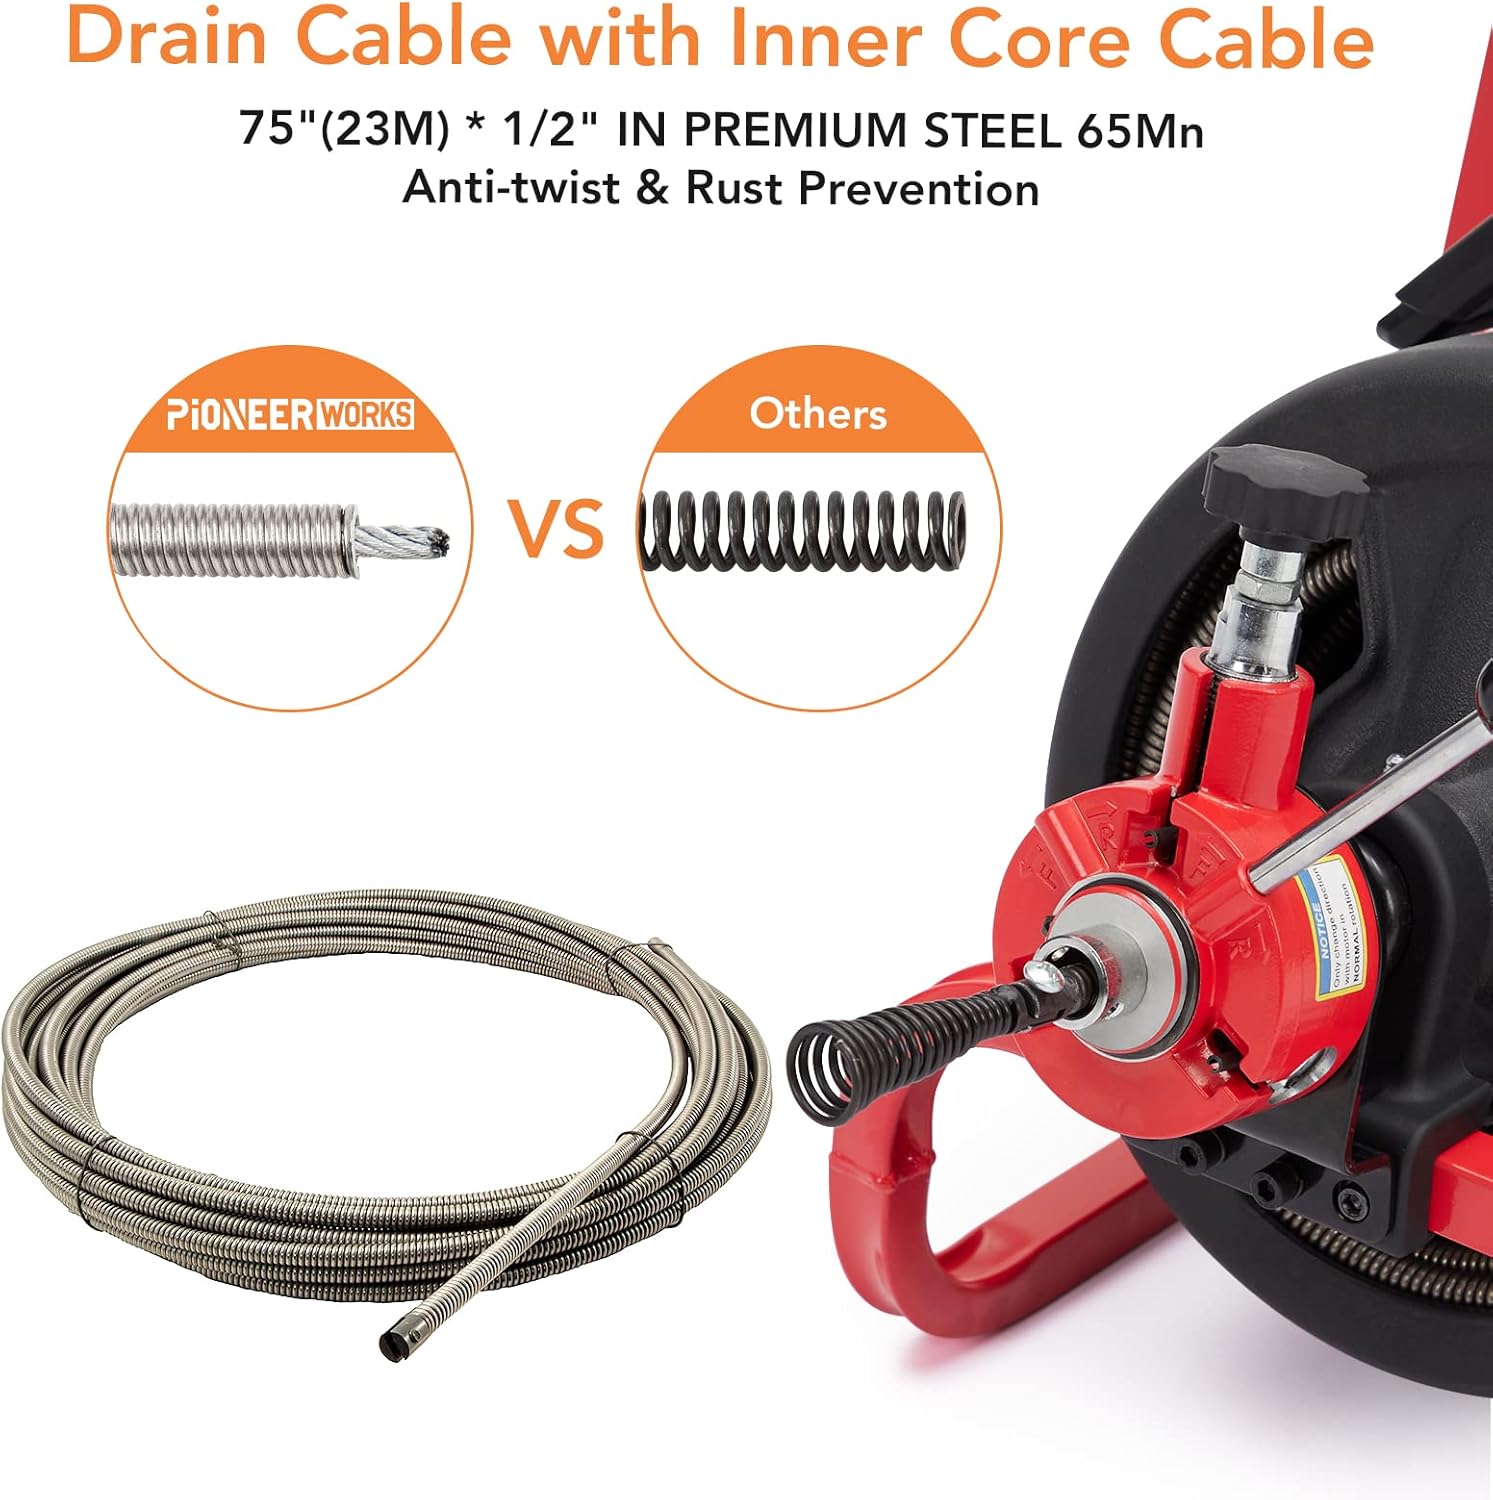
Image 2.2: The 75-foot x 1/2 inch drain cable features an inner core for enhanced anti-twist and rust prevention, compared to standard cables.
3. Components List
The PioneerWorks DA01 drain cleaner machine comes with the following components:
- Electric Drain Cleaner Machine (main unit with 75Ft x 1/2 Inch cable)
- Auto-feed mechanism
- Retractable Handle
- Air-activated Footswitch
- Built-in GFCI power cord
- Heavy-duty Wheels
- User Manual
- Work Gloves (1 pair)
- Screwdriver
- Hex Key
- 6 Interchangeable Cutters:
- Drop Head Auger
- Boring Bulb Cutter
- C-Cutter
- Side Cutter
- Spade Cutter
- Saw Tooth Cutter

Image 3.1: The included set of 6 cutters and work gloves for various drain cleaning tasks.
4. Setup
Follow these steps to assemble and prepare your drain cleaner machine for operation:
- Unpack Components: Carefully remove all components from the packaging. Verify that all items listed in the Components List are present.
- Attach Auto-feed Mechanism:Align the auto-feed mechanism with the end of the drain cable. Use the provided screwdriver to secure it firmly.

Image 4.1: Secure the auto-feed mechanism to the end of the drain cable.
- Mount Auto-feed Mechanism to Machine:Position the auto-feed mechanism onto the designated mounting points at the front of the machine's frame. Secure it using the provided bolts and hex key.
Image 4.2: Fasten the auto-feed mechanism to the front of the machine's frame using the provided bolts and hex key.
- Attach Handle: Insert the retractable handle into the slots on the main frame. Tighten the knobs to secure the handle in place.
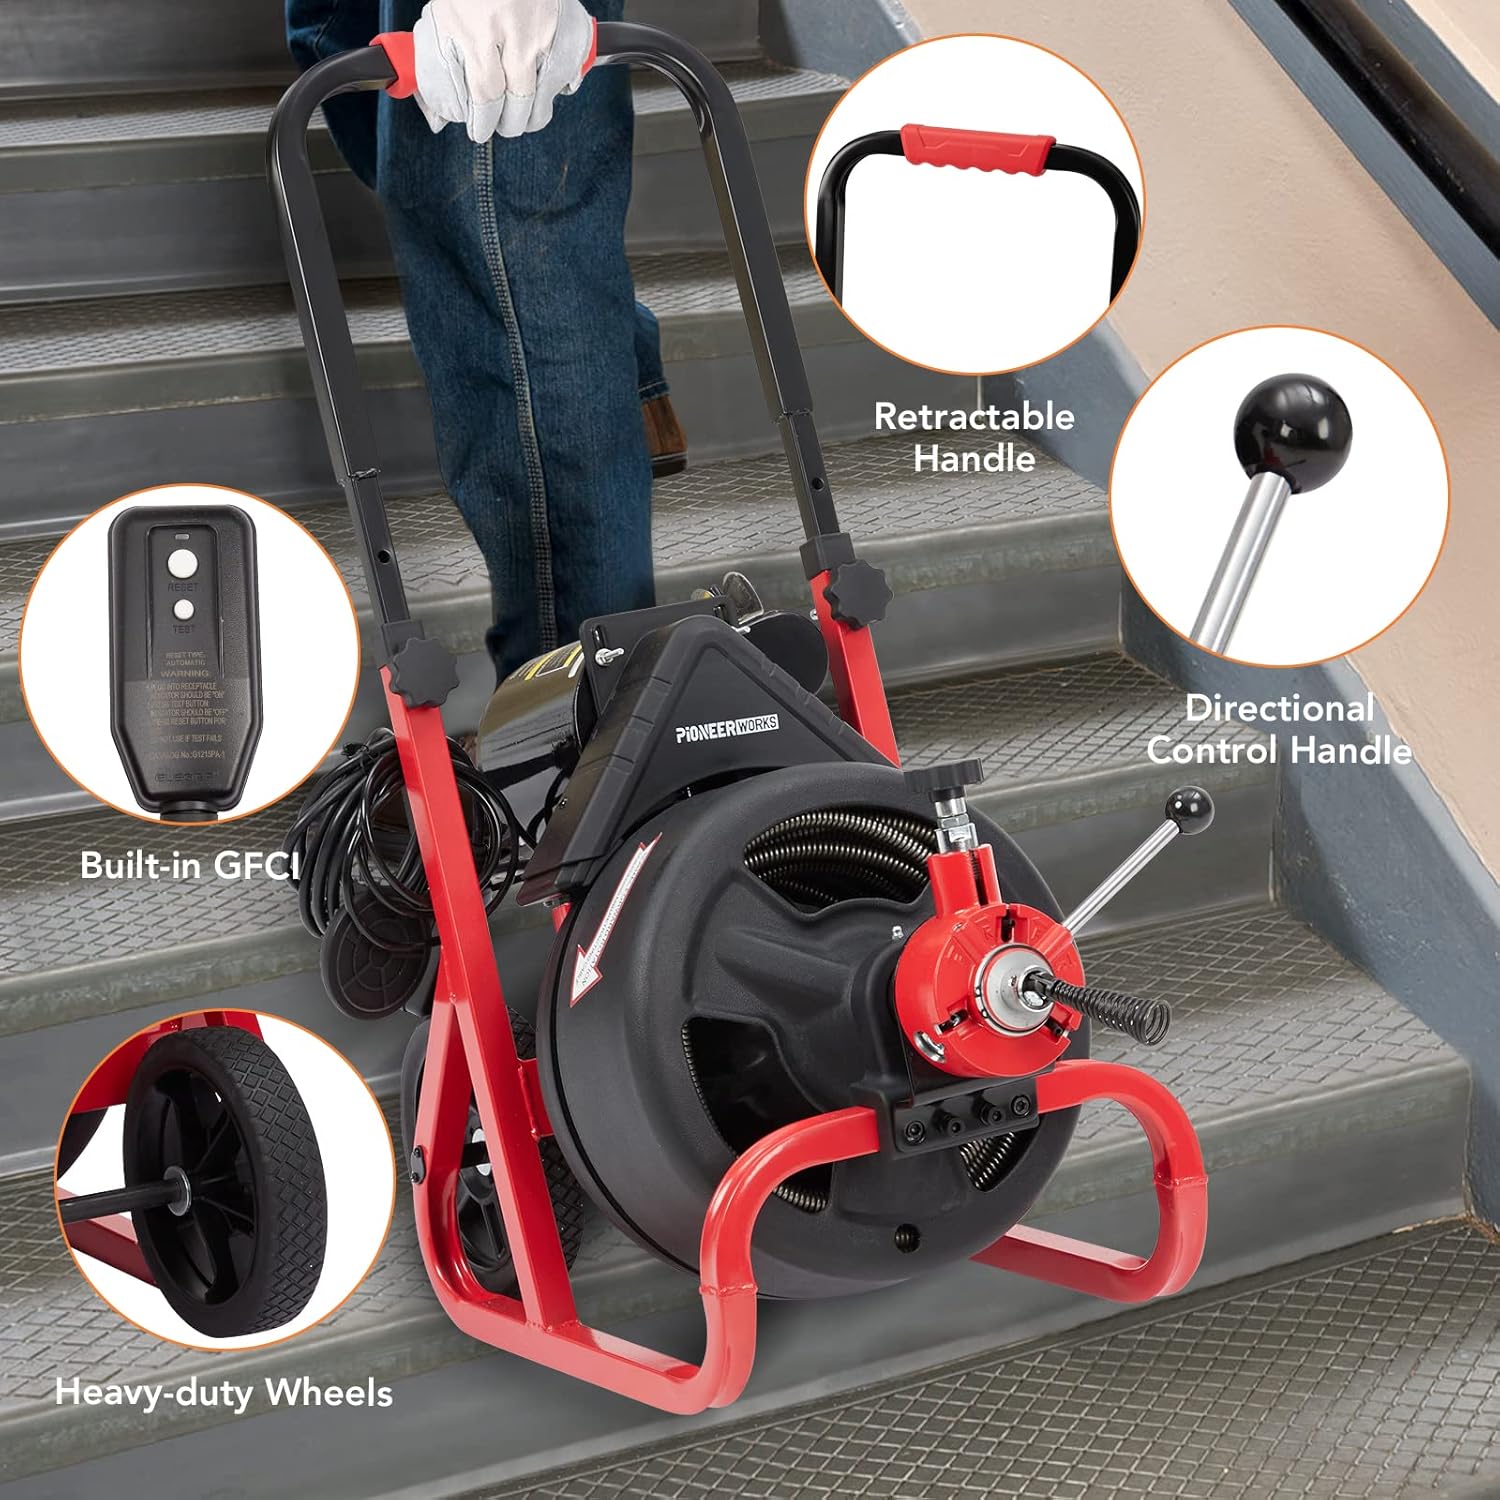
Image 4.3: The retractable handle is attached to the machine for easy transport and maneuverability.
- Select and Attach Cutter: Choose the appropriate cutter for the type of clog you are addressing. Attach it securely to the end of the drain cable using the provided fasteners.

Image 4.4: A user demonstrates attaching a cutter head to the drain cable.
Video 4.1: This video demonstrates the unboxing and assembly process of the PioneerWorks Electric Drain Cleaner Machine, including attaching the auto-feed mechanism and handle.
5. Operating Instructions
Before operating, ensure you have read the safety instructions and completed the setup. Always wear protective gloves and eyewear.
- Power Connection: Plug the machine into a grounded electrical outlet. Ensure the GFCI is functioning correctly by pressing the 'Test' and 'Reset' buttons.
- Positioning: Place the machine as close as possible to the drain opening.
- Cable Insertion: Gently feed the cable into the drain opening. Use the auto-feed mechanism by engaging the forward control and pressing the footswitch. Guide the cable manually as needed.

Image 5.1: An operator utilizing the auto-feed function to guide the drain cable into a floor drain.
- Clearing the Clog: When the cutter reaches the clog, allow the machine to work slowly. Do not force the cable. The rotating cutter will break up or retrieve the obstruction. Move the cable back and forth slightly to ensure thorough cleaning.
- Cable Retrieval: Once the clog is cleared, disengage the forward control and engage the reverse control on the auto-feed mechanism. Press the footswitch to retract the cable slowly. Guide the cable back into the drum.
- Post-Operation: Disconnect the power. Clean the cable and cutters thoroughly before storage.
Cutter Selection Guide:
Choose the appropriate cutter based on the type of clog:
- Drop Head Auger: Ideal for navigating bends and retrieving loose objects.
- Boring Bulb Cutter: Effective for breaking up soft blockages and retrieving small items.
- C-Cutter: Suitable for general cleaning and removing grease or sludge.
- Side Cutter: Designed for scraping pipe walls and removing roots or heavy deposits.
- Spade Cutter: Best for cutting through hard blockages and compacted debris.
- Saw Tooth Cutter: Excellent for cutting through roots and stubborn obstructions.

Image 5.2: The drain cleaner machine can be used for various applications such as floor drains, sewer lines, and garden drains.
6. Maintenance
Regular maintenance ensures the longevity and optimal performance of your PioneerWorks drain cleaner machine.
- Clean Cable and Cutters: After each use, thoroughly clean the cable and all cutters to remove debris, grease, and sludge. Rinse with water and dry completely to prevent rust.
- Lubrication: Periodically apply a rust-inhibiting lubricant to the cable and moving parts of the auto-feed mechanism.
- Inspect for Wear: Regularly inspect the cable for kinks, breaks, or excessive wear. Check cutters for damage or dullness. Replace worn or damaged parts immediately.
- Motor and Electrical Components: Keep the motor housing clean and free from debris. Inspect the power cord and GFCI for any signs of damage.
- Storage: Store the machine in a dry, clean, and secure location, away from moisture and extreme temperatures. Ensure the cable is properly coiled within the drum.
7. Troubleshooting
Refer to this section for common issues and their potential solutions.
| Problem | Possible Cause | Solution |
|---|---|---|
| Machine does not start | No power; GFCI tripped; Footswitch not engaged | Check power connection; Reset GFCI; Ensure footswitch is fully pressed |
| Cable not feeding/retracting | Auto-feed mechanism not engaged; Cable kinked or stuck; Motor issue | Verify auto-feed lever position; Check for cable obstructions; Inspect motor for damage (contact support if needed) |
| Ineffective clog removal | Incorrect cutter; Clog too dense; Cable not reaching clog | Select appropriate cutter; Advance cable slowly; Use proper technique (gentle back-and-forth motion) |
| Cutter detaches or breaks | Improper attachment; Excessive force; Worn cutter | Ensure cutters are securely fastened; Avoid forcing the cable; Replace worn cutters |
| Machine tips over during transport | Uneven surface; Narrow wheelbase | Exercise caution on uneven surfaces; Use two people for transport if necessary; Ensure handle is securely attached |
8. Specifications
| Specification | Detail |
|---|---|
| Manufacturer | PIONEERWORKS |
| Model Number | DA01 |
| Cable Length | 75 Feet (23 meters) |
| Cable Diameter | 1/2 Inch |
| Compatible Pipe Diameter | 2 to 4 Inches |
| Item Weight | 86.8 pounds |
| Product Dimensions | 23.2 x 16.5 x 19.7 inches |
| Color | BLACK/RED |
| Usage | Outside (and indoor drains) |
| Included Components | Drain Auger Machine, 6 Cutters, Gloves |
| Batteries Required | No |
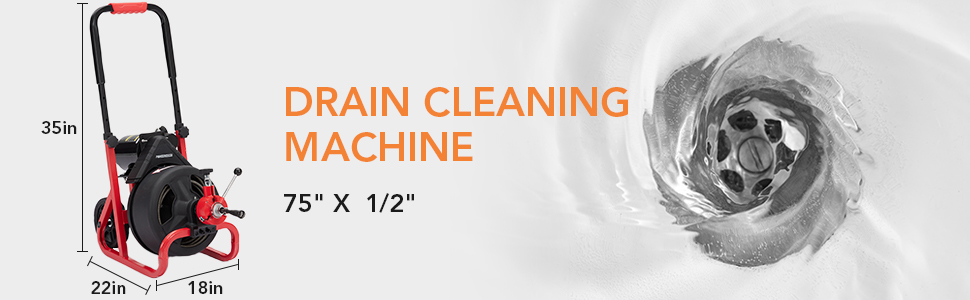
Image 8.1: Key dimensions of the PioneerWorks Drain Cleaning Machine.
9. Warranty and Support
The PioneerWorks DA01 Electric Drain Cleaner Machine comes with a 2-year warranty. For any questions, technical assistance, or warranty claims, please contact PioneerWorks customer support through the retailer where the product was purchased or visit the official PioneerWorks website for contact information.
Please retain your proof of purchase for warranty validation.