1. Introduction
This manual provides detailed instructions for the safe and efficient operation of your AddAcc D12 20000mAh Rechargeable Camping Fan. This versatile fan is designed for various environments, including camping, travel, outdoor activities, RVs, garages, and as an emergency backup during power outages. Please read this manual thoroughly before using the product.

Image 1.1: The AddAcc D12 fan providing comfort during a family camping trip.
2. Package Contents
Verify that all items are present in the package:
- 1 x AddAcc D12 20000mAh Rechargeable Camping Fan
- 1 x USB-C Charging Cable
- 1 x Remote Control
3. Product Features
The AddAcc D12 fan incorporates several features for enhanced usability and performance:
- High-Capacity Battery: Built-in 20000mAh rechargeable battery (non-replaceable) provides up to 60 hours of fan operation or 200 hours of light.
- Power Bank Function: Equipped with USB-C input and USB-A output ports to charge other electronic devices.
- Auto Oscillation: Features 90-degree or 45-degree automatic oscillation to cover a wider area.
- Adjustable Angle: Fan head pivots 270 degrees vertically for precise airflow direction.
- Multiple Fan Speeds: Four adjustable fan speeds deliver airflow up to 18 feet.
- Integrated LED Light: 16 bright LED lights with three brightness settings (up to 400 lumens) for illumination.
- Dual Control: Operable via on-device buttons or the included remote control.
- Timer Function: Set the fan to run for 1, 2, 4, or 8 hours.
- Sleep Mode: Deactivates indicator lights for undisturbed sleep.
- Versatile Mounting: Features a built-in 360-degree rotatable hook for hanging and a stable base for tabletop use.
- Durable Construction: Made from tough, drop-proof ABS material with dirt/sand proof USB port covers.

Image 3.1: Overview of the AddAcc D12 fan, remote, and power bank capability.

Image 3.2: The double-layer blade design for efficient air delivery.

Image 3.3: Illustration of the powerful yet quiet motor.
4. Setup
4.1 Initial Charging
- Before first use, fully charge the fan.
- Connect the provided USB-C charging cable to the fan's USB-C input port.
- Connect the other end of the cable to a 5V/3A USB power adapter (not included) or a compatible power source.
- The four battery indicator lights on the control panel will illuminate to show charging progress. A full charge typically takes 8-10 hours.
- Once fully charged, all four indicator lights will remain solid.
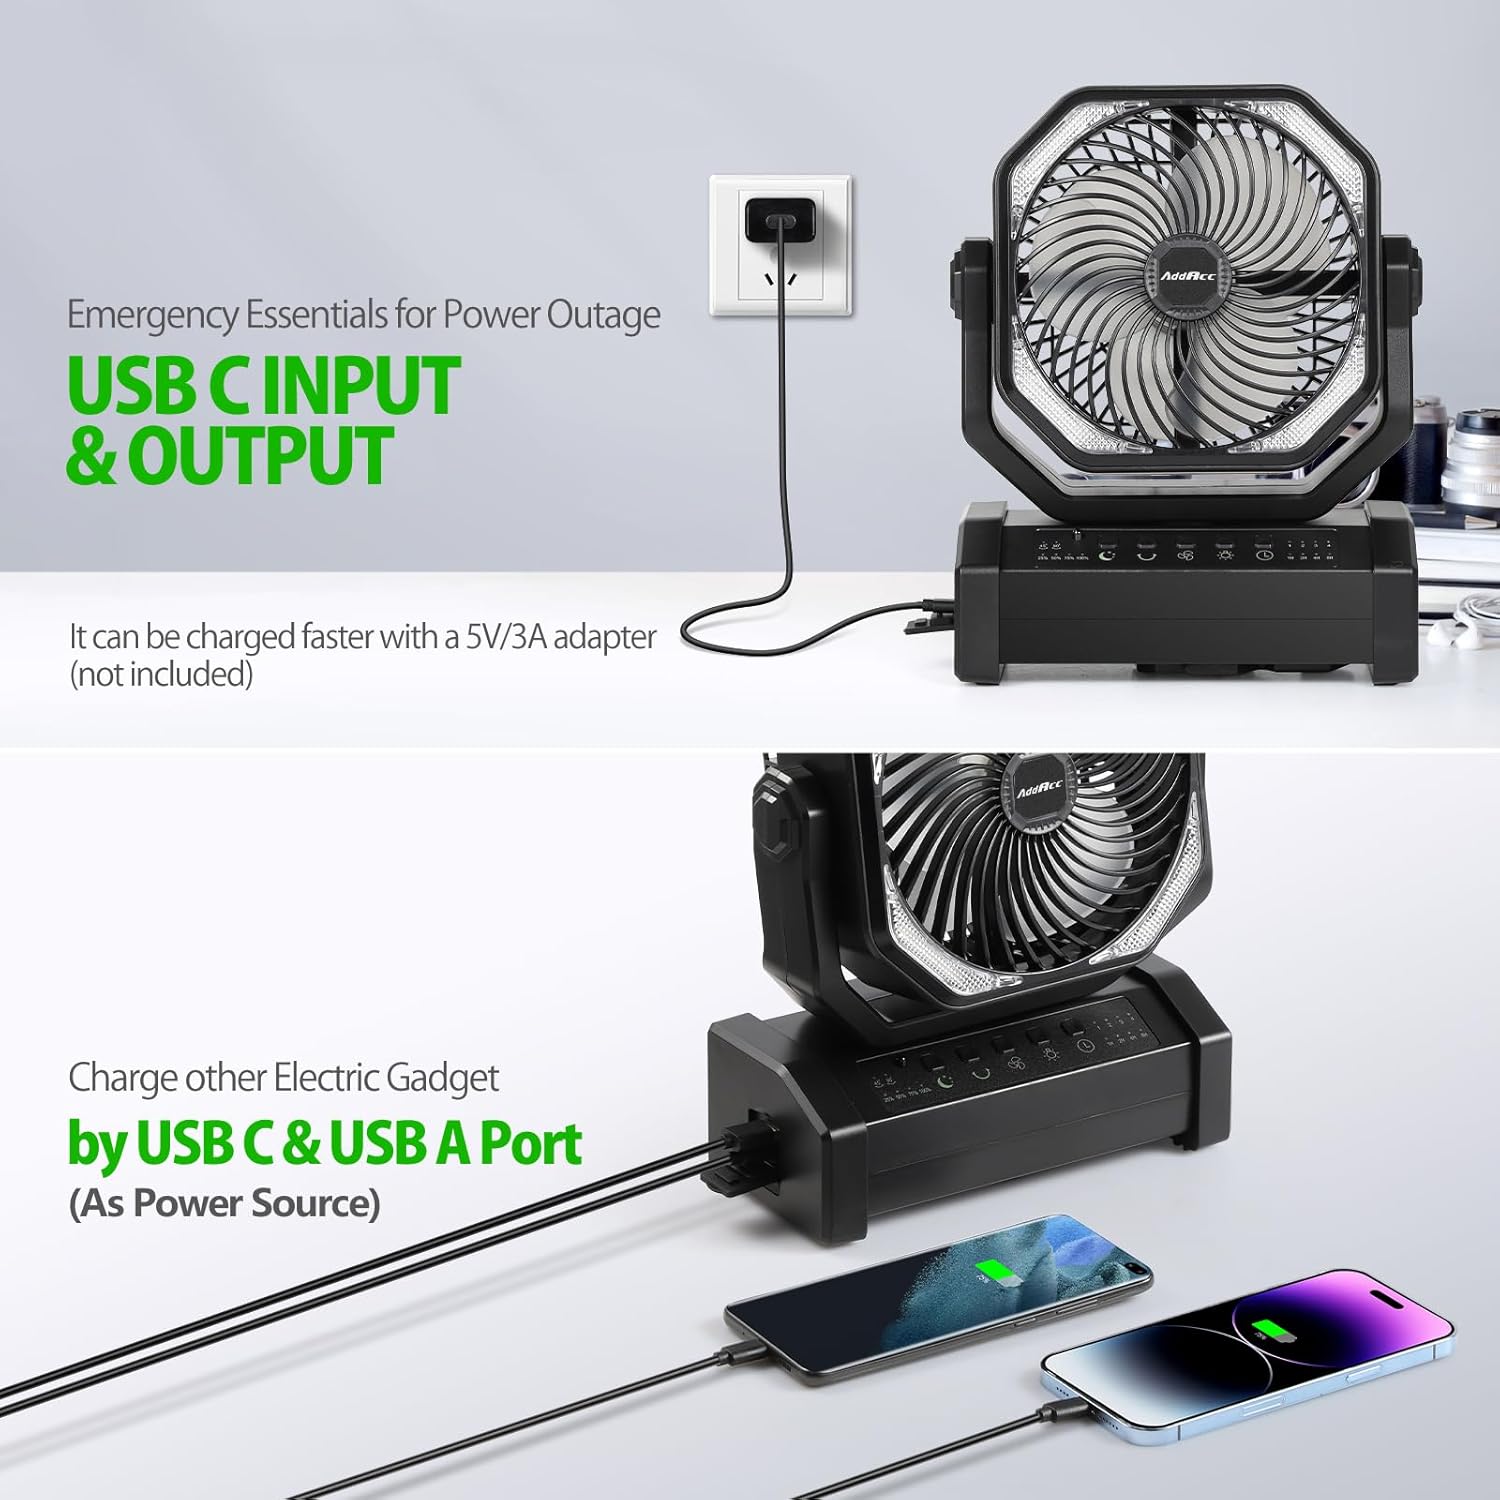
Image 4.1: The fan being charged via its USB-C input port.

Image 4.2: Fast charging capabilities with Type-C input and USB-A output.
5. Operating Instructions
5.1 Control Panel Overview
The fan can be operated using the buttons on the control panel or the remote control. Each function has a dedicated button.

Image 5.1: The fan's control panel with buttons for Sleep Mode, Oscillations, Speed, Light, and Timer.
5.2 Power On/Off
- Press the Power button on the control panel or remote to turn the fan on or off.
5.3 Fan Speed Adjustment
- Press the Speed button on the control panel or remote to cycle through 4 fan speeds.

Image 5.2: The four powerful airflow settings and their reach.
5.4 Light Brightness Adjustment
- Press the Light button on the control panel or remote to cycle through 3 brightness settings (100, 200, 400 lumens).

Image 5.3: The fan's integrated light offering three brightness levels.

Image 5.4: The three brightness settings of the fan's light.
5.5 Oscillation Control
- Press the Oscillation button on the control panel or remote to activate 45-degree or 90-degree auto oscillation. Press again to stop.
- Manually adjust the fan head up or down to pivot it 270 degrees.
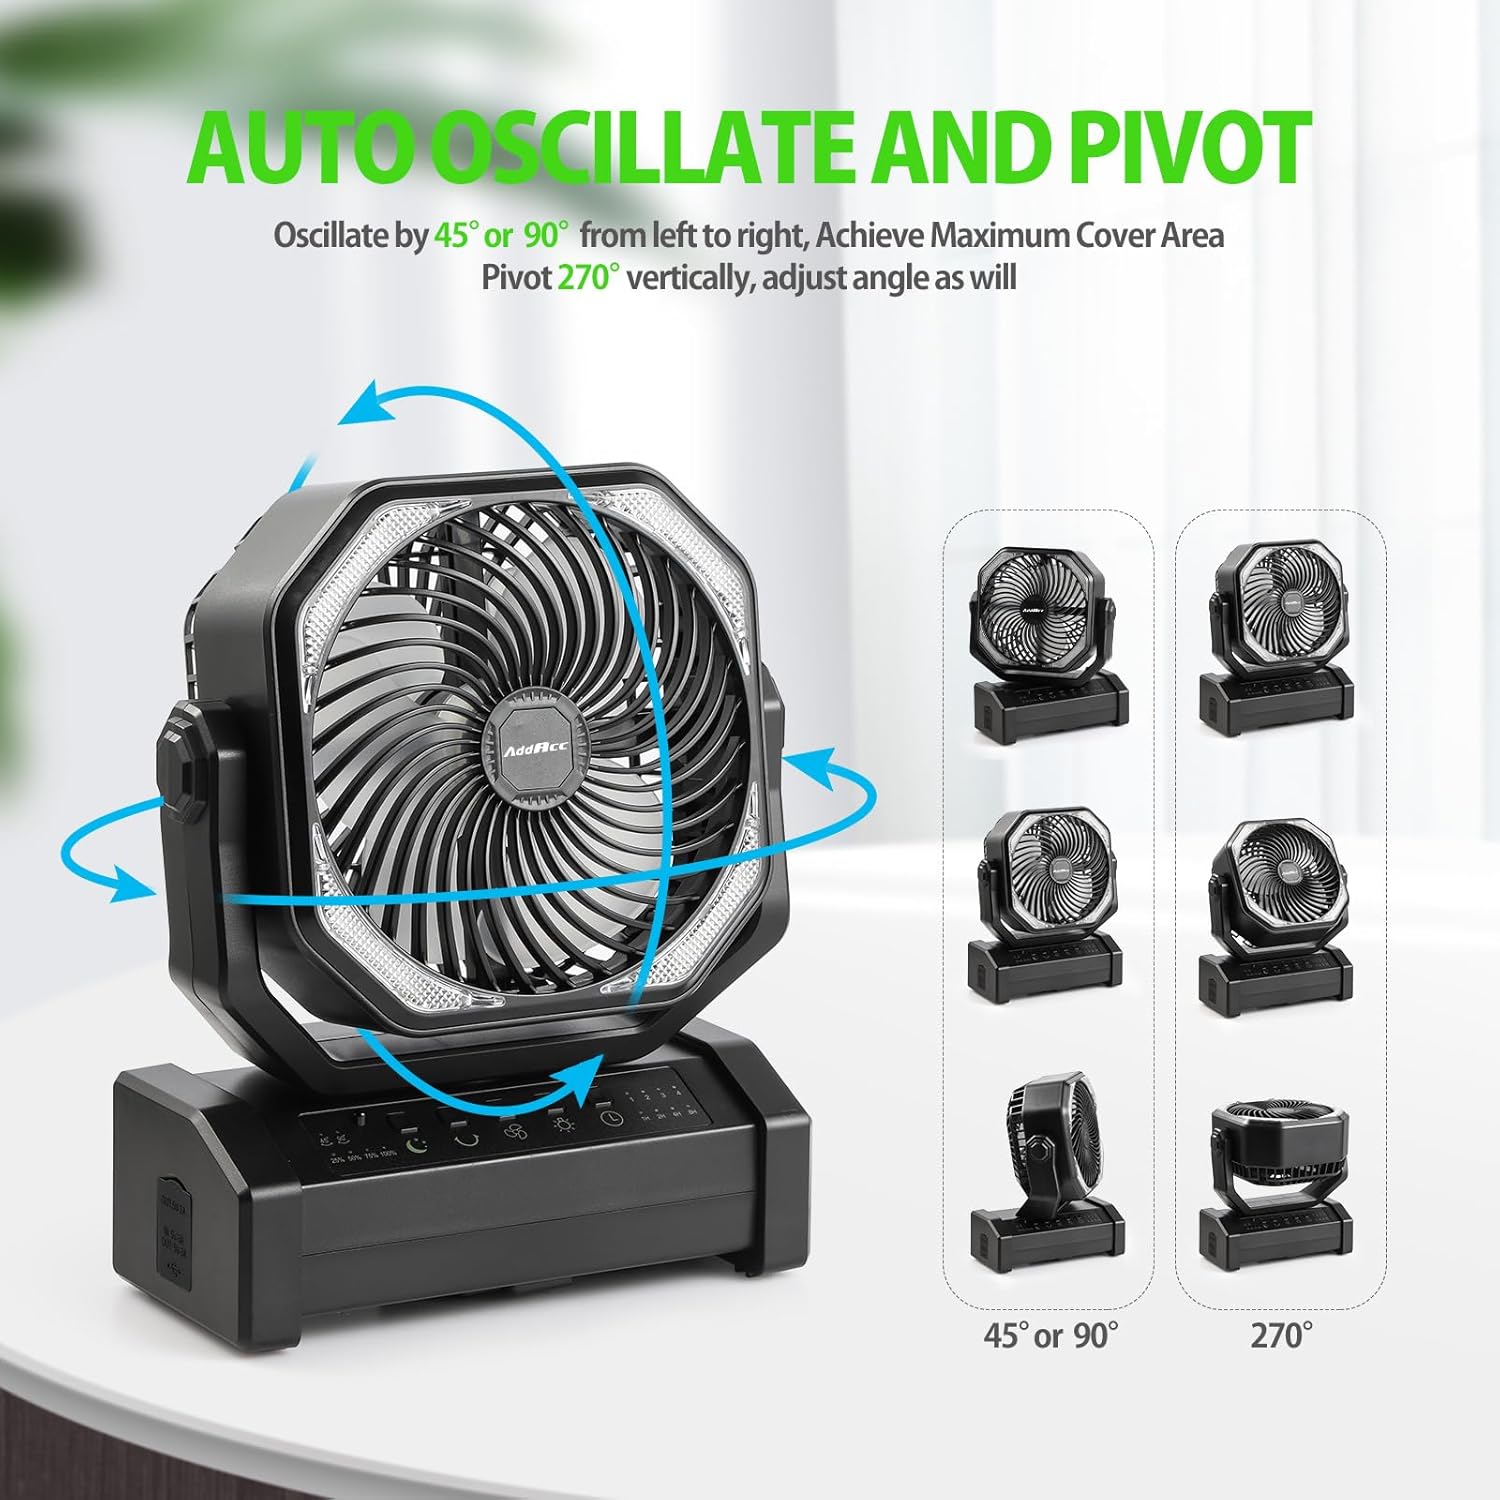
Image 5.5: The fan's auto oscillation and 270-degree vertical pivot capabilities.

Image 5.6: The 270-degree angle adjustment and 45/90-degree auto-rotation feature.
5.6 Timer Function
- Press the Timer button on the control panel or remote to set the fan to automatically turn off after 1, 2, 4, or 8 hours.
5.7 Sleep Mode
- Press the Sleep Mode button on the control panel or remote to turn off all indicator lights for a darker environment.

Image 5.7: The fan's night mode and timer settings for comfortable sleep.
5.8 Remote Control
- Ensure the remote control has a working battery.
- Point the remote directly at the fan's receiver for optimal functionality.

Image 5.8: Using the remote control to adjust fan settings.

Image 5.9: Customizing fan speed with the remote control.
6. Charging and Power Bank Function
6.1 Charging the Fan
Refer to Section 4.1 for detailed instructions on charging the fan.
6.2 Using as a Power Bank
- Connect your electronic device (e.g., smartphone, tablet) to the fan's USB-A output port using a compatible charging cable.
- The fan's internal battery will provide power to charge your device.
Image 6.1: The fan's ability to charge other devices via its USB-A port.

Image 6.2: The fan serving as a backup power source during outages.
7. Maintenance
7.1 Cleaning
- Ensure the fan is turned off and unplugged before cleaning.
- Wipe the exterior surfaces with a soft, damp cloth. Do not use abrasive cleaners or solvents.
- For dust accumulation on the fan blades, use a soft brush or compressed air. Do not attempt to disassemble the fan for cleaning.
7.2 Storage
- Store the fan in a cool, dry place away from direct sunlight and extreme temperatures.
- If storing for an extended period, charge the battery to approximately 50% every 3 months to maintain battery health.
8. Troubleshooting
If you encounter issues with your AddAcc D12 fan, refer to the following common problems and solutions:
| Problem | Possible Cause | Solution |
|---|---|---|
| Fan does not turn on. | Battery is depleted. | Charge the fan fully (refer to Section 4.1). |
| Remote control is not working. | Remote battery is low or depleted; Obstruction between remote and fan; Remote not pointed correctly. | Replace remote battery; Ensure clear line of sight; Point remote directly at the fan. |
| Fan is not oscillating. | Oscillation function is not activated. | Press the Oscillation button on the control panel or remote. |
| Device not charging from fan's USB-A port. | Fan battery is low; Cable is faulty; Device is incompatible. | Charge the fan; Try a different USB cable; Ensure device is compatible with 5V/2A output. |
9. Specifications
| Feature | Detail |
|---|---|
| Brand | AddAcc |
| Model Name | D12 |
| Power Source | Battery Powered |
| Battery Capacity | 20000mAh (2 Lithium Ion batteries included) |
| Fan Run Time | Up to 60 hours |
| Light Run Time | Up to 200 hours |
| Charging Input | USB-C (5V/3A recommended) |
| Power Bank Output | USB-A (5V/2A) |
| Fan Speeds | 4 |
| Air Flow Capacity | 184 Cubic Feet Per Minute |
| Oscillation | 45/90 degrees Auto Oscillation |
| Vertical Pivot | 270 degrees |
| LED Light Brightness | 3 settings (up to 400 lumens) |
| Timer Settings | 1h/2h/4h/8h |
| Control Method | Push Button, Remote Control |
| Product Dimensions | 4.06"D x 8.58"W x 10.67"H |
| Item Weight | 3.43 pounds |
| Material | Tough ABS |
| Indoor/Outdoor Usage | Indoor, Outdoor |
10. Warranty and Support
AddAcc provides a 360-day free return policy for this product. For any inquiries or support needs, a 24-hour online service is available. Please refer to your purchase platform for specific contact details or visit the official AddAcc store for assistance.
For additional information or to explore other AddAcc products, visit the AddAcc Store.