1. Introduction
Thank you for choosing the TAGVIT 1/2-Inch Drive Digital Torque Wrench. This precision instrument is designed for accurate torque measurement in various applications, including automotive, motorcycle, and bicycle maintenance. This manual provides essential information for the safe and effective operation, setup, and maintenance of your digital torque wrench. Please read it thoroughly before use.
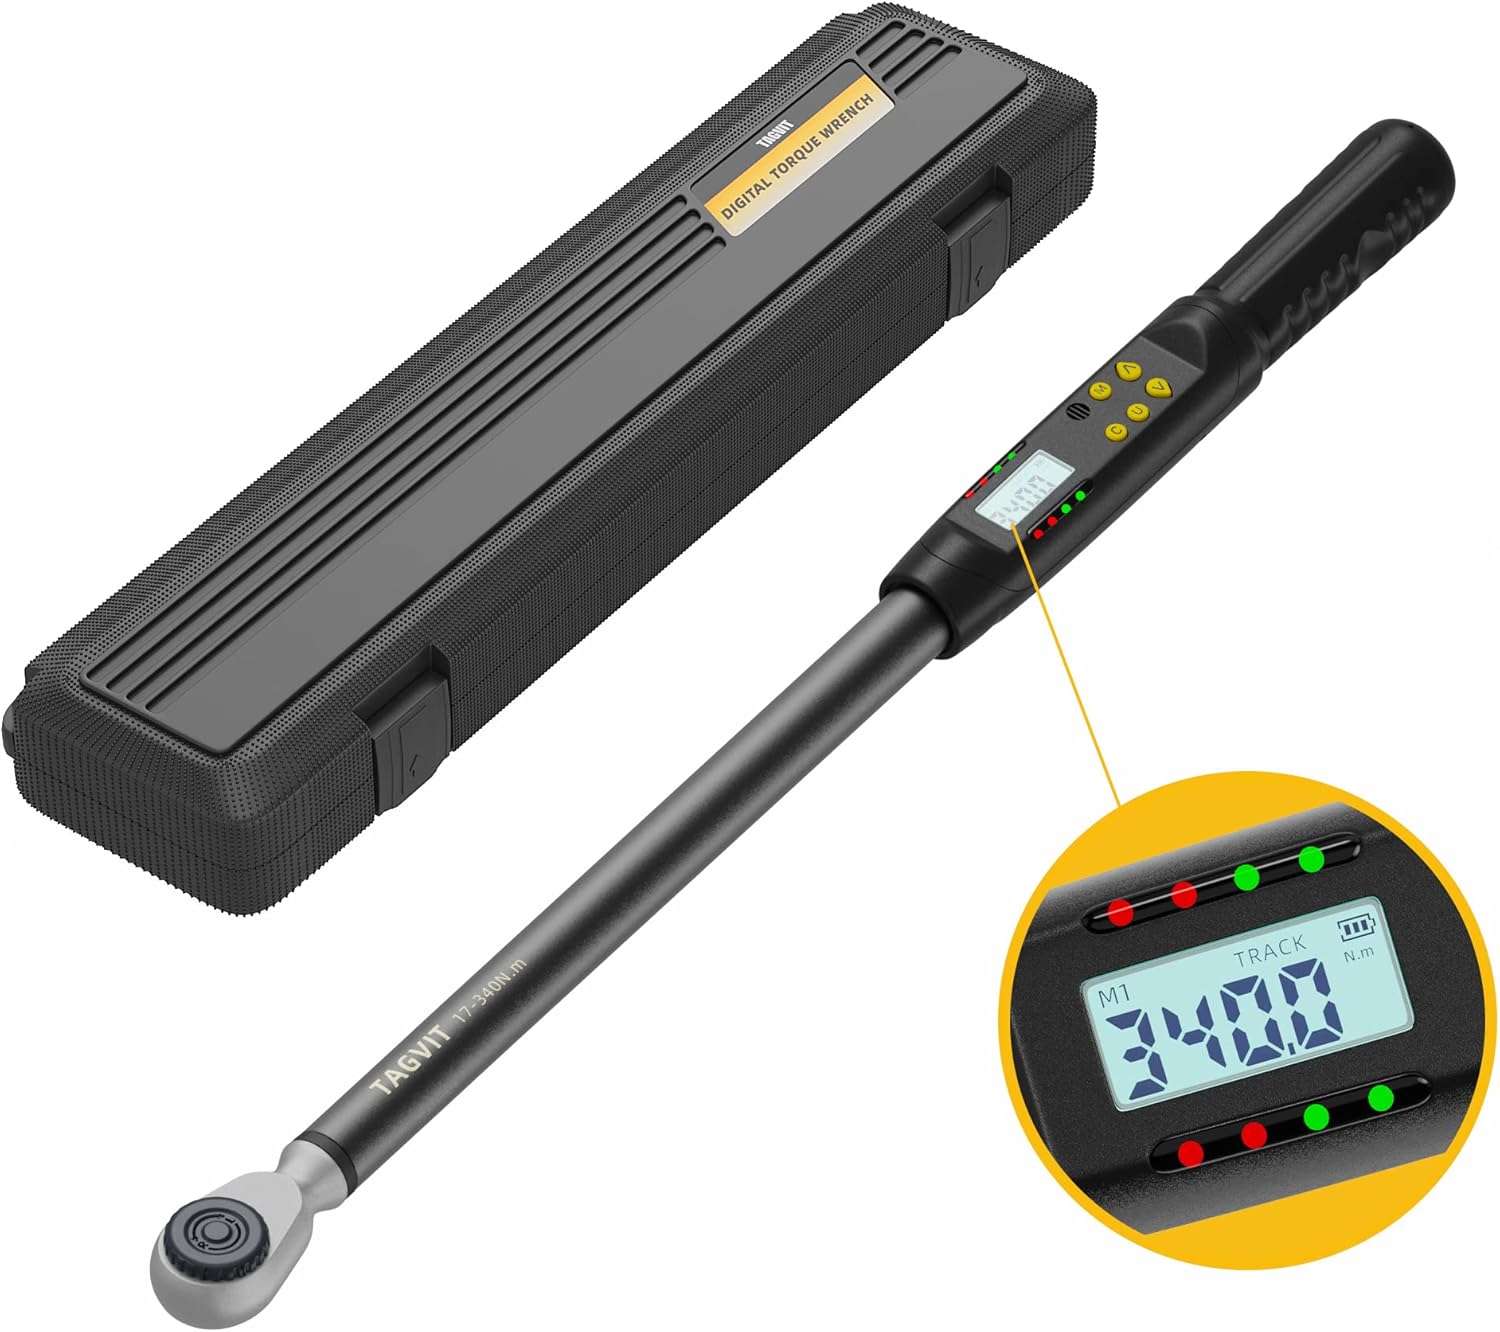
Image 1.1: TAGVIT 1/2-Inch Drive Digital Torque Wrench with its storage case. The wrench features a digital display and control buttons.
2. Safety Information
Always observe the following safety precautions to prevent injury or damage to the tool:
- Wear appropriate personal protective equipment, such as safety glasses, when operating the wrench.
- Do not exceed the maximum torque capacity of the wrench (12.5-250.8 ft.lb / 17-340 Nm).
- Ensure the wrench is clean and free from oil or grease before use to maintain a secure grip.
- Avoid dropping the wrench or subjecting it to severe impacts, as this can affect its accuracy.
- Store the wrench in its protective case in a dry, clean environment when not in use.
- Do not attempt to disassemble or modify the wrench. Refer servicing to qualified personnel.
3. Package Contents
Verify that all items are present in the package:
- TAGVIT 1/2-Inch Drive Digital Torque Wrench
- Protective Storage Case
- User Manual (this document)
- AA Batteries (2x)
4. Setup
4.1 Battery Installation
The digital torque wrench requires two AA batteries for operation. Follow these steps to install them:
- Locate the battery cover at the end of the wrench handle.
- Use a screwdriver or coin to turn the battery cover counter-clockwise to open it.
- Insert two AA batteries, ensuring correct polarity (+/-).
- Replace the battery cover and turn it clockwise to secure it.
- Press the power button to turn on the wrench.

Image 4.1: Step-by-step guide for installing AA batteries into the wrench handle.
5. Operating Instructions
5.1 Controls Overview
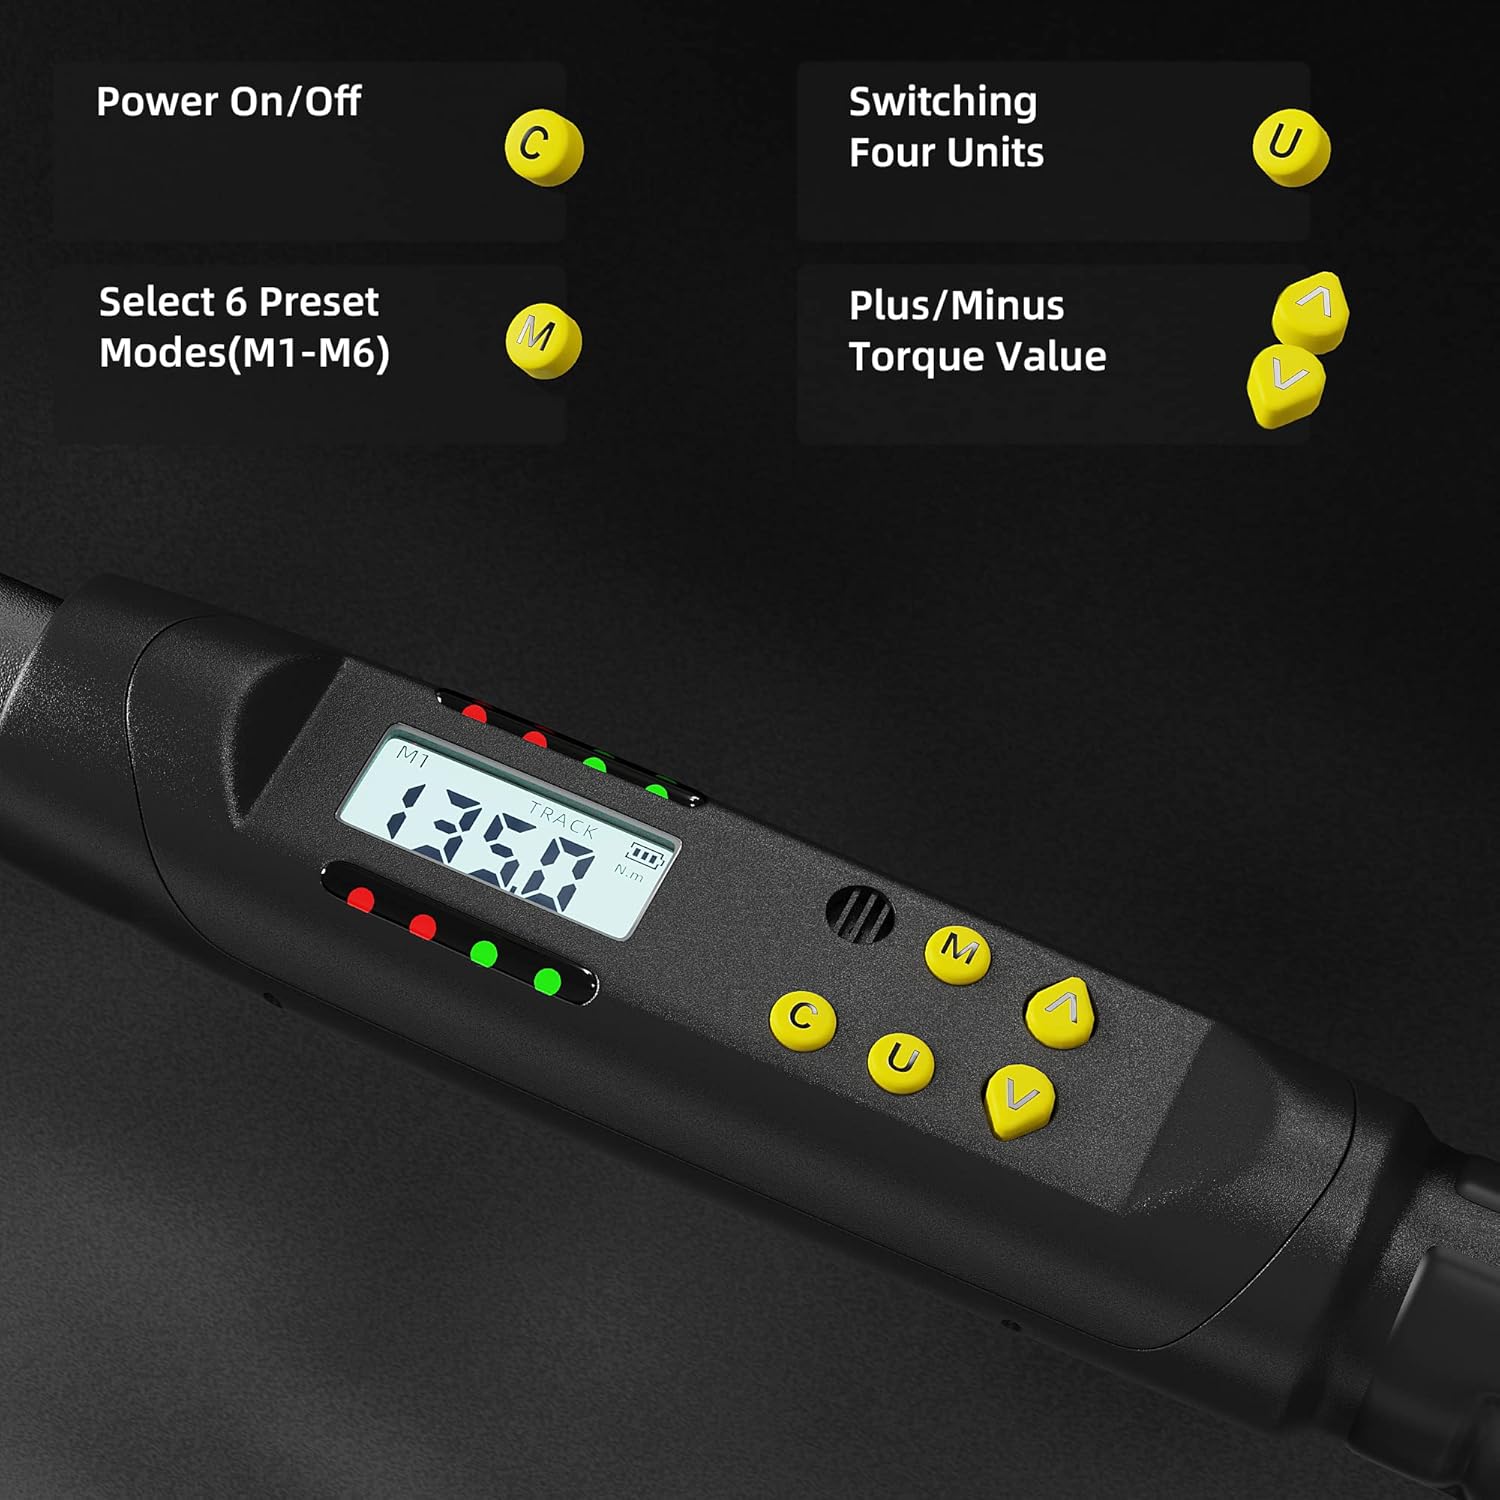
Image 5.1: The control panel features buttons for Power (C), Unit (U), Mode (M), and adjustment arrows (^ / V).
- C Button: Power On/Off.
- U Button: Switch between torque measurement units.
- M Button: Select preset modes (M1-M6) and lock/unlock settings.
- ^ / V Buttons: Adjust torque values up or down.
5.2 Power On/Off
Press the C button to turn the wrench on. To turn it off, press and hold the C button for a few seconds.
5.3 Unit Switching
Press the U button to cycle through the available torque units: Nm, Ft.lb, In.lb, and Kg.cm.

Image 5.2: The 'U' button allows quick selection of desired torque units.
5.4 Setting Torque Value
To set a target torque value:
- Ensure the wrench is in a preset mode (M1-M6). Press the M button to cycle through modes if necessary.
- Use the ^ (Up) and V (Down) buttons to adjust the displayed torque value to your desired setting.
- The wrench will automatically save the setting for the selected preset mode.
5.5 TRACK / PEAK Mode
The wrench offers two measurement modes:
- TRACK Mode: Displays the real-time torque value as force is applied.
- PEAK Mode: Displays the maximum torque value achieved during the application.
To switch between TRACK and PEAK modes, press and hold the U and ^ buttons simultaneously.

Image 5.3: Visual representation of TRACK and PEAK modes on the wrench display.
5.6 Direction Adjustment
The ratchet head allows for both clockwise (CW) and counter-clockwise (CCW) operation. To change the direction:
- Hold the square drive of the ratchet head.
- Turn the circular turntable on the ratchet head to select the desired direction (R for right/clockwise, L for left/counter-clockwise).

Image 5.4: Adjusting the ratchet head for dual-direction use.
5.7 Buzzer & LED Notification
When approaching the preset torque value, the wrench provides visual and audible feedback:
- 85-90% of Target Torque: The LED lights will flash intermittently, and the buzzer will emit intermittent beeps.
- 100% of Target Torque: The LED lights will flash continuously, and the buzzer will emit a continuous beep. Stop applying force immediately.

Image 5.5: The wrench provides clear visual and audible alerts as the target torque is reached.
5.8 Locking/Unlocking Settings
To prevent accidental changes to the set torque value, you can lock the settings:
- Press and hold the M button to toggle between 'LoC' (Locked) and 'UnL' (Unlocked) states.

Image 5.6: The display indicates when settings are locked or unlocked.
5.9 Data Storage
The wrench can store up to 500 groups of torque data. To view stored data:
- In TRACK mode, long press the U key to enter 'SETTING MODE'.
- Press the M key to cycle to 'READ MODE'.
- Press the U key to confirm 'READ MODE'.
- Use the ^ / V keys to scroll through the stored data records.

Image 5.7: Steps to access and review previously recorded torque values.
5.10 Auto Sleep Function
To conserve battery life, the wrench features an auto-sleep function:
- If inactive for 3 minutes, the display will dim.
- If inactive for 5 minutes, the wrench will automatically power off.

Image 5.8: The auto-sleep feature helps extend battery life.
6. Maintenance
6.1 Cleaning
Wipe the wrench clean with a soft, dry cloth after each use. Do not use abrasive cleaners or solvents, as these can damage the display or finish.
6.2 Storage
Store the digital torque wrench in its protective case in a dry, temperature-controlled environment. Remove batteries if the wrench will not be used for an extended period to prevent leakage.
6.3 Calibration
Digital torque wrenches are precision tools and may require periodic calibration to maintain accuracy. Refer to a professional calibration service if you suspect accuracy issues or after prolonged use.
7. Troubleshooting
| Problem | Possible Cause | Solution |
|---|---|---|
| Wrench does not power on. | Dead or incorrectly installed batteries. | Check battery polarity or replace with new AA batteries. |
| Inaccurate torque readings. | Wrench needs calibration; improper technique. | Ensure proper technique (smooth, steady pull). Consider professional calibration. |
| Display shows "Er0". | Internal error. | Turn the wrench off and then on again. If the error persists, contact customer support. |
| Buzzer/LED not working. | Low battery; feature disabled (not applicable for this model). | Replace batteries. Ensure the wrench is functioning correctly otherwise. |
8. Specifications
| Feature | Detail |
|---|---|
| Brand | TAGVIT |
| Model Number | SX |
| Drive Size | 1/2-Inch |
| Torque Range | 12.5-250.8 ft.lb / 17-340 Nm |
| Accuracy (CW) | ±2% |
| Accuracy (CCW) | ±3% |
| Torque Units | Nm, Ft.lb, In.lb, Kg.cm |
| Ratchet Head | 45-tooth, Dual Direction |
| Measurement Modes | TRACK, PEAK |
| Preset Modes | M1-M6 |
| Data Storage | Up to 500 groups |
| Power Source | 2 x AA Batteries |
| Material | Chrome Vanadium Steel |
| Item Weight | 2.51 Kilograms (5.52 pounds) |
| Product Dimensions | 29.45 x 3.46 x 2.68 inches |
9. Warranty and Support
For warranty information or technical support, please refer to the documentation provided with your purchase or contact TAGVIT customer service through the retailer where the product was purchased. Keep your proof of purchase for warranty claims.


