1. Product Overview
The ELS PET Dog Grooming Kit & Vacuum Suction is designed to provide a comprehensive solution for pet grooming at home. This system integrates powerful vacuum suction with various grooming tools to capture up to 99% of pet hair during grooming and trimming, ensuring a clean environment. It features a low-noise design to minimize pet anxiety and offers adjustable suction levels for different grooming needs.

Image: ELS PET Dog Grooming Kit and Vacuum Suction unit in use with a golden retriever.
2. Important Safety Instructions
Please read all safety instructions carefully before using the ELS PET Dog Grooming Kit & Vacuum Suction. Failure to follow these instructions may result in electric shock, fire, or serious injury.
- Avoid using the device near water sources or in wet environments.
- Keep grooming blades and attachments away from eyes and sensitive skin areas of your pet.
- This product is designed for pet use only. Do not use on humans.
- Exercise caution to prevent injury to your pet during grooming.
- Always follow recommended cleaning and maintenance procedures to ensure safe operation.
- Unplug the device from the power outlet before cleaning or performing any maintenance.
- Do not operate the device with a damaged cord or plug. If damaged, contact customer support.
- Keep out of reach of children.
3. Package Contents
Verify that all components are present in the package:
- Main Vacuum Unit
- Flexible Hose
- Electric Dog Clippers
- 4 Hair-Clipping Combs (3mm, 6mm, 9mm, 12mm)
- Grooming Brush (Slicker Brush)
- Deshedding Brush
- Nozzle Head
- Cleaning Brush
- Power Adapter
- User Manual

Image: Electric dog clippers with various comb attachments.

Image: Unique hair-smoothing slicker brush attachment.
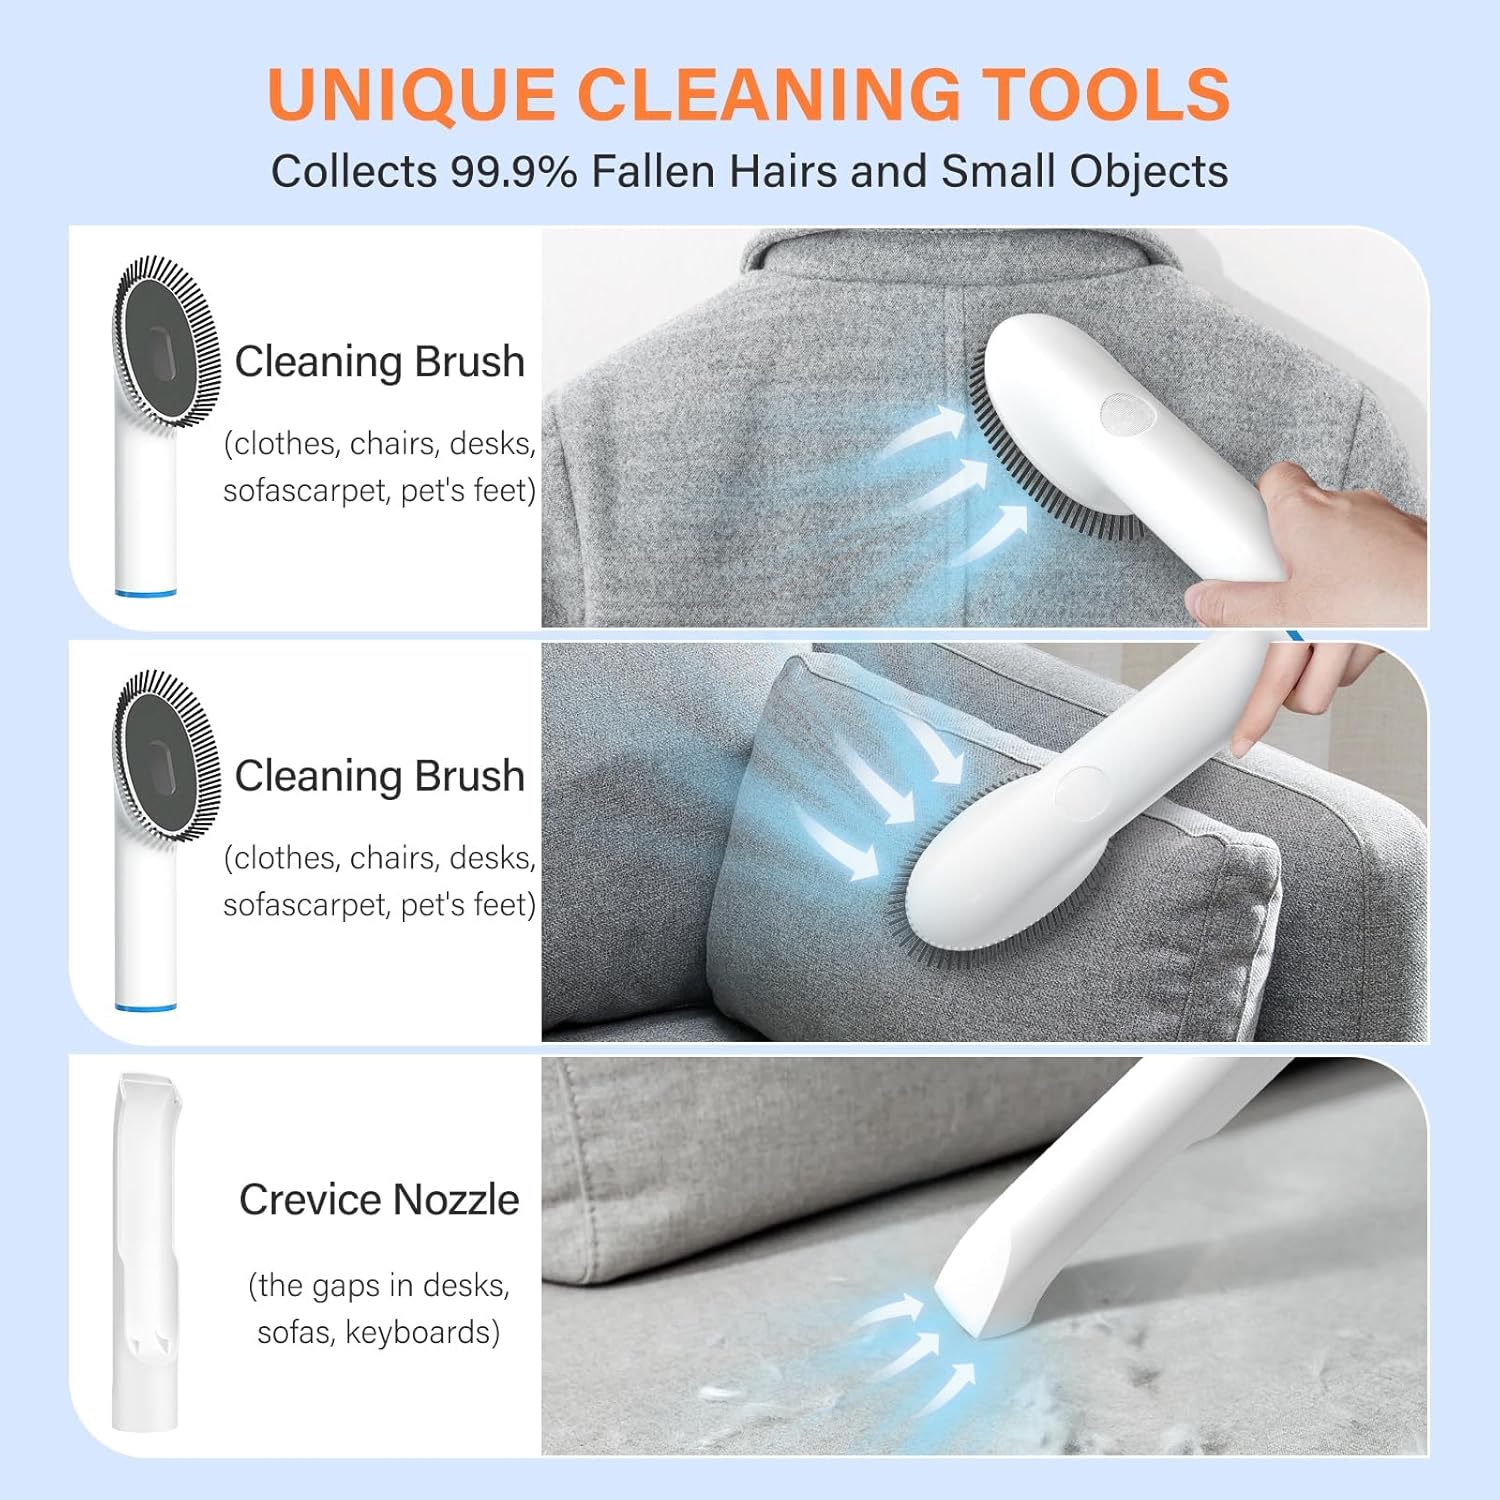
Image: Unique cleaning tools including a cleaning brush and crevice nozzle.
4. Assembly and Initial Setup
Follow these steps to assemble your ELS PET Dog Grooming Kit:
- Unpack Components: Carefully remove all items from the packaging.
- Connect Hose: Attach the flexible hose to the main vacuum unit's suction port. Ensure it clicks securely into place.
- Attach Desired Tool: Select the appropriate grooming tool (e.g., grooming brush, clippers) and attach it to the end of the flexible hose. Ensure a snug fit.
- Power Connection: Plug the power adapter into the main vacuum unit and then into a standard electrical outlet.
- Prepare Pet: Introduce your pet to the device gradually, especially for first-time use. Allow them to sniff and get accustomed to the unit before turning it on.
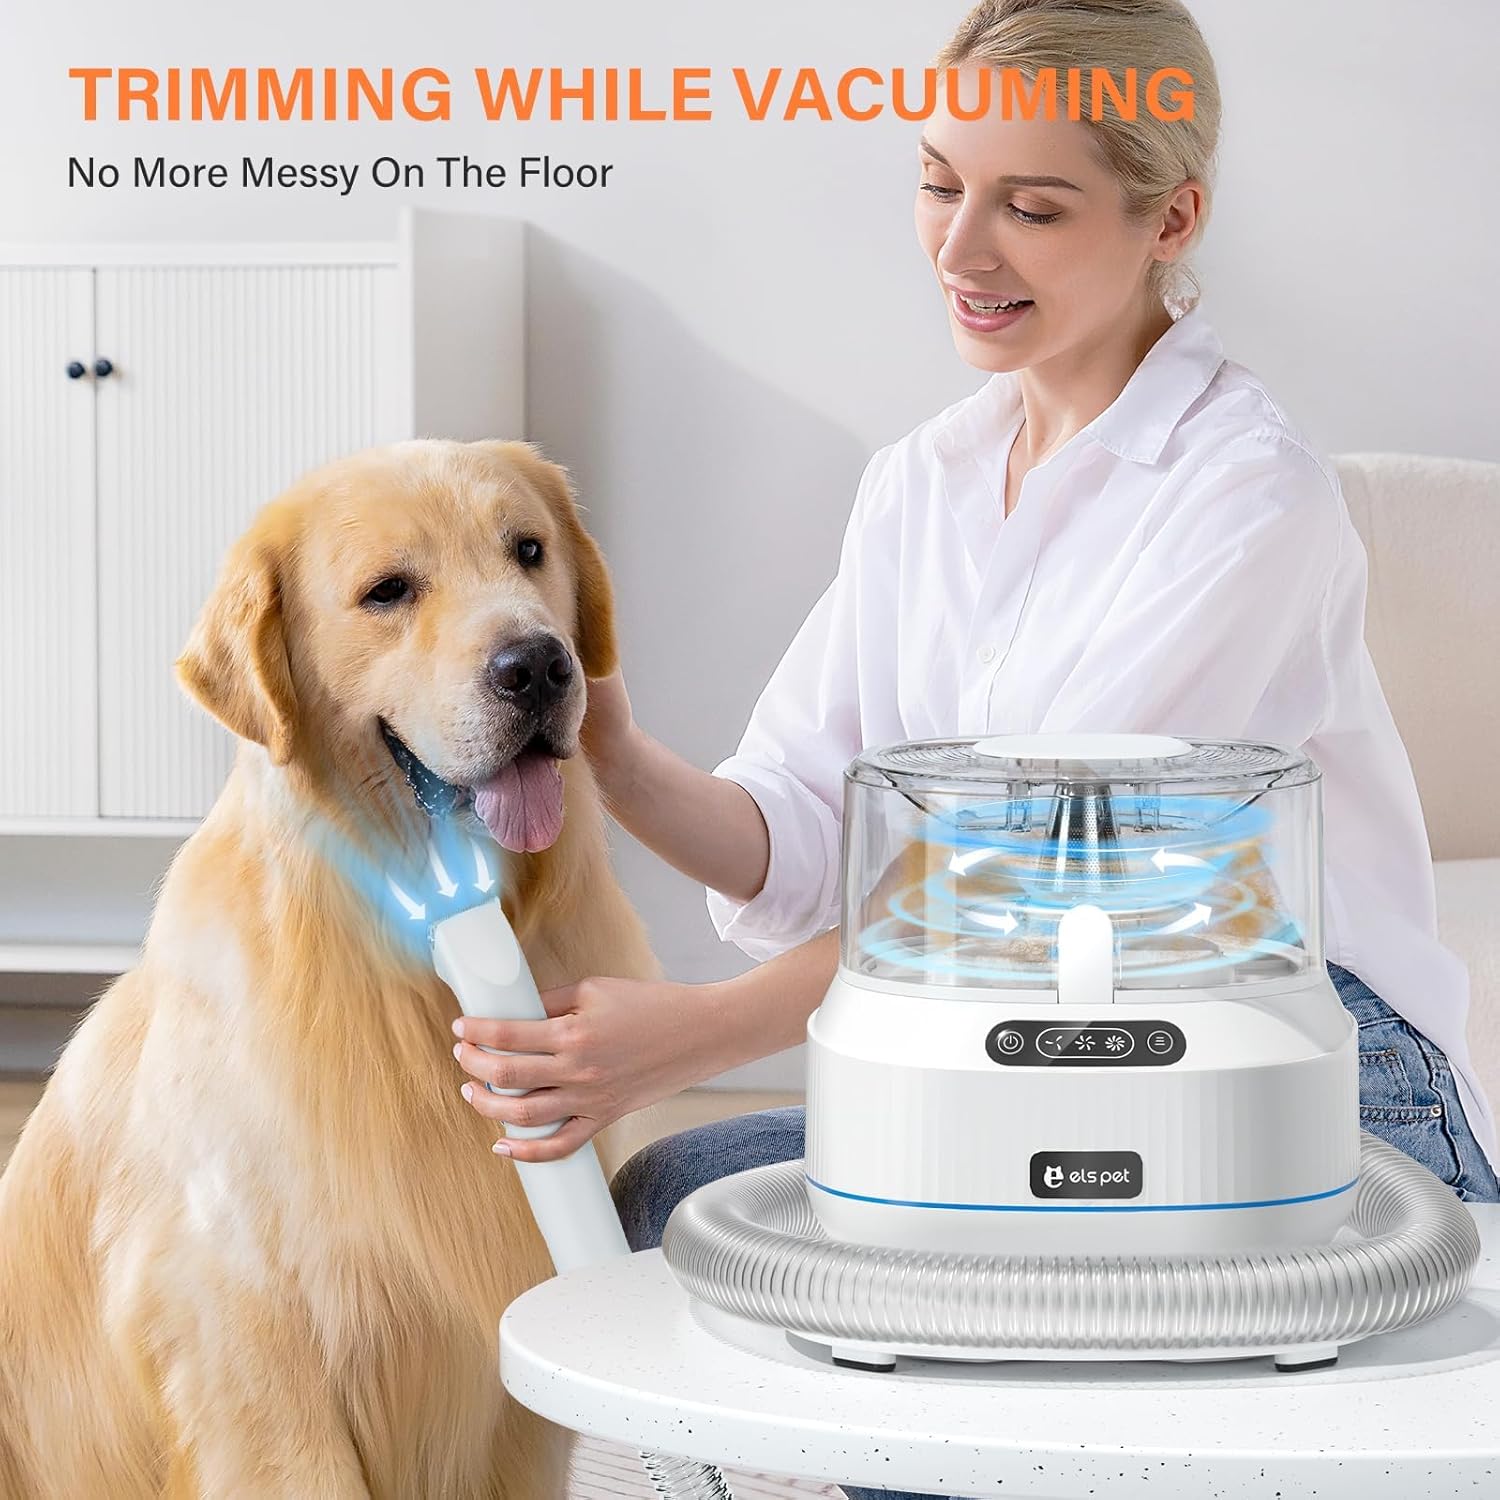
Image: Assembled ELS PET Grooming Kit ready for use.
5. Operating Your Grooming Kit
5.1 Powering On and Suction Adjustment
- Turn On: Press the power button on the main unit to turn on the device. For first-time users or sensitive pets, start with the lowest power setting.
- Adjust Suction: The device features three adjustable suction levels (6-10kpa). Use the suction control buttons on the unit to switch between low, medium, and high settings as needed for different hair types and grooming tasks.

Image: Vacuum unit showing adjustable suction levels and low noise feature.
5.2 Using the Grooming Tools
- Grooming Brush (Slicker Brush): Use this brush for daily grooming to gently remove loose hair, dirt, and tangles. It helps keep your pet's coat shiny and smooth.
- Deshedding Brush: Ideal for pets with thick undercoats, this tool effectively removes excess shedding hair, reducing hair around your home.
- Electric Dog Clippers: Attach the desired comb guide (3mm, 6mm, 9mm, or 12mm) to the clippers for precise hair trimming. Move the clippers smoothly against the direction of hair growth.
- Nozzle Head: Use this attachment to vacuum pet hair from hard-to-reach areas, such as between sofa cushions, car seats, or floor crevices.
- Cleaning Brush: This brush is effective for collecting pet hair from carpets, rugs, upholstery, and clothing.

Image: Daily grooming with the slicker brush.

Image: Monthly hair trimming with the electric clippers.

Image: Hair cleaning and vacuuming using the cleaning brush and nozzle head.
6. Care and Maintenance
Regular cleaning and maintenance will prolong the life and efficiency of your grooming kit.
6.1 Emptying the Dustbin
The 1.4L dustbin is designed for easy emptying. When the dustbin is full, or after each grooming session:
- Ensure the device is turned off and unplugged.
- Press the release button to detach the dustbin from the main unit.
- Open the dustbin lid and empty the collected pet hair and debris into a trash receptacle.
- Reattach the dustbin securely to the main unit.
6.2 Cleaning Filters and Tools
- Dustbin Filter: The dustbin contains a removable filter. Regularly clean this filter by tapping out debris or rinsing it with water. Ensure the filter is completely dry before reinserting it.
- Grooming Tools: After each use, remove any hair from the grooming brushes and clippers. The clipper blades can be cleaned with the provided cleaning brush. For thorough cleaning, wipe tools with a damp cloth. Do not immerse electrical components in water.
- Hose: Check the flexible hose for any blockages and clear them if necessary.
7. Troubleshooting Guide
If you encounter any issues with your ELS PET Dog Grooming Kit, refer to the table below for common problems and solutions.
| Problem | Possible Cause | Solution |
|---|---|---|
| Device does not turn on | Not plugged in; Power outlet issue; Damaged power cord. | Ensure power cord is securely plugged in. Test outlet with another device. Inspect power cord for damage; contact support if damaged. |
| Low suction power | Dustbin full; Filter clogged; Hose or attachment blocked. | Empty the dustbin. Clean or replace the filter. Check hose and attachments for blockages and clear them. |
| Clippers not cutting effectively | Blades dull or dirty; Hair tangled in blades. | Clean blades thoroughly. Ensure blades are free of tangled hair. |
| Excessive noise | Blockage in hose or unit; Unit operating at highest suction setting. | Check for and clear any blockages. Reduce suction level if noise is due to high power. |
8. Product Specifications
| Feature | Specification |
|---|---|
| Model Number | LMJ-PRO1 |
| Brand | ELS PET |
| Product Dimensions | 24 x 24 x 20 cm |
| Item Weight | 4.2 kg |
| Power Source | Corded Electric |
| Suction Range | 6-10 Kpa (3-level adjustable) |
| Noise Level | Below 60 decibels |
| Dustbin Capacity | 1.4 L |
| Blade Material | Stainless Steel |
| Target Audience | Cats, Dogs |
| Batteries Required | No (1 Lithium Ion battery included for clippers, if applicable) |
9. Warranty and Customer Support
ELS PET provides a 1-year warranty for this product from the date of purchase. This warranty covers manufacturing defects and malfunctions under normal use.
If you require assistance, have questions about the product, or need to claim warranty service, please contact ELS PET customer support via email. Our team is committed to providing a satisfactory solution within 12 hours.
Please retain your proof of purchase for warranty claims.