1. Introduction
Thank you for choosing the Fulljion 60W Automatic Handheld Soldering Iron Kit. This tool is designed for various soldering applications, including circuit board welding, appliance repair, and home DIY projects. This manual provides essential information for the safe and efficient operation of your soldering iron kit. Please read it thoroughly before use and retain it for future reference.
2. Safety Information
Warning: Soldering iron tips and tubes operate at high temperatures (480-600 degrees Celsius). Improper use can cause severe burns or fire hazards. Always observe the following safety precautions:
- Always wear appropriate personal protective equipment, including safety glasses, to protect against solder splashes.
- Ensure adequate ventilation in your workspace to avoid inhaling solder fumes.
- Do not touch the metal parts of the soldering iron (tip, heater, tube) when it is powered on or still hot.
- After use, immediately turn off the power and allow the tool to cool completely to room temperature before storing.
- Keep the soldering iron and all accessories out of reach of children and pets.
- Never leave a hot soldering iron unattended.
- Use the tool only for its intended purpose.
3. Package Contents
Verify that all items are present in your package:
- 1 x Automatic Soldering Gun
- 2 x Anti-static Tweezers
- 1 x Desoldering Pump
- 1 x Soldering Wire
4. Product Overview
Familiarize yourself with the components of the Fulljion Automatic Soldering Gun:
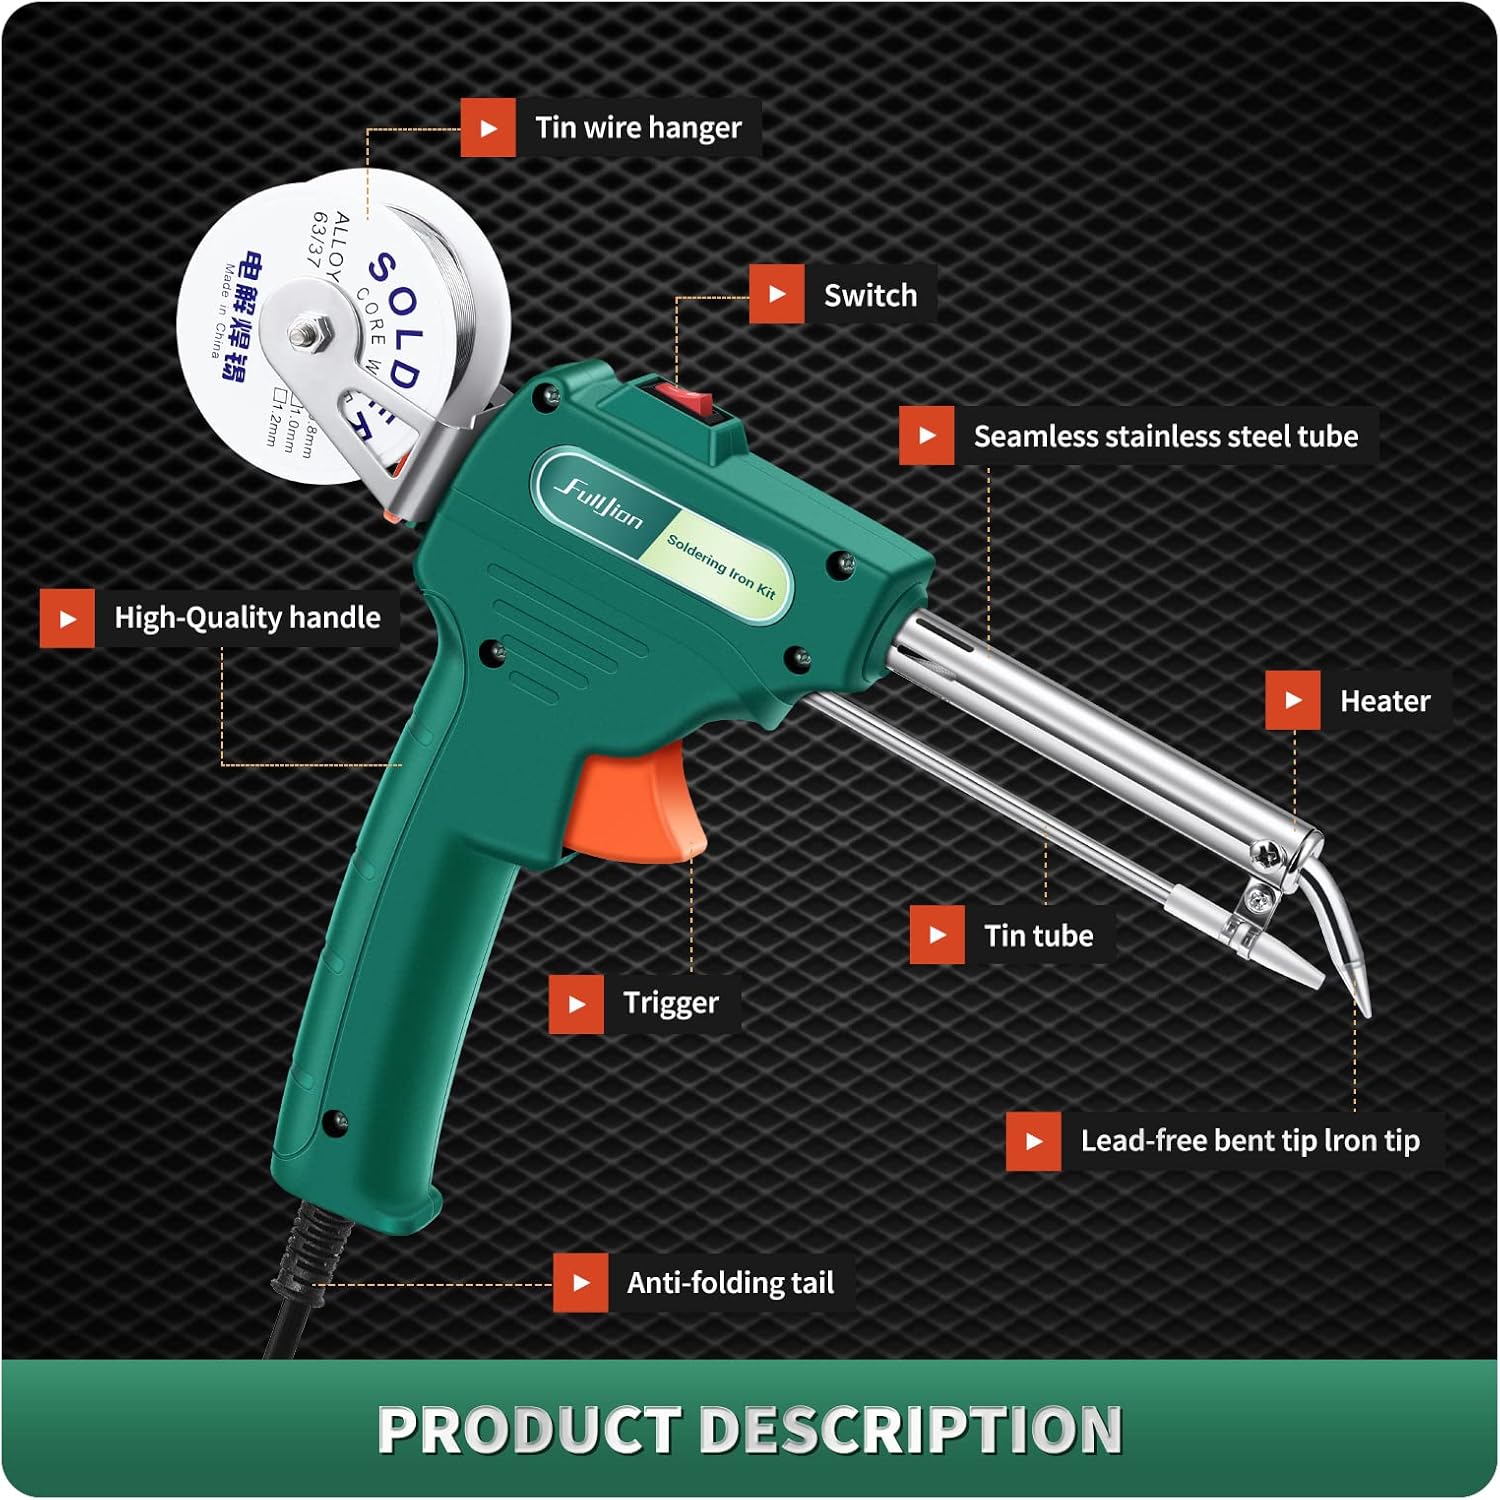
Image 4.1: Soldering Gun Components. This diagram illustrates the key parts of the soldering gun, including the tin wire hanger, switch, seamless stainless steel tube, heater, high-quality handle, tin tube, trigger, lead-free bent tip iron tip, and anti-folding tail.
- Tin Wire Hanger: Holds the solder wire spool.
- Switch: Powers the unit on and off.
- Seamless Stainless Steel Tube: Provides durability and corrosion resistance.
- Heater: Rapidly heats the soldering tip.
- High-Quality Handle: Ergonomically designed for comfortable grip.
- Tin Tube: Guides the solder wire to the tip.
- Trigger: Activates the automatic solder feed mechanism.
- Lead-Free Bent Tip Iron Tip: The heated point for soldering.
- Anti-folding Tail: Protects the power cord connection.
5. Setup and Operation
5.1 Loading Solder Wire
Follow these steps to properly load the solder wire into the automatic soldering gun:
- Rotate the nut and straighten the tin wire: Ensure the solder wire is straight for smooth feeding.
- Install the clip and tin wire: Secure the solder wire spool onto the hanger.
- Pass the tin wire in a straight line to the tip of the soldering iron: Carefully feed the wire through the inlet until it reaches the tin guide tube.

Image 5.1: Solder Wire Loading Process. This image demonstrates the three steps for loading solder wire: straightening the wire, installing the spool, and feeding the wire into the gun.
5.2 Initial Use and Soldering
When using the soldering iron for the first time, or after a period of disuse:
- Preheat: Plug in the soldering gun and turn on the power switch. Allow it to preheat for a few minutes. It is normal for some smoke to be produced during the initial preheating phase.
- Automatic Solder Feed: Once heated, pull the trigger. The self-reset ratchet trigger buckle will feed solder wire automatically to the tip, allowing for convenient one-handed operation.
- Soldering: Apply the heated tip to the joint to be soldered, then pull the trigger to feed solder onto the joint. Ensure the joint is properly heated for good solder flow.

Image 5.2: Fast Heating and Ergonomic Design. This image highlights the soldering gun's quick heat-up time (approximately 2 minutes), ease of use, anti-scalding handle, and automatic switch for efficient operation.
5.3 Using the Desoldering Pump
The desoldering pump is used to remove excess solder from components or circuit boards:
- Prepare the pump: Press the plunger down until it clicks into place, cocking the pump.
- Melt the solder: Use the soldering iron to heat the solder joint you wish to desolder until the solder melts.
- Remove solder: While the solder is still molten, quickly place the tip of the desoldering pump directly over the melted solder and press the release button. The pump will create a vacuum, sucking up the molten solder. Repeat if necessary to remove all excess solder.

Image 5.3: Desoldering Pump Usage. This image illustrates the steps for using the desoldering pump: cocking the plunger, melting the solder with the iron, and then using the pump to remove the molten solder.
6. Maintenance
Proper maintenance ensures the longevity and performance of your soldering kit:
- Tip Cleaning: Regularly clean the soldering tip with a damp sponge or brass wool to remove oxidation and old solder. A clean tip ensures efficient heat transfer.
- Heating Core Replacement: The soldering gun features a side door design for easy access to the internal components. This allows for convenient observation of internal operation and replacement of the heating core when necessary.

Image 6.1: Side Door Design. This image shows the unique side door design of the soldering gun, which allows for easy inspection and replacement of internal parts like the heating core.
- Storage: Always allow the soldering iron to cool completely before storing it in a safe, dry place, away from dust and moisture.
- Desoldering Pump Cleaning: Periodically disassemble and clean the desoldering pump to remove accumulated solder.
7. Troubleshooting
If you encounter issues with your soldering iron kit, refer to the following common problems and solutions:
- Soldering iron does not heat up:
- Check if the power cord is securely plugged into an active outlet.
- Ensure the power switch on the gun is in the 'ON' position.
- Inspect the power cord for any visible damage.
- Solder wire does not feed properly:
- Ensure the solder wire is straightened and correctly installed on the hanger.
- Verify that the solder wire is fed smoothly through the inlet and tin guide tube without kinks or obstructions. You may need to open the side panel to ensure the wire is correctly aligned.
- Check if the trigger mechanism is functioning correctly.
- Poor solder joints:
- Ensure the soldering tip is clean and properly tinned.
- Allow sufficient preheating time for the iron to reach operating temperature.
- Ensure the components and pads are clean and free of oxidation.
8. Specifications
| Feature | Specification |
|---|---|
| Brand | fulljion |
| Model Number | 3-LTGJ |
| Wattage | 60 watts |
| Power Source | AC |
| Style | Gun |
| Head Style | Pencil |
| Handle Material | Stainless Steel |
| Burner Type | Ceramic |
| Special Features | Portable, Automatic Solder Feed |
| Package Dimensions | 34.39 x 26.39 x 9.5 cm |
| Item Weight | 558 g |
9. Applications
The Fulljion 60W Automatic Handheld Soldering Iron Kit is suitable for a variety of tasks:

Image 9.1: Product Applications. This image illustrates common uses for the soldering iron kit, including electronic repair, home DIY projects, and appliance repair.
- Electronic Repair
- Home DIY Projects
- Appliance Repair
- Circuit Board Welding
- Jewelry Welding
10. Warranty and Support
For warranty information or technical support, please contact the manufacturer directly through their official channels. Keep your purchase receipt as proof of purchase.