
1. Introduction
Thank you for choosing the Philips Walita Essential XL Digital Airfryer. This appliance utilizes Rapid Air Technology to cook your favorite foods with little to no added oil. This manual provides essential information for safe operation, maintenance, and optimal performance of your Airfryer.

Image 1.1: The Philips Walita Essential XL Digital Airfryer in a kitchen setting, ready for use.
2. Important Safety Instructions
Before using the appliance, read this user manual carefully and save it for future reference. Failure to follow these instructions may result in electric shock, fire, or serious injury.
- Do not immerse the appliance in water or any other liquid.
- Ensure the voltage indicated on the appliance corresponds to your local mains voltage before connecting.
- Keep the appliance and its cord out of reach of children.
- Do not operate the appliance if the plug, main cord, or the appliance itself is damaged.
- Always unplug the appliance after use and before cleaning.
- Do not place the appliance against a wall or against other appliances. Leave at least 10 cm free space on the back and sides and 10 cm free space above the appliance.
- Hot air is released through the air outlet opening. Keep your hands and face at a safe distance from the openings.
- The surfaces may become hot during use. Do not touch hot surfaces. Use handles or knobs.
3. Product Components
Familiarize yourself with the parts of your Philips Walita Essential XL Digital Airfryer.
- Main Unit
- Digital Display with Touch Controls
- Basket Handle
- Removable Basket with Non-Stick Grid
- Air Inlet (top)
- Air Outlet (rear)

Image 3.1: Front view of the Airfryer, highlighting the digital display and basket handle.
4. Setup and First Use
Follow these steps to prepare your Airfryer for its first use.
4.1 Unpacking
- Remove all packaging materials.
- Remove any stickers or labels from the appliance.
- Clean the basket and grid thoroughly with hot water, some dishwashing liquid, and a non-abrasive sponge.
- Wipe the inside and outside of the appliance with a moist cloth.
4.2 Placement
- Place the appliance on a stable, horizontal, and level surface.
- Do not place the appliance on non-heat-resistant surfaces.
- Ensure adequate ventilation around the appliance.
4.3 Power Connection
- Plug the main cord into a grounded wall socket.
5. Operating Instructions
Your Airfryer is designed for easy and efficient cooking. It features a digital display with touch controls and seven preset programs.

Image 5.1: The digital display with touch controls and preset cooking options.
5.1 General Operation
- Pull the basket out of the appliance.
- Place the ingredients in the basket. Do not exceed the MAX indication.
- Slide the basket back into the Airfryer.
- Press the power button to turn on the appliance.
5.2 Using Preset Programs
The Airfryer comes with 7 pre-programmed settings for common dishes:
- Frozen snacks
- Fresh fries
- Meat
- Fish
- Chicken thighs
- Cake
- Grilled vegetables
To use a preset:
- After turning on the appliance, select the desired preset icon on the digital display.
- The Airfryer will automatically set the optimal temperature and time.
- Press the start button to begin cooking.
5.3 Manual Temperature and Time Setting
You can manually adjust the temperature and cooking time for custom recipes.
- Use the temperature control buttons (up/down arrows) to set the desired temperature between 80°C and 200°C.
- Use the timer control buttons (up/down arrows) to set the cooking time, up to 30 minutes.
- Press the start button to begin cooking.
5.4 Keep Warm Function
The Airfryer includes a 'Keep Warm' function to maintain your food's temperature after cooking.
- After a cooking cycle, select the 'Keep Warm' icon on the display.
- The appliance will maintain a warm temperature for a set period.

Image 5.2: The Airfryer basket containing food, illustrating the hot air circulation for even cooking.
6. Cleaning and Maintenance
Regular cleaning ensures optimal performance and extends the lifespan of your Airfryer. Always unplug the appliance and allow it to cool down completely before cleaning.
6.1 Cleaning the Basket and Grid
- The removable basket and non-stick grid are dishwasher safe.
- Alternatively, wash them with hot water, dishwashing liquid, and a non-abrasive sponge.
- For stubborn food residues, soak the basket and grid in hot water for about 10 minutes.
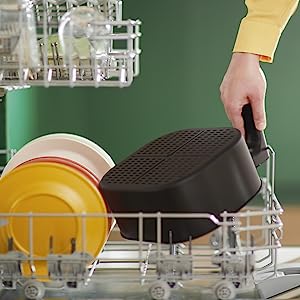
Image 6.1: The Airfryer basket is designed for easy cleaning and is dishwasher safe.
6.2 Cleaning the Main Unit
- Wipe the outside of the appliance with a moist cloth.
- Clean the inside of the appliance with hot water and a non-abrasive sponge.
- Never use abrasive cleaning materials or harsh chemicals.
7. Troubleshooting
If you encounter any issues with your Airfryer, refer to the following common problems and solutions.
| Problem | Possible Cause | Solution |
|---|---|---|
| Airfryer does not work. | The appliance is not plugged in. | Plug the main plug into a grounded wall socket. |
| Food is not cooked evenly. | Too much food in the basket; food not shaken. | Reduce food quantity; shake the basket halfway through cooking. |
| White smoke comes from the appliance. | Fat residues from previous use; fatty ingredients. | Clean the basket and grid thoroughly; remove excess oil from ingredients. |
| Fresh fries are not crispy. | Not enough oil used; incorrect potato type. | Add a little oil; use fresh potatoes suitable for frying. |
8. Specifications
- Model: RI9270/90
- Capacity: 6.2 Liters (Total), 4.6 Liters (Useful)
- Power: 2000 Watts
- Voltage: 110 Volts
- Temperature Range: 80°C - 200°C
- Timer: Up to 30 minutes
- Dimensions (L x W x H): 40.5 x 31.6 x 30.2 cm
- Weight: 5.5 kg
- Material: Plastic
- Special Features: Digital Touch Display, 7 Presets, Keep Warm Function, Dishwasher-Safe Parts

Image 8.1: Product dimensions for the Philips Walita Essential XL Digital Airfryer.
9. Warranty and Support
This Philips Walita Essential XL Digital Airfryer (Model RI9270/90) comes with a two-year international warranty against manufacturing defects. Please retain your proof of purchase for warranty claims.
For further assistance, troubleshooting, or to register your product, please visit the official Philips Walita website or contact customer support. You can also explore recipes and tips on the HomeID App.