1. Introduction
Thank you for choosing the V310 OBDII/EOBD Code Reader. This device is designed to help you diagnose issues with your vehicle's engine system by reading and clearing Diagnostic Trouble Codes (DTCs), viewing live data, and performing various diagnostic tests. This manual provides detailed instructions on how to set up, operate, and maintain your V310 Code Reader.
The V310 is compatible with most 1996 and newer vehicles (cars, light trucks, and SUVs) that are OBDII compliant. A small number of 1994 and 1995 gasoline cars may also be OBDII compatible. To confirm compatibility for older vehicles, check for a 16-pin Data Link Connector (DLC) under the dashboard and verify that the Vehicle Emission Control Information Label states the car is OBDII compliant.

Figure 1.1: V310 OBDII/EOBD Code Reader
This image shows the V310 OBDII/EOBD Code Reader, a compact diagnostic tool with a display screen and control buttons, connected to an OBDII connector.
2. Product Overview
2.1 Components
The V310 Code Reader consists of the main unit with an LCD screen, control buttons, and an integrated OBDII cable with a 16-pin connector.
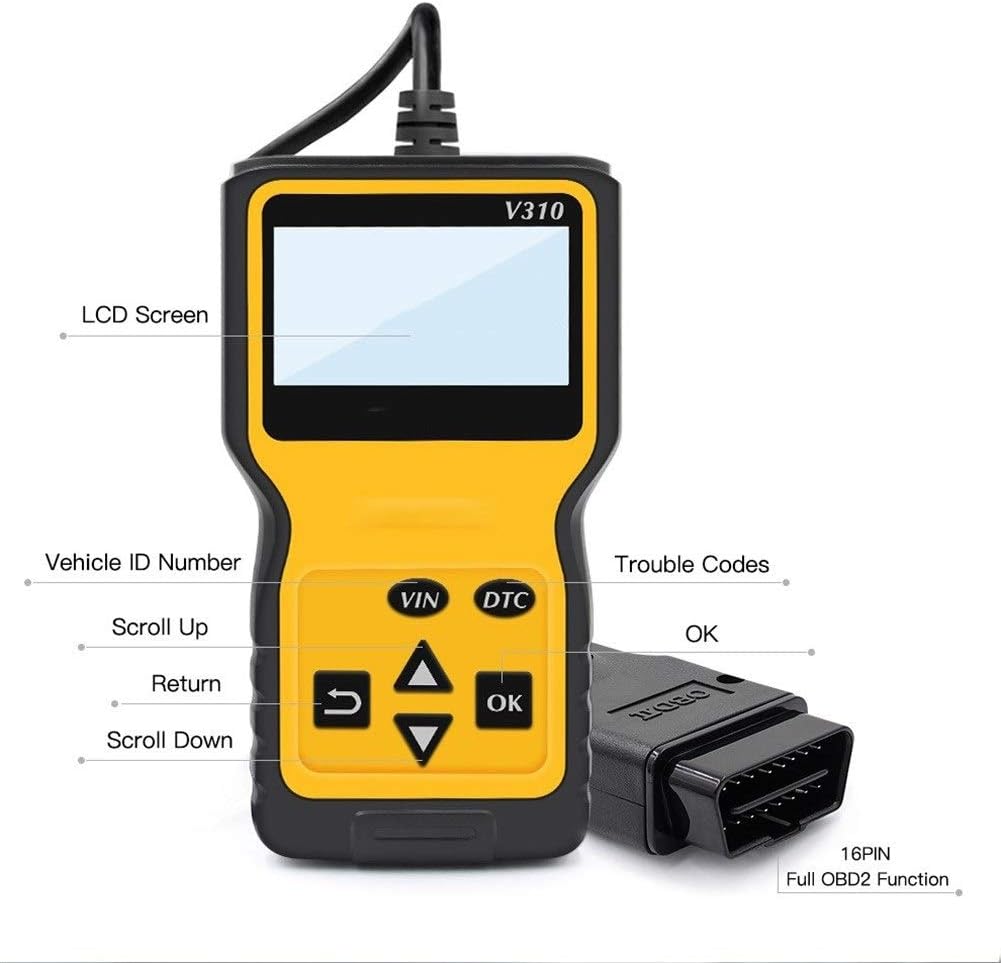
Figure 2.1: V310 Code Reader Labeled Components
This image highlights the key components of the V310 device, including the LCD Screen, VIN (Vehicle ID Number) button, DTC (Trouble Codes) button, Scroll Up/Down buttons, Return button, OK button, and the 16-pin OBD2 connector.
- LCD Screen: Displays diagnostic results and menu options.
- VIN Button: Accesses Vehicle Identification Number information.
- DTC Button: Directly accesses Diagnostic Trouble Codes.
- Scroll Up/Down Buttons: Navigates through menu options and data.
- OK Button: Confirms selections or enters sub-menus.
- Return Button: Returns to the previous screen or menu.
- 16-Pin OBDII Connector: Connects the device to the vehicle's OBDII port.
2.2 Key Features
The V310 Code Reader offers a range of powerful features for comprehensive vehicle diagnostics:

Figure 2.2: V310 Code Reader Main Functions
This image illustrates the seven primary functions of the V310 OBD Code Reader: Read Codes, Erase Codes, View Freeze Frame, I/M Readiness, Vehicle Info, Data Stream, and Multi-Language support.
- Read Codes: Retrieves Generic (P0, P2, P3, and U0) and Manufacturer Specific (P1, P3, and U1) codes.
- Erase Codes: Clears Diagnostic Trouble Codes (DTCs) and resets monitors.
- View Freeze Frame Data: Displays a snapshot of the vehicle's operating conditions at the time an emission-related fault occurred.
- I/M Readiness: Checks the readiness of the emission monitoring systems.
- Vehicle Information: Retrieves VIN, Calibration ID (CALID), and Calibration Verification Number (CVN).
- Data Stream (Live Data): Displays real-time operating parameters of the vehicle's engine.
- Multi-Language Support: Supports multiple languages for menu and data display.
- No Batteries Needed: Powered directly from the vehicle's OBDII port.
- Lifetime Free Software Updates: Ensures the device stays current with the latest vehicle protocols and features.
3. Setup
Setting up your V310 Code Reader is a simple process:
- Locate the OBDII Port: The 16-pin Data Link Connector (DLC) is usually located under the dashboard on the driver's side of the vehicle. Refer to your vehicle's service manual for the exact location if you cannot find it.
- Turn Off the Ignition: Ensure the vehicle's ignition is in the OFF position before connecting the scanner.
- Connect the Scanner: Firmly plug the V310's OBDII connector into the vehicle's DLC.
- Turn On the Ignition: Turn the vehicle's ignition to the ON position (engine off). The V310 will automatically power on and display the main menu.
4. Operating Instructions
4.1 System Setup (Language, Units, Contrast)
Before performing diagnostics, you may want to configure the system settings:
- From the main menu, use the Scroll Up/Down buttons to navigate to "System Setup" and press OK.
- Language Setting: Select "Language" and press OK. Use Scroll Up/Down to choose your desired language (e.g., English, Spanish, French, German, Italian, Dutch) and press OK to confirm.
- Unit of Measure: Select "Unit Of Measure" and press OK to switch between Metric and Imperial units.
- Contrast: Select "Contrast" and press OK. Use Scroll Up/Down to adjust the screen contrast.

Figure 4.1: Language Selection Menu
This image shows the V310's system setup menu, specifically highlighting the language selection option with various languages like English, Spanish, French, Italian, German, and Dutch available for choice.
4.2 Diagnostic Functions
From the main menu, select the desired diagnostic function:

Figure 4.2: Diagnostic Menu and DTC Lookup
This image displays the V310's diagnostic menu, showing options like Read Codes, Erase Codes, View Freeze Frame, I/M Readiness, Vehicle Info, Data Stream, and Realtime Curve. It also illustrates the DTC Lookup function with an example code P0000.
- Read Codes:
Select "Read Codes" from the Diagnostic Menu and press OK. The scanner will retrieve and display any stored or pending Diagnostic Trouble Codes (DTCs). Each code will be accompanied by a brief description.
- Erase Codes:
Select "Erase Codes" and press OK. Confirm your choice when prompted. This function clears all DTCs from the vehicle's computer and turns off the Check Engine Light (MIL). Warning: Do not erase codes before addressing the underlying issue, as this may hide problems and prevent proper diagnosis.
- View Freeze Frame:
Select "View Freeze Frame" and press OK. This displays a snapshot of critical vehicle parameters (e.g., engine RPM, vehicle speed, coolant temperature) recorded at the moment an emission-related fault occurred. This data is crucial for diagnosing intermittent problems.
- I/M Readiness:
Select "I/M Readiness" and press OK. This function checks if the various emission-related systems on the vehicle are operating correctly and have completed their diagnostic tests. It's often used before an emissions inspection.
- Vehicle Info:
Select "Vehicle Info" and press OK. This retrieves information such as the Vehicle Identification Number (VIN), Calibration ID (CALID), and Calibration Verification Number (CVN).
- Data Stream (Live Data):
Select "Data Stream" and press OK. This allows you to view real-time sensor data from the vehicle's engine control unit (ECU). Data can be displayed in text format or as a graphical curve.

Figure 4.3: Realtime Curve Display
This image shows the V310 displaying real-time data in a graphical format, specifically illustrating the 'Realtime Curve' for parameters like Car Speed, Calculate Load Value, Engine Coolant Temp, and Engine RPM.
- DTC Lookup:
From the main menu, select "DTC Lookup" or press the dedicated DTC button. Enter the 5-digit code using the Scroll Up/Down buttons to change digits and OK to move to the next digit. Press OK after entering the full code to view its definition.
5. Maintenance
To ensure the longevity and optimal performance of your V310 Code Reader, follow these maintenance guidelines:
- Cleaning: Use a soft, dry cloth to clean the device. Do not use abrasive cleaners or solvents.
- Storage: Store the device in a clean, dry environment away from direct sunlight, extreme temperatures, and excessive moisture.
- Cable Care: Avoid bending or twisting the OBDII cable excessively. Always grasp the connector when plugging or unplugging it from the vehicle's DLC.
- Software Updates: Regularly check for and install software updates to ensure compatibility with new vehicle models and improved functionality. The V310 offers lifetime free software updates.
6. Troubleshooting
If you encounter issues while using your V310 Code Reader, refer to the following common problems and solutions:
| Problem | Possible Cause | Solution |
|---|---|---|
| No Power / Device Does Not Turn On | Loose connection; Vehicle ignition off; Blown fuse in vehicle's OBDII circuit. | Ensure the OBDII connector is firmly plugged in. Turn the vehicle ignition to the ON position. Check the vehicle's fuse box for a blown fuse related to the OBDII port. |
| Linking Error / Communication Error | Vehicle not OBDII compliant; Faulty connection; Vehicle's ECU is not responding. | Verify vehicle compatibility. Ensure the connection is secure. Try turning the ignition off and on again. If possible, test on another OBDII compliant vehicle. |
| Codes Cannot Be Cleared | Ignition not ON; Fault still present; Multiple ECUs. | Ensure ignition is ON (engine off). The underlying fault must be repaired before codes can be permanently cleared. Some vehicles may require specific procedures for clearing codes. |
| Screen is Dim or Unreadable | Contrast setting is too low. | Adjust the screen contrast in the "System Setup" menu. |
7. Specifications
| Specification | Value |
|---|---|
| Display | 128 x 64 pixel LCD screen |
| Operating Temperature | 0°C to 60°C (32°F to 140°F) |
| Storage Temperature | -20°C to 70°C (-4°F to 158°F) |
| External Power | 8.0 to 15.0 Volts via vehicle battery |
| Dimensions (L x W x H) | 28 cm x 18.5 cm x 5 cm (approx.) |
| Weight | 0.34 kg (approx.) |
8. Warranty and Support
This product comes with a standard manufacturer's warranty. Please refer to the product packaging or contact the seller for specific warranty terms and conditions.
For technical support, troubleshooting assistance, or inquiries regarding software updates, please contact the product manufacturer or your point of purchase. Keep your purchase receipt as proof of purchase for warranty claims.