C61051W
CADA C61051W Technic RC Charger Instruction Manual
Model: C61051W | Brand: generic
Introduction
This manual provides detailed instructions for the assembly, operation, and maintenance of the CADA C61051W Technic RC Charger. This 1675-piece building kit allows you to construct a multifunction farm car with remote control capabilities, including motor and light functions. Please read this manual thoroughly before beginning assembly or operation to ensure proper use and longevity of the product.
Package Contents
Verify that all components are present before starting assembly. The package should include:
- 1675 building blocks
- Remote control unit
- Motor components (M Size Motor Pro, L Size Motor Pro, Servo Motor Pro)
- Light components (LED lights)
- Infrared receiver
- 2.4GHz Lipo Battery Box Pro
- Instruction manual (this document)
- Additional accessories (e.g., forklift attachments)

Image: The complete CADA C61051W kit, showing the assembled model, the product box, remote control, and various electronic components including motors and battery box.
Assembly Instructions
Follow the step-by-step diagrams provided in the separate assembly booklet included with your kit. Ensure all connections are secure and components are correctly oriented.
- Preparation: Unpack all parts and organize them by type or size to facilitate assembly.
- Chassis Assembly: Begin by constructing the main chassis of the farm car, ensuring the structural integrity.
- Motor and Gearbox Installation: Carefully integrate the L Size Motor Pro for driving control and the M Size Motor Pro for boom lift and bucket control. Ensure gears mesh smoothly.
- Electronic Component Integration: Install the Infrared receiver and the 2.4GHz Lipo Battery Box Pro. Connect all motors and LED lights to the battery box and receiver as per the wiring diagram.
- Boom and Bucket Assembly: Assemble the boom and bucket mechanisms, ensuring smooth articulation. Note the 9.5cm boom extension and 120° angle bucket movement capabilities.
- Cab and Detailing: Complete the cab, including the cockpit and rearview mirror. Attach front and rear LED lights.
- Wheel Attachment: Securely attach all wheels.
- Accessory Attachment: Attach the loading bucket or the forklift accessories as desired.
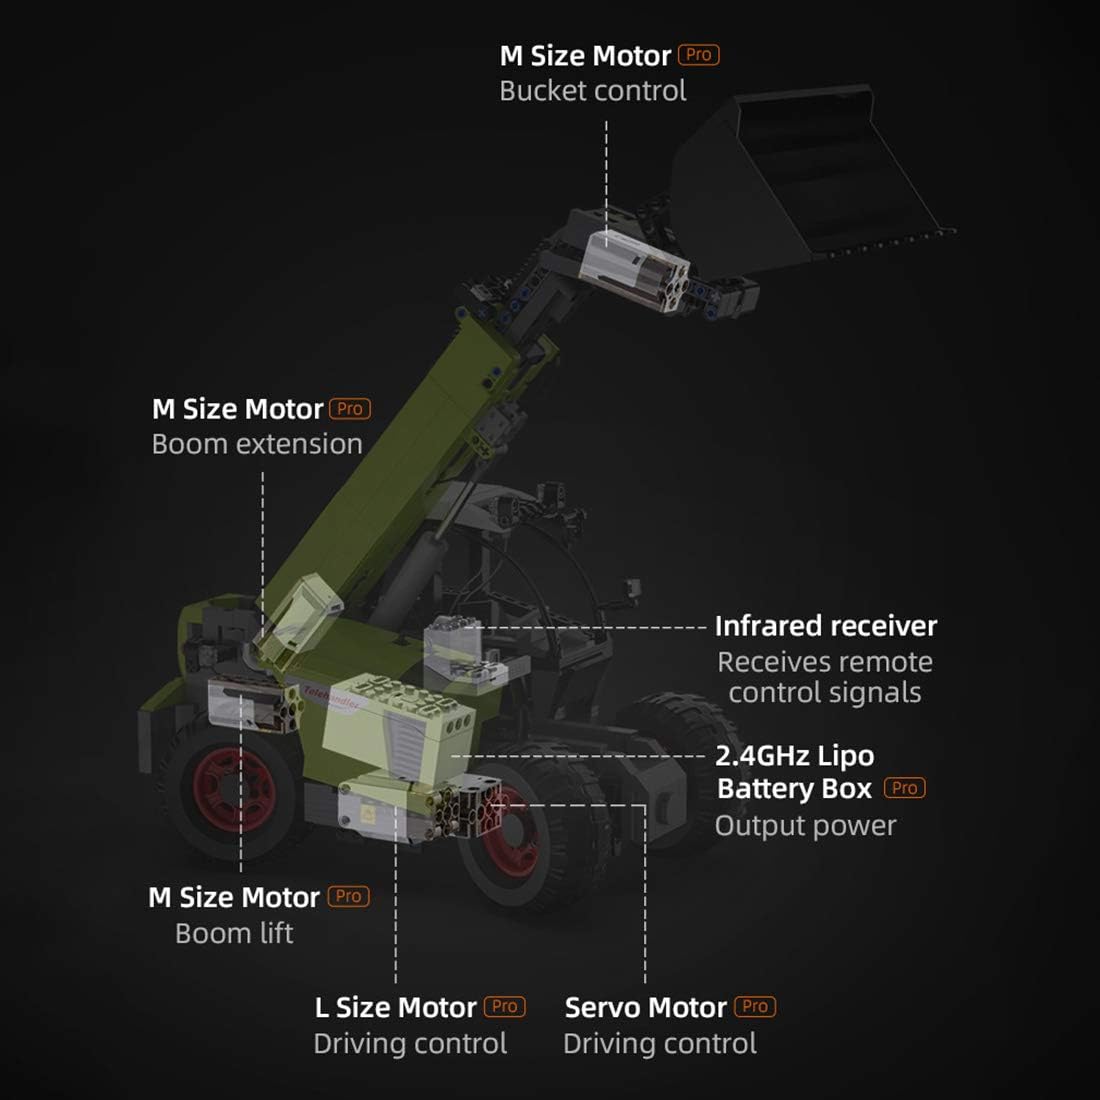
Image: An internal view diagram of the CADA C61051W model, highlighting the placement of the M Size Motor Pro for bucket control, M Size Motor Pro for boom extension, M Size Motor Pro for boom lift, L Size Motor Pro for driving control, Servo Motor Pro for driving control, Infrared receiver, and 2.4GHz Lipo Battery Box Pro.
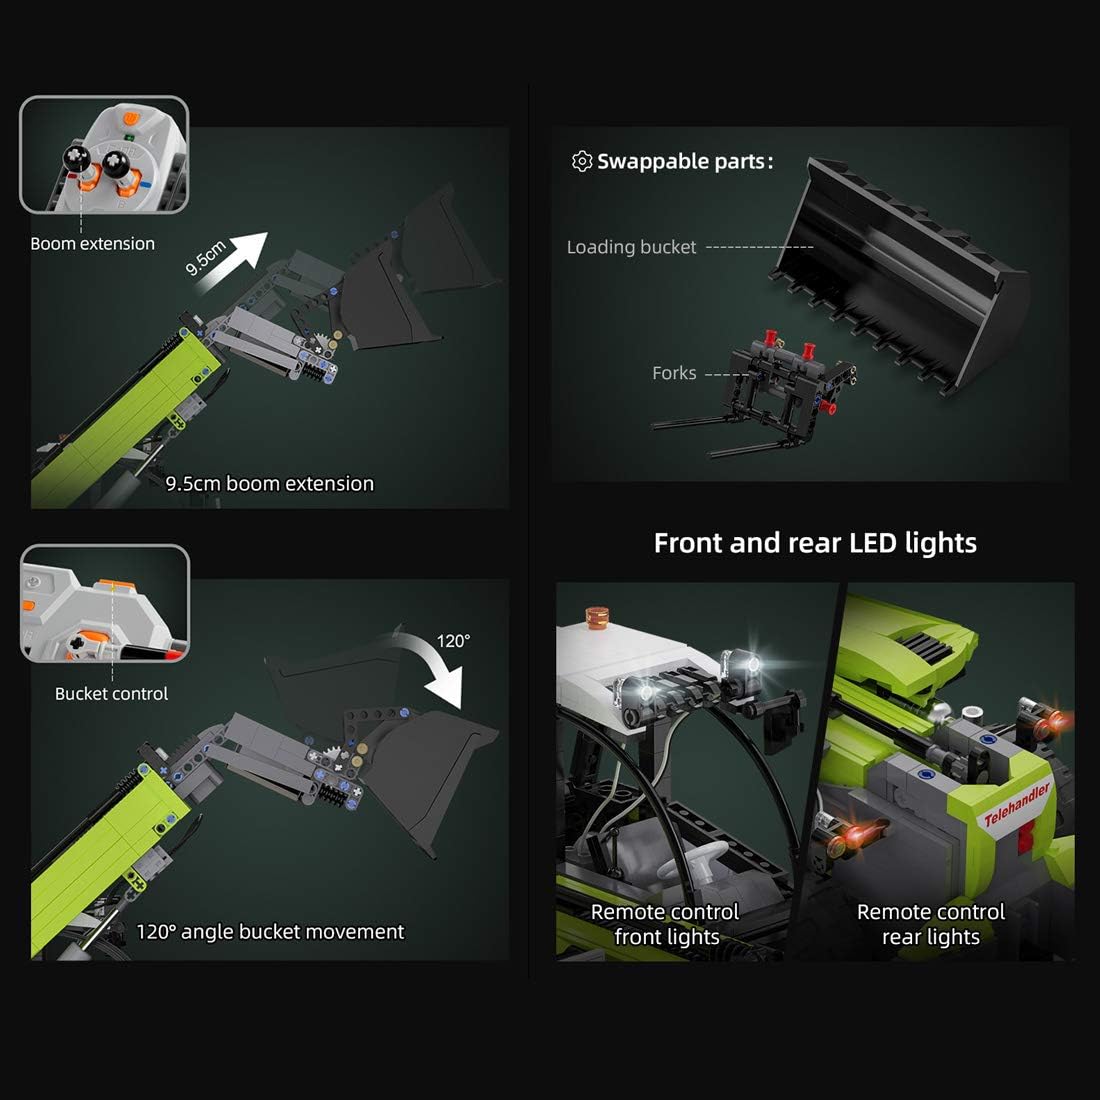
Image: A composite image detailing key features: 9.5cm boom extension, 120° angle bucket movement, swappable parts (loading bucket and forks), and remote control front and rear LED lights.
Operating Instructions
Remote Control Pairing
Ensure the Lipo Battery Box is charged and powered on. Turn on the remote control. The remote and receiver should automatically pair. If not, refer to the specific pairing instructions in the assembly booklet.

Image: The CADA C61051W model alongside its fully functional remote control unit, illustrating the remote operation capability.
Control Functions
- Driving: Use the joysticks on the remote control to move the vehicle forward, backward, left, and right.
- Boom Lift: Control the boom's vertical movement. The boom can lift to a 70° angle.
- Boom Extension: Extend and retract the boom by 9.5cm.
- Bucket Control: Adjust the angle of the loading bucket or forklift attachments up to 120°.
- Lights: Activate the front and rear LED lights using the designated button on the remote.

Image: The CADA C61051W model demonstrating its boom lift capability, showing a 70° angle boom lift from the remote control unit.

Image: The CADA C61051W model equipped with forklift accessories, demonstrating its versatility beyond the standard loading bucket.
Maintenance
- Cleaning: Use a soft, dry cloth to clean the model. Avoid water or harsh chemicals.
- Storage: Store the model in a cool, dry place away from direct sunlight to prevent material degradation.
- Battery Care: Fully charge the Lipo Battery Box before extended storage. Remove batteries from the remote control if not used for a long period.
- Component Check: Periodically inspect all connections and moving parts for wear or looseness. Tighten any loose screws or re-attach detached blocks.
Troubleshooting
| Problem | Possible Cause | Solution |
|---|---|---|
| Vehicle does not respond to remote control. | Low battery in vehicle or remote; remote not paired; receiver not powered. | Charge vehicle battery. Replace remote control batteries. Re-pair remote and receiver. Ensure receiver is connected and powered. |
| Motors are weak or unresponsive. | Low battery; motor connection loose; obstruction in gears. | Charge vehicle battery. Check motor wiring connections. Remove any obstructions from gears. |
| Lights do not work. | Loose light connection; damaged LED. | Check LED wiring. If damaged, contact support for replacement parts. |
| Parts detach during operation. | Improper assembly; excessive force during play. | Refer to assembly instructions and re-attach parts securely. Avoid rough handling. |
Specifications
- Model: C61051W
- Pieces: 1675
- Dimensions (Approximate): 39.0cm (Length) x 15.0cm (Width) x 17.5cm (Height)
- Control: 2.4GHz Remote Control
- Power Source: Lipo Battery Box Pro
- Functions: Forward/Backward, Left/Right, Boom Lift (70°), Boom Extension (9.5cm), Bucket Control (120°), Front/Rear LED Lights
- Compatibility: Compatible with Lego Technic building systems.

Image: The CADA C61051W model with key dimensions indicated (39.0cm length, 15.0cm width, 17.5cm height). Insets show detailed views of the rearview mirror and plate, and the cockpit interior.
Warranty and Support
This product comes with a standard manufacturer's warranty against defects in materials and workmanship. Please retain your proof of purchase. For warranty claims, missing parts, or technical support, please contact the retailer or manufacturer directly. Contact information is typically found on the product packaging or the retailer's website.
Note: The "generic" brand indicates that specific manufacturer contact details may vary. Please refer to your purchase documentation for precise support information.