Introduction
This manual provides detailed instructions for the installation, operation, and maintenance of your Mars Gaming MCPU-XT Black CPU Heatsink. The MCPU-XT is designed for high-performance CPU cooling, featuring a dual-tower design, 6 HCT heatpipes, and two ARGB PWM 12cm fans, capable of dissipating up to 300W TDP. Please read this manual thoroughly before proceeding with installation.
Key Features
- Dual Tower Cooling: Enhances heat transfer capacity through its dual-tower design, maximizing the efficiency of the 6 heatpipes.
- Extreme 300W TDP Performance: Supports CPUs with up to 300W TDP, utilizing high-density fins, dual fans, and 6 ultra-efficient HCT heatpipes.
- Universal Multisocket Compatibility: Compatible with Intel LGA 2066/2011/1700/1200/1156/1155/1151/1150/1366 series and AMD AM5/AM4/AM3+/AM3/AM2+/AM2/FM2/FM1 sockets.
- ARGB Compatibility: Features automatic rainbow mode and supports Addressable RGB motherboards (3-pin 5V ARGB connector) for synchronization with systems like Asus Aura Sync, Mystic Light Sync, and RGB Fusion.
- Optimized Easy Mounting: Includes a tool for quick and straightforward installation without requiring fan removal.

Image: The MCPU-XT heatsink showcasing its dual cooling towers and an illuminated ARGB fan, highlighting its design for enhanced heat dissipation.
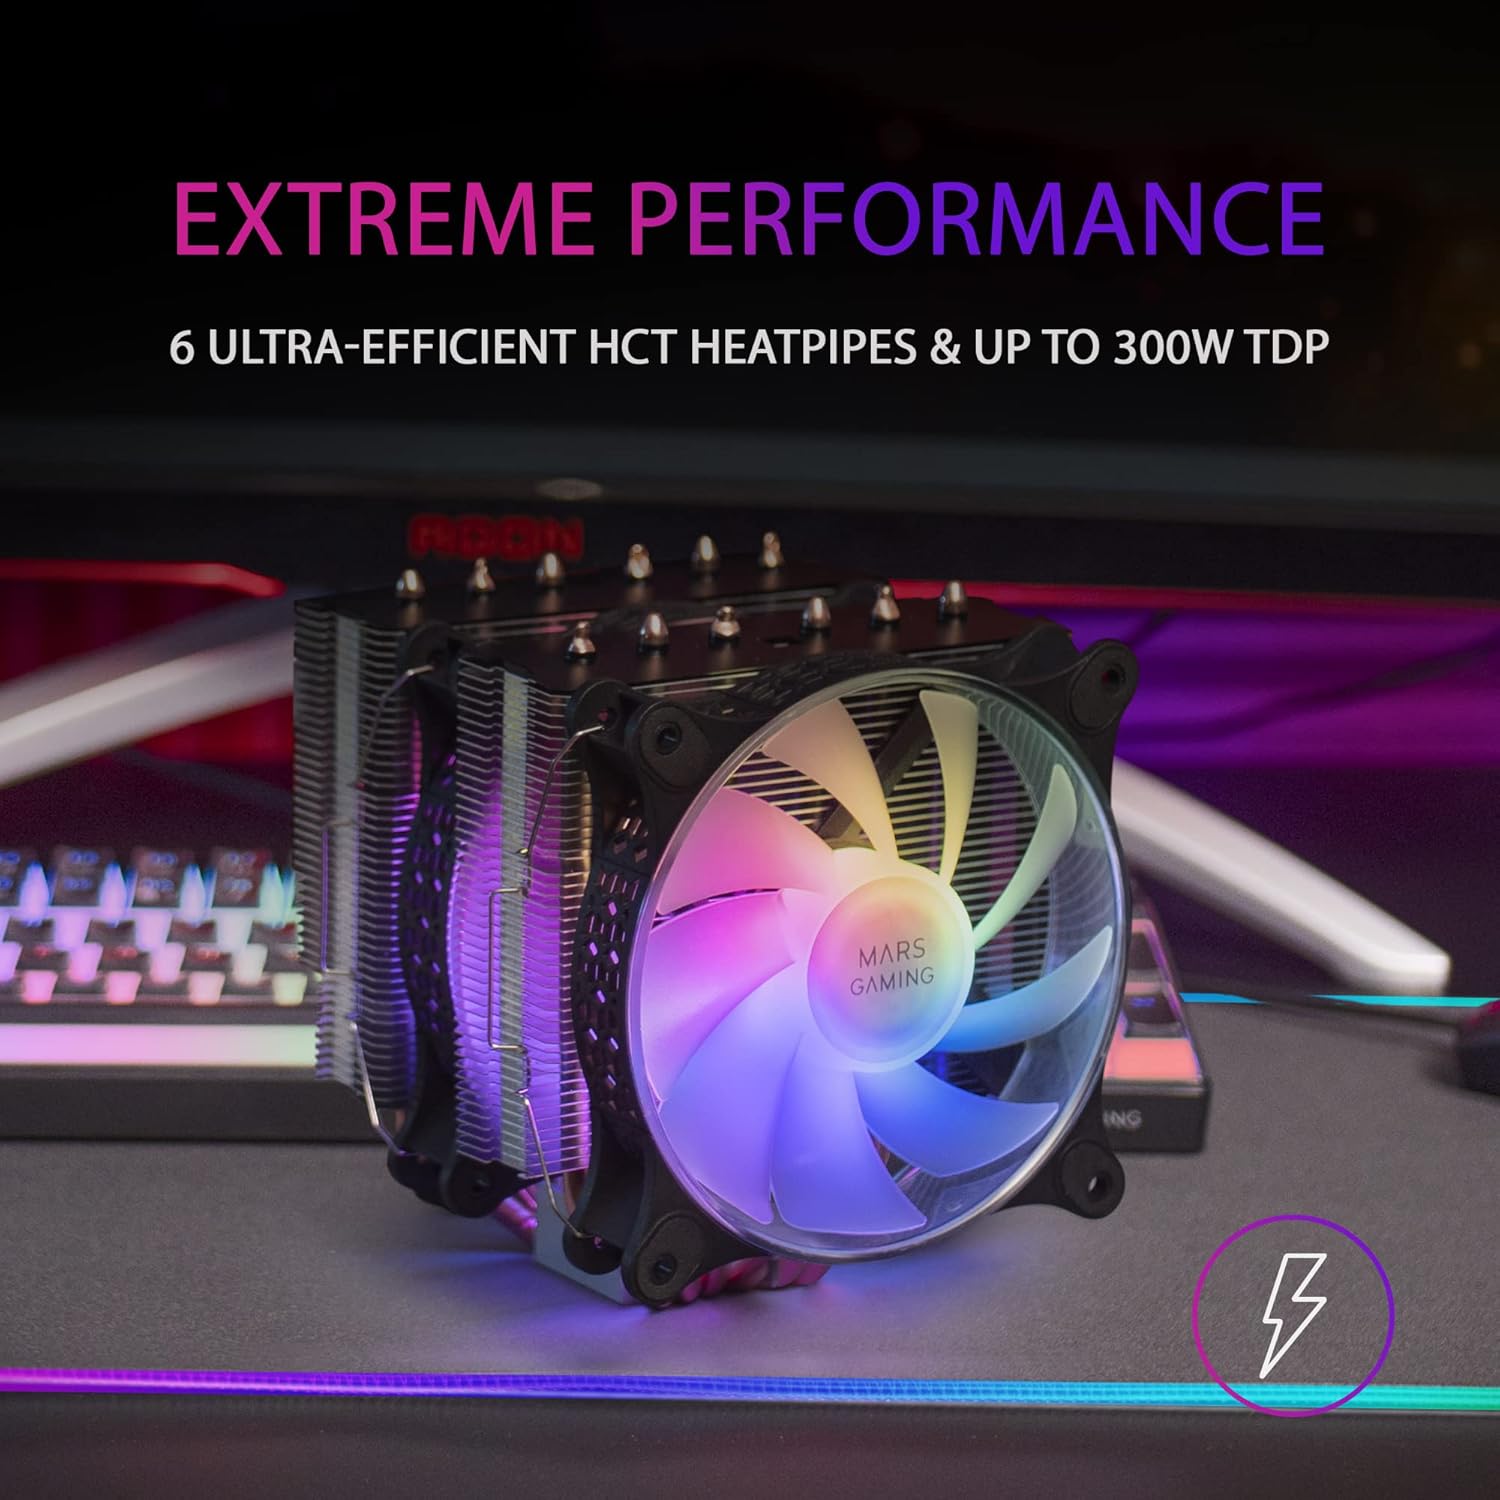
Image: A close-up of the MCPU-XT heatsink, emphasizing its 6 ultra-efficient HCT heatpipes and robust cooling capabilities for up to 300W TDP.

Image: The MCPU-XT heatsink with its ARGB lighting active, illustrating its compatibility with addressable RGB motherboards for customizable illumination.

Image: A view of the MCPU-XT heatsink's mounting mechanism, indicating its universal multisocket design for broad compatibility with Intel and AMD platforms.
Installation Guide
Package Contents
Verify that all components are present before beginning installation:
- MCPU-XT CPU Heatsink with pre-installed fans
- Mounting brackets for Intel sockets
- Mounting brackets for AMD sockets
- Backplate
- Mounting screws and standoffs
- Thermal paste
- Installation tool
Pre-Installation Checklist
- Ensure your motherboard is compatible with the MCPU-XT heatsink.
- Power off your computer and disconnect it from the power source.
- Remove any existing CPU cooler and clean the CPU surface thoroughly of old thermal paste.
- Consult your motherboard manual for CPU cooler installation guidelines.
Mounting Instructions
- Prepare the Backplate: Attach the appropriate backplate to the rear of your motherboard, aligning it with the CPU socket holes.
- Install Standoffs: Secure the correct standoffs onto the backplate screws from the front side of the motherboard.
- Apply Thermal Paste: Apply a small amount of thermal paste (pea-sized dot or thin line) to the center of your CPU's integrated heat spreader (IHS).
- Position Heatsink: Carefully place the MCPU-XT heatsink onto the CPU, ensuring the base makes even contact with the thermal paste.
- Secure Heatsink: Use the provided mounting screws and installation tool to secure the heatsink to the standoffs. Tighten screws in a diagonal pattern until snug, but do not overtighten. The optimized mounting design allows installation without removing the fans.
- Connect Fan Cables: Connect the 4-pin PWM fan cables to the CPU_FAN header(s) on your motherboard.
- Connect ARGB Cable: If desired, connect the 3-pin 5V ARGB connector to a compatible Addressable RGB header on your motherboard. If no ARGB header is available, the fans will operate in automatic rainbow mode.

Image: The MCPU-XT heatsink with the included installation tool, demonstrating the ease of mounting without needing to remove the fans.
Operation
Fan Control (PWM)
The MCPU-XT's fans utilize 4-pin PWM (Pulse Width Modulation) technology. This allows your motherboard to dynamically control fan speed based on CPU temperature, ensuring optimal cooling performance while minimizing noise. You can typically configure fan curves in your motherboard's BIOS/UEFI settings or through manufacturer-provided software.
ARGB Lighting
The fans feature Addressable RGB lighting. If connected to a compatible 3-pin 5V ARGB header on your motherboard, you can control the lighting effects and colors using your motherboard's RGB software (e.g., Asus Aura Sync, Mystic Light Sync, RGB Fusion). If not connected to an ARGB header, the fans will default to an automatic rainbow lighting mode.
Maintenance
Regular maintenance helps ensure optimal performance and longevity of your MCPU-XT heatsink.
- Dust Removal: Periodically (e.g., every 3-6 months), power off your computer and use compressed air to gently blow dust out of the heatsink fins and fan blades. Hold the fan blades to prevent them from spinning rapidly during cleaning.
- Thermal Paste: The thermal paste typically lasts for several years. If you notice a significant increase in CPU temperatures, consider reapplying fresh thermal paste. This requires removing the heatsink, cleaning both the CPU and heatsink base, and applying new thermal paste.
- Fan Inspection: Check fan cables for secure connections and ensure fan blades are free from obstructions.
Troubleshooting
- High CPU Temperatures:
- Ensure the heatsink is securely mounted and making proper contact with the CPU.
- Verify that thermal paste was applied correctly and evenly.
- Check if fan cables are properly connected to the CPU_FAN header(s) and spinning.
- Clean any dust accumulation from the heatsink fins and fans.
- Ensure adequate airflow within your PC case.
- Fans Not Spinning:
- Confirm fan cables are securely connected to the motherboard's CPU_FAN header(s).
- Check BIOS/UEFI settings to ensure fan control is enabled and not set to a very low RPM.
- Inspect for any physical obstructions preventing fan rotation.
- ARGB Lighting Not Working/Incorrect:
- Ensure the 3-pin 5V ARGB connector is correctly plugged into a compatible ARGB header on your motherboard (not a 4-pin 12V RGB header).
- Verify that your motherboard's RGB software is installed and configured correctly.
- If not connected to an ARGB header, the fans should display an automatic rainbow effect. If not, check the connection.
- Excessive Fan Noise:
- Adjust fan curves in your motherboard's BIOS/UEFI settings to reduce fan speed at lower temperatures.
- Ensure no cables or obstructions are hitting the fan blades.
- Clean dust from fan blades.
Technical Specifications
| Product Dimensions | 5.28"L x 5.2"W x 5.71"H |
| Brand | Mars Gaming |
| Power Connector Type | 4-Pin PWM |
| Voltage | 12 Volts |
| Wattage (TDP) | 300 watts |
| Cooling Method | Air |
| Compatible Devices | Desktop CPUs |
| Noise Level | 9 Decibels (minimum) |
| Material | Polycarbonate, Aluminum, Copper |
| Maximum Rotational Speed | 1800 RPM |
| Air Flow Capacity | 100 Cubic Feet Per Minute (CFM) |
| Item Weight | 873 Grams |
| Socket Compatibility | Intel LGA 2066/2011/1700/1200/1156/1155/1151/1150/1366, AMD AM5/AM4/AM3+/AM3/AM2+/AM2/FM2/FM1 |
Warranty and Support
Mars Gaming products are manufactured to high quality standards. For specific warranty terms and conditions, please refer to the warranty card included with your product or visit the official Mars Gaming website. If you encounter any issues or require technical assistance, please contact Mars Gaming customer support through their official channels.