VIHELM HT-A1
VIHELM HT-A1 Portable Pocket Thermal Imager User Manual
Model: HT-A1 | Brand: VIHELM
1. Introduction
Thank you for choosing the VIHELM HT-A1 Portable Pocket Thermal Imager. This device is designed for precise temperature measurement and thermal imaging across various applications, from industrial inspections to home diagnostics. Its compact size and robust features make it an essential tool for professionals and enthusiasts alike. This manual provides detailed instructions on how to set up, operate, maintain, and troubleshoot your HT-A1 thermal imager to ensure optimal performance and longevity.
2. Product Overview and Components
The HT-A1 thermal imager features a user-friendly interface and a durable design. Familiarize yourself with the device's main components and controls.
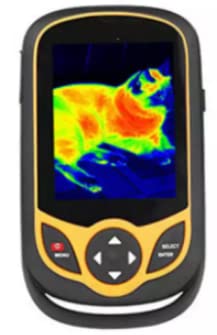
Figure 2.1: Front view of the HT-A1 Thermal Imager with a thermal image displayed.
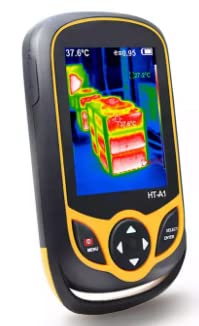
Figure 2.2: Angled view of the HT-A1, highlighting its compact design.
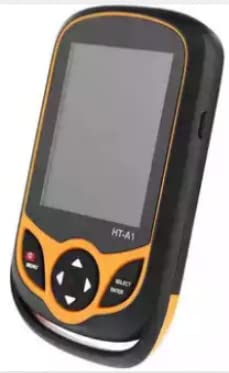
Figure 2.3: HT-A1 with screen off, showing the button layout.

Figure 2.4: Rear view of the HT-A1, showing the infrared lens.
2.1. Screen Elements and Indicators
Understanding the information displayed on the screen is crucial for accurate measurements.
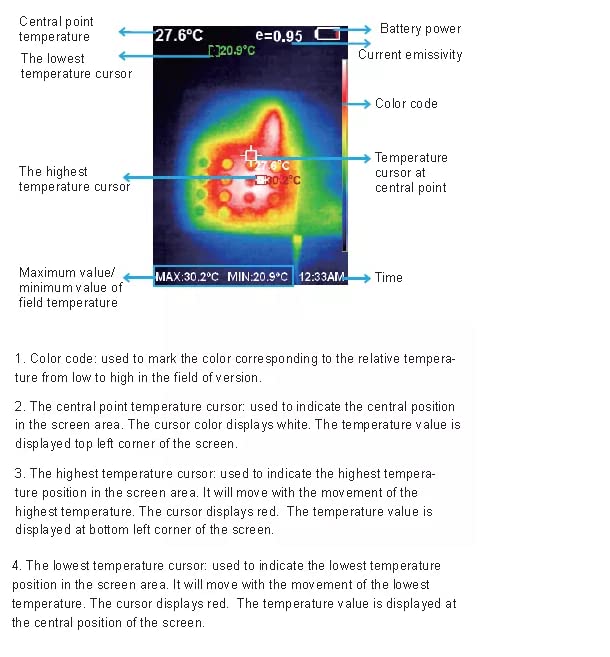
Figure 2.5: Screen elements and their descriptions.
- Color code: Used to mark the color corresponding to the relative temperature from low to high in the field of vision.
- Central point temperature cursor: Used to indicate the central position in the screen area. The cursor color displays white. The temperature value is displayed top left corner of the screen.
- Highest temperature cursor: Used to indicate the highest temperature position in the screen area. It will move with the movement of the highest temperature. The cursor displays red. The temperature value is displayed at bottom left corner of the screen.
- Lowest temperature cursor: Used to indicate the lowest temperature position in the screen area. It will move with the movement of the lowest temperature. The cursor displays red. The temperature value is displayed at the central position of the screen.
3. What's in the Box
Upon opening the package, please verify that all the following items are included:
- HT-A1 Thermal Imager (x1)
- USB Cable (x1)
- Power Adapter (x1)
- Wrist Strap (x1)
- User Manual (this document)
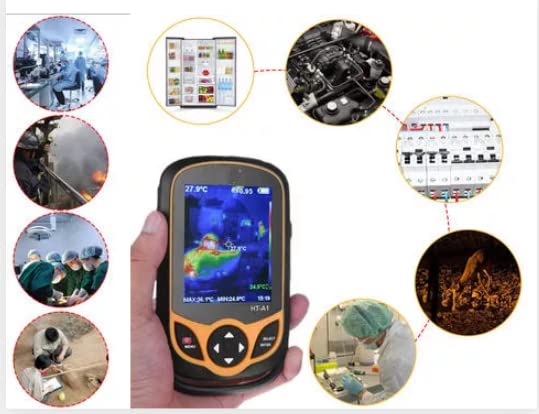
Figure 3.1: Package contents of the HT-A1.
4. Setup
4.1. Charging the Device
The HT-A1 comes with a built-in rechargeable 1800mAh battery. Before first use, it is recommended to fully charge the device.
- Connect the provided USB cable to the Micro USB 2.0 port on the thermal imager.
- Connect the other end of the USB cable to the power adapter.
- Plug the power adapter into a standard wall outlet.
- The charging indicator on the device will show the charging status. Once fully charged, the indicator will change or turn off.
4.2. Powering On/Off
- To Power On: Press and hold the Power button (usually marked with a red icon) until the screen illuminates.
- To Power Off: Press and hold the Power button until the device shuts down.
4.3. Initial Settings
Upon first power-on or after a factory reset, you may need to configure basic settings.
- Use the navigation buttons (up/down/left/right) to navigate through menu options.
- Press the 'SELECT/ENTER' button to confirm selections.
- Access the 'MENU' to adjust settings such as:
- Language: Select your preferred language.
- Date & Time: Set the current date and time for accurate timestamping of saved images.
- Automatic Power-Off Time: Configure the device to automatically power off after 5 minutes, 20 minutes, or not power off automatically, to conserve battery life.
5. Operating Instructions
5.1. Basic Thermal Imaging
Once powered on, the device will display a live thermal image. Point the imager at the object or area you wish to inspect.
- The screen will show the temperature distribution using a selected color palette.
- The central point, highest, and lowest temperature cursors will automatically indicate specific temperature points on the screen.
5.2. Adjusting Settings During Operation
- Color Palette: Press the 'MENU' button and navigate to 'Color Palette' to choose from options like Rainbow, Iron Oxide Red, Cold Color, Black & White, and White & Black. Different palettes highlight temperature differences in various ways.
- Emissivity: Emissivity (ε) is a measure of an object's ability to emit infrared energy. It is adjustable from 0.01 to 1.0. Correct emissivity setting is crucial for accurate temperature readings. Consult a reference table for common material emissivities. Access this setting via the 'MENU'.
- View Option: The device integrates thermal images with visible images. This feature allows for a 25% step length integration, providing a clearer context for the thermal data.
5.3. Saving Images
To save a thermal image:
- While viewing the live thermal image, press the 'SAVE' or 'CAPTURE' button (refer to button layout if available).
- Images are saved in JPG format to the built-in 3GB storage (capable of storing over 2 million images).
5.4. Connecting to a Computer
To transfer saved images to a computer:
- Connect the HT-A1 to your computer using the provided Micro USB 2.0 cable.
- The device should appear as a removable storage device on your computer.
- Navigate to the image folder to access and copy your JPG files.
5.5. Typical Applications
The HT-A1 is suitable for a wide range of applications, including but not limited to:
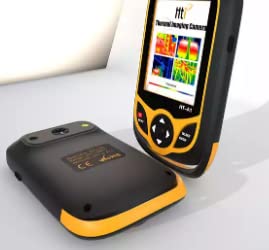
Figure 5.1: Diverse applications of the HT-A1 Thermal Imager.
- Electrical inspections (e.g., circuit breakers, wiring)
- HVAC system diagnostics (e.g., insulation, leaks)
- Building inspections (e.g., moisture, energy efficiency)
- Automotive diagnostics
- Research and development
6. Specifications
Detailed technical specifications for the VIHELM HT-A1 Thermal Imager:
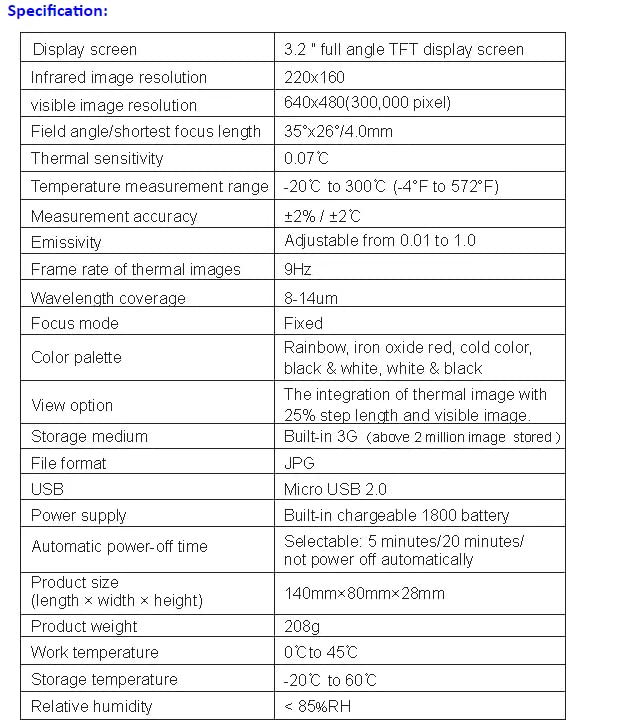
Figure 6.1: HT-A1 Technical Specifications.
| Feature | Specification |
|---|---|
| Display screen | 3.2 " full angle TFT display screen |
| Infrared image resolution | 220x160 |
| Visible image resolution | 640x480 (300,000 pixel) |
| Field angle/shortest focus length | 35°x26°/4.0mm |
| Thermal sensitivity | 0.07 °C |
| Temperature measurement range | -20 °C to 300 °C (-4°F to 572°F) |
| Measurement accuracy | ±2% / ±2°C |
| Emissivity | Adjustable from 0.01 to 1.0 |
| Frame rate of thermal images | 9Hz |
| Wavelength coverage | 8-14um |
| Focus mode | Fixed |
| Color palette | Rainbow, iron oxide red, cold color, black & white, white & black |
| View option | The integration of thermal image with 25% step length and visible image |
| Storage medium | Built-in 3G (above 2 million image stored) |
| File format | JPG |
| USB | Micro USB 2.0 |
| Power supply | Built-in chargeable 1800 battery |
| Automatic power-off time | Selectable: 5 minutes/ 20 minutes/ not power off automatically |
| Product size (length × width × height) | 140mm × 80mm × 28mm |
| Product weight | 208g |
| Work temperature | 0°C to 45°C |
| Storage temperature | -20 °C to 60 °C |
| Relative humidity | < 85%RH |
7. Maintenance
7.1. Cleaning the Device
- Use a soft, dry cloth to clean the exterior of the device.
- For the lens, use a lens cleaning cloth and specialized lens cleaning solution. Avoid abrasive materials or harsh chemicals that could scratch the lens or damage the screen.
- Ensure no liquid enters the device's ports or openings.
7.2. Battery Care
- Charge the battery regularly, even if the device is not in frequent use, to maintain battery health.
- Avoid fully discharging the battery frequently.
- Use only the provided charging cable and adapter.
7.3. Storage
When not in use, store the HT-A1 in a cool, dry place within the specified storage temperature range of -20°C to 60°C and relative humidity below 85%RH. Keep it away from direct sunlight, extreme temperatures, and high humidity.
8. Troubleshooting
If you encounter issues with your HT-A1, refer to the following common problems and solutions:
- Device does not power on: Ensure the battery is charged. Connect the device to the charger and try again. If the issue persists, contact support.
- Image is blurry or unclear: Ensure the lens is clean. Check if the object is within the optimal focus range (fixed focus).
- Temperature readings seem inaccurate: Verify that the emissivity setting is correct for the material being measured. Ensure the device is within its operating temperature range (0°C to 45°C).
- Cannot connect to computer: Ensure the USB cable is securely connected to both the device and the computer. Try a different USB port or cable. Restart both the device and the computer.
- Device freezes or becomes unresponsive: Press and hold the power button to force a restart. If the problem continues, a factory reset might be necessary (consult the menu for this option, if available).
For issues not covered here, please contact VIHELM customer support.
9. Warranty and Support
The VIHELM HT-A1 Portable Pocket Thermal Imager is manufactured by VIHELM. For specific warranty terms and conditions, please refer to the warranty card included with your product or visit the official VIHELM website. In case of technical issues, repair, or general inquiries, please contact VIHELM customer support through their official channels.
Please retain your proof of purchase for warranty claims.