
1. Introduction
This manual provides detailed instructions for the assembly, operation, maintenance, and troubleshooting of your Feonase Queen Platform Bed Frame, model BF585. Please read this manual thoroughly before assembly and retain it for future reference.

Figure 1: Feonase Queen Platform Bed Frame, Model BF585.
2. Safety Information
- Read all instructions: Ensure you understand all assembly steps and safety warnings before beginning.
- Two-person assembly recommended: For safety and ease, assemble with another person.
- Use correct tools: Only use the provided tools or appropriate alternatives.
- Keep children and pets away: Small parts can be a choking hazard.
- Place on a level surface: Assemble the bed frame on a soft, clean, and level surface to prevent damage.
- Do not overtighten screws: Overtightening can strip threads or crack components.
- Regularly check fasteners: Periodically inspect all bolts and screws to ensure they remain tight.
- Maximum weight capacity: Do not exceed the stated weight capacity of 1000 lbs.
3. Package Contents
Verify that all components listed below are present before beginning assembly. If any parts are missing or damaged, contact customer support.
- Metal Bed Frame (various sections) x 1
- Headboard x 1
- Slats (Solid Wood)
- Installation Tools & Accessories (bolts, screws, Allen wrench, etc.)
- Installation Manual (this document)
4. Specifications
| Feature | Detail |
|---|---|
| Model | BF585 |
| Size | Queen |
| Overall Dimensions (L x W) | 82" x 60" (approx. 2.08 x 1.58 meters) |
| Headboard Height | Adjustable from 45" to 49" |
| Frame Height (from floor) | 11" |
| Ground Clearance | 6.3 Inches |
| Weight Capacity | Up to 1000 lbs |
| Materials | Metal, Solid Wood Slats, Faux Leather, High-Density Sponge |
| Color | White |
| Assembly Required | Yes |
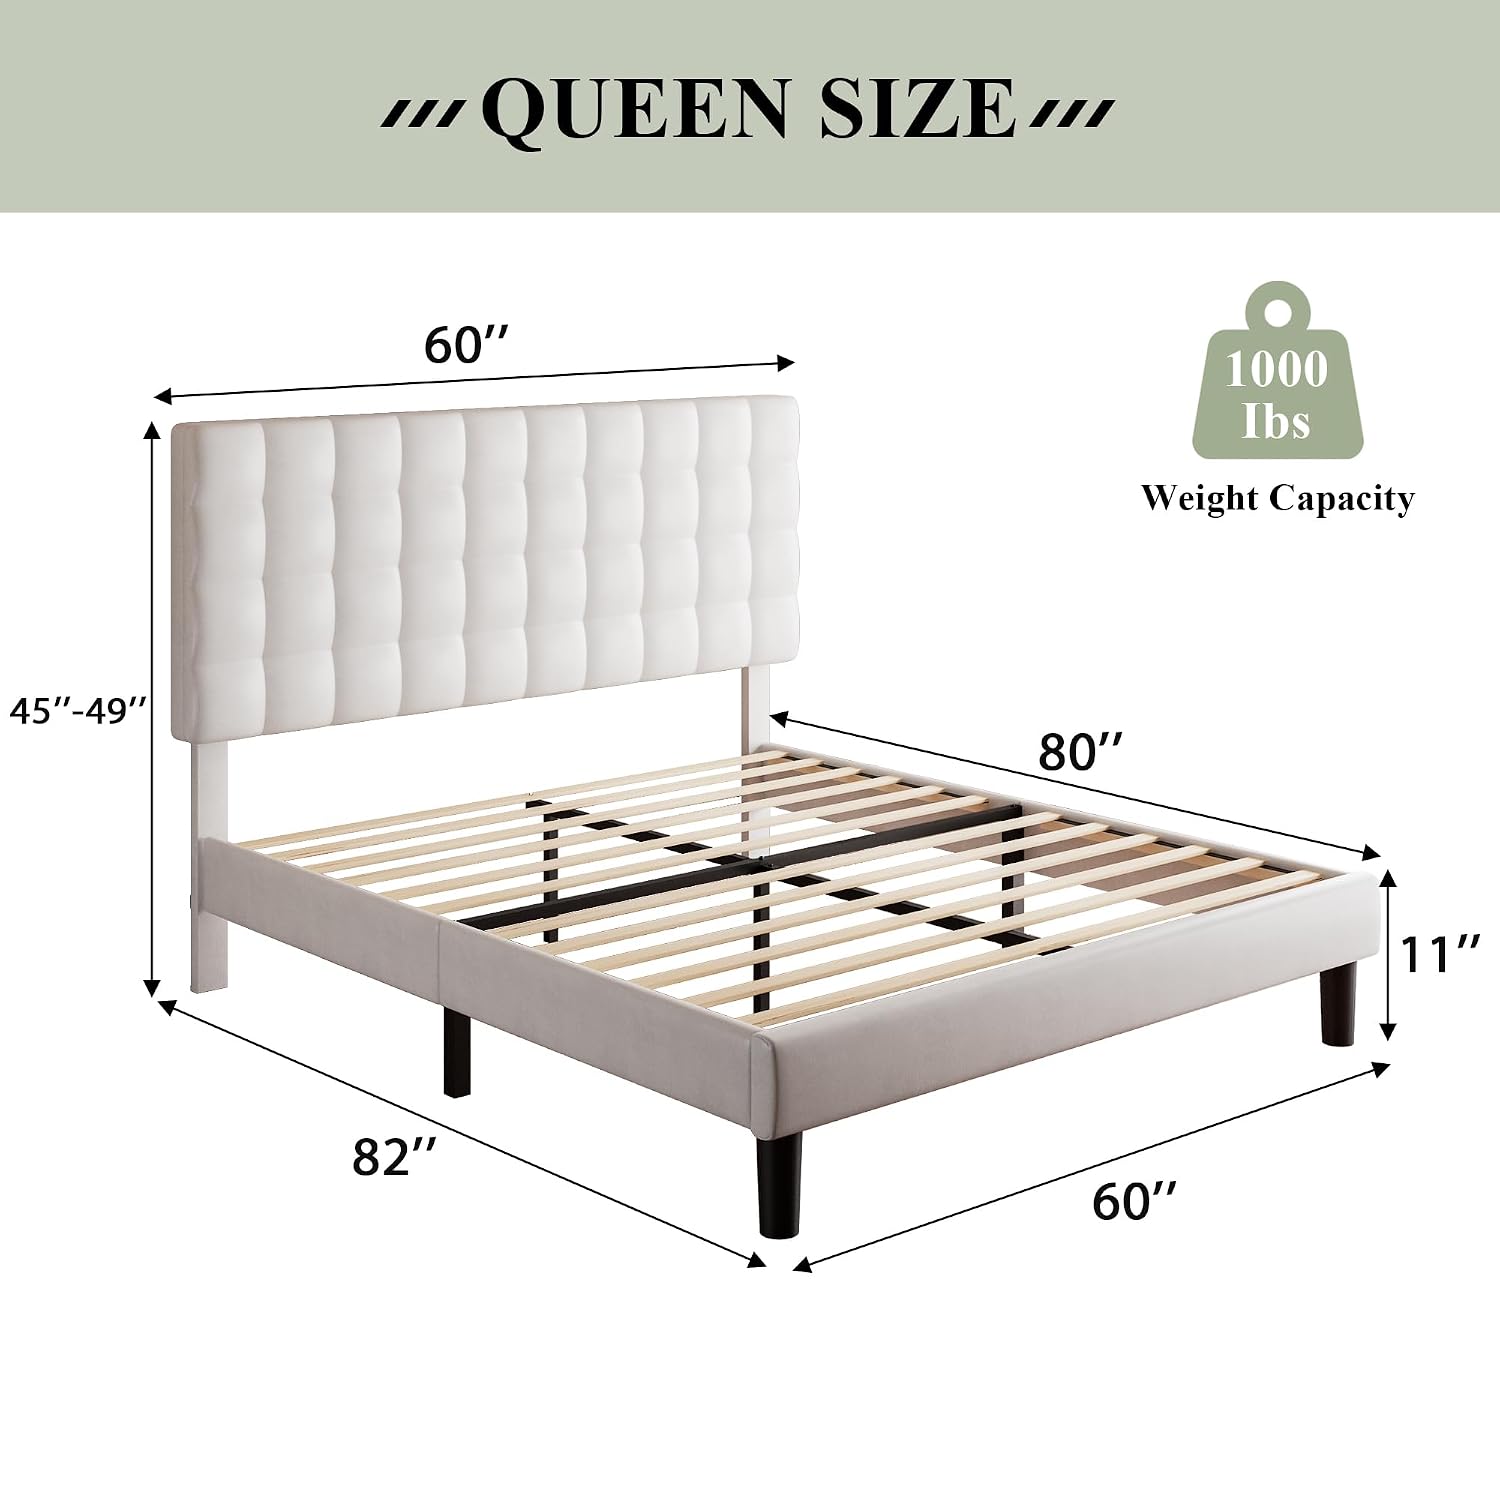
Figure 2: Queen Size Bed Frame Dimensions and Weight Capacity.

Figure 3: Ground Clearance for easy cleaning.
5. Setup and Assembly Instructions
Follow these steps carefully to assemble your Feonase Queen Platform Bed Frame. It is recommended to have two people for assembly.
- Unpack Components: Carefully remove all parts from the packaging. Lay them out on a clean, soft surface to prevent scratches. Verify all parts are present against the package contents list.
- Assemble Headboard: Attach the headboard support legs to the main headboard panel using the provided bolts and Allen wrench. Ensure they are securely fastened but do not overtighten. The headboard height can be adjusted during this step (45" to 49").
- Connect Side Rails: Attach the side rails to the headboard and footboard (if separate, or directly to the headboard and end rail if it's a platform design). Use the appropriate bolts and tighten them.
- Install Center Support Beam: Place the heavy-duty metal center support beam along the length of the frame. Secure it to the headboard and footboard/end rail connections.
- Attach Support Legs: Install the 8 support legs to the designated points on the metal frame, including the center beam. Ensure they are firmly attached and provide stable support.
- Place Wood Slats: Unroll or place the solid wood slats across the bed frame. Many slats come with Velcro or pre-drilled holes for secure attachment. Ensure the EVA mute bars are properly positioned to prevent noise.
- Final Tightening: Once all components are in place, go back and gently tighten all bolts and screws to ensure a secure and stable structure. Do not overtighten.

Figure 4: Structural components including metal frame, wood slats, and support legs.

Figure 5: Headboard height adjustment.
6. Operating (Usage)
Your Feonase Queen Platform Bed Frame is designed for optimal comfort and support without the need for a box spring.
- Mattress Placement: Place your Queen-sized mattress directly onto the solid wood slats. No box spring is required.
- Weight Distribution: Ensure weight is distributed evenly across the bed frame. Do not concentrate heavy loads on a single point.
- Headboard Comfort: The high-density sponge-filled headboard provides comfortable back support for sitting up in bed.
7. Maintenance and Care
Proper care will extend the life and appearance of your bed frame.
- Cleaning the Faux Leather: Wipe the faux leather surfaces with a dry cloth. For minor spills, a damp cloth with mild soap can be used, followed by drying thoroughly. Avoid harsh chemicals or abrasive cleaners.
- Frame Cleaning: Dust the metal and wood components with a dry or slightly damp cloth.
- Fastener Check: Periodically (e.g., every 3-6 months) check all bolts and screws to ensure they are tight. Retighten if necessary to maintain stability and prevent squeaks.
- Avoid Direct Sunlight: Prolonged exposure to direct sunlight can cause the faux leather to fade or crack over time.

Figure 6: High-density sponge filling for comfort and durability.
8. Troubleshooting
| Problem | Possible Cause | Solution |
|---|---|---|
| Bed frame squeaks | Loose bolts/screws; friction between slats and frame. | Ensure all bolts are tightened. Check that EVA mute bars are correctly placed between slats and frame. |
| Bed frame feels unstable | Loose connections; uneven floor; missing support legs. | Verify all connections are secure. Ensure the bed is on a level surface. Confirm all 8 support legs are installed and touching the floor. |
| Parts missing or damaged | Shipping error or manufacturing defect. | Do not proceed with assembly. Contact Feonase customer support immediately for replacement parts. |
9. Warranty and Support
For warranty information or technical support, please refer to the documentation included with your purchase or contact Feonase customer service directly. Keep your purchase receipt for warranty claims.
Contact Information: Please visit the official Feonase website or refer to your purchase platform for the most current customer support contact details.