vidaXL 171549
vidaXL Outdoor Aviary Budgie Cage User Manual
Model: 171549
1. Introduction
This manual provides essential information for the safe and correct assembly, operation, and maintenance of your vidaXL Outdoor Aviary Budgie Cage. Please read all instructions carefully before beginning assembly and retain this manual for future reference.
Safety Information
- Always ensure all components are securely fastened before placing any animals inside the aviary.
- Regularly inspect the aviary for any signs of damage, loose parts, or sharp edges that could harm your birds.
- Keep small parts and tools out of reach of children and pets during assembly.
- Wear appropriate safety gear, such as gloves, during assembly to prevent cuts or pinches.
- Ensure the aviary is placed on a level, stable surface to prevent tipping.
2. Included Components
Before assembly, verify that all parts listed below are present and undamaged. If any parts are missing or damaged, do not proceed with assembly and contact customer support.
- Metal Frame Sections (various lengths and shapes for walls, roof, and base)
- Mesh Panels (for walls and roof)
- Galvanized Steel Base Panels (for the lower section of the walls)
- Door Frame and Door Panel
- Door Latch Mechanism
- Fasteners (screws, nuts, bolts, washers)
- Assembly Tools (e.g., Allen wrench, spanner - may not be included, prepare your own)

Figure 2.1: Overview of the vidaXL Outdoor Aviary Budgie Cage. This image displays the complete assembled structure, highlighting the galvanized steel frame and mesh panels.
3. Setup and Assembly
Assembly requires at least two adults. Follow these steps carefully. Due to the large number of fasteners, patience and attention to detail are crucial.
- Prepare the Area: Choose a level, stable outdoor location for the aviary. Clear any debris and ensure sufficient space for assembly.
- Assemble the Base Frame: Connect the bottom metal frame sections using the provided fasteners. Ensure all connections are snug but do not fully tighten until the entire base is formed.
- Attach Base Panels: Secure the galvanized steel base panels to the lower part of the assembled base frame. These panels form the solid lower walls of the aviary.
- Erect Side Frames: Attach the vertical and horizontal metal frame sections for the side walls to the base frame. Gradually build up the wall structure.
- Install Mesh Panels: Once the wall frames are partially erected, begin attaching the mesh panels to the interior of the frame sections using the designated fasteners. Ensure the mesh is taut and securely fastened at all connection points.
- Assemble and Install Door: Construct the door frame and attach the door panel. Integrate the door into the designated opening in one of the wall sections. Install the door latch mechanism as shown in Figure 3.1.
- Assemble Roof Frame: Connect the metal frame sections for the roof. Lift and secure the roof frame onto the top of the wall frames.
- Install Roof Mesh: Attach the mesh panels to the roof frame, ensuring full coverage and secure fastening.
- Final Tightening: Once all components are in place and aligned, systematically tighten all fasteners across the entire structure. Do not overtighten.
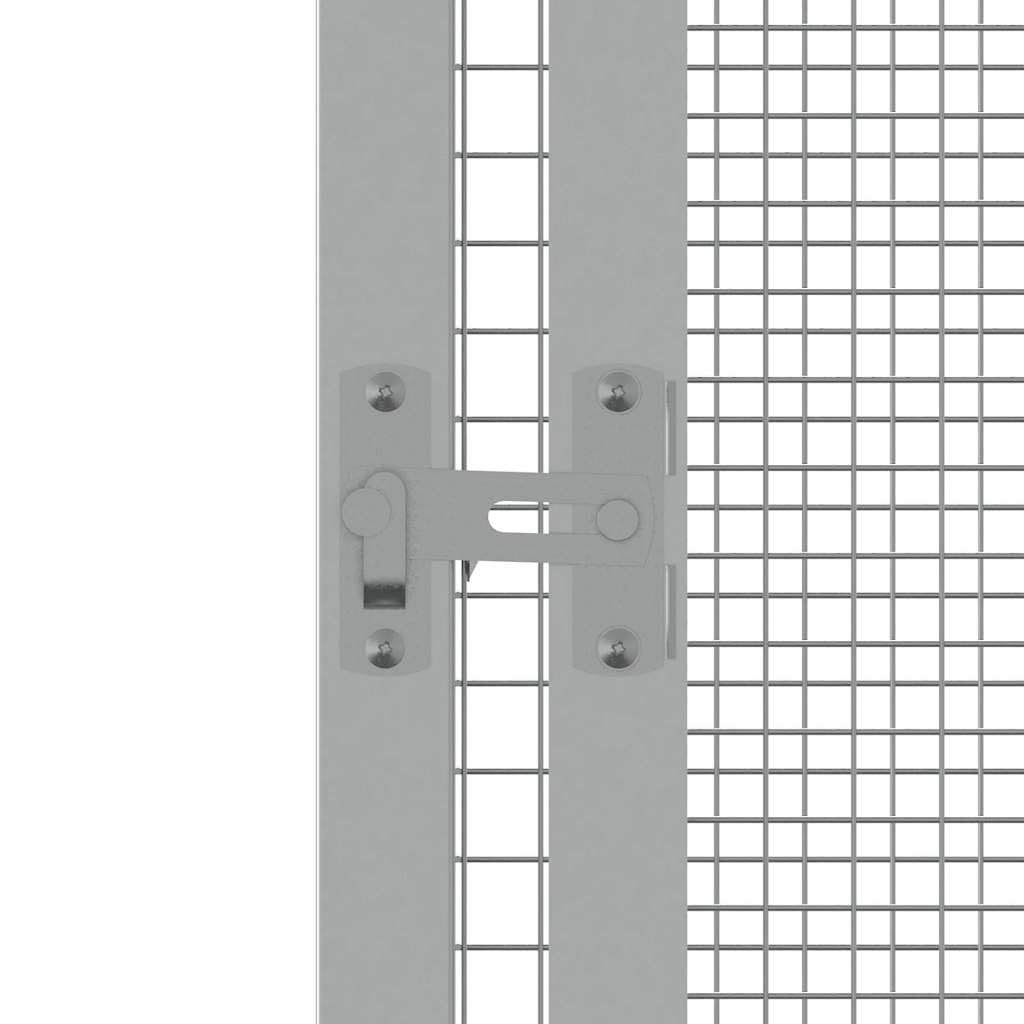
Figure 3.1: Detail of the door latch mechanism. This image illustrates how the latch secures the aviary door, ensuring birds remain safely enclosed.

Figure 3.2: Interior view of the aviary. This image shows the spacious internal structure and mesh paneling, providing a clear perspective of the bird habitat from within.
4. Operation
Opening and Closing the Door
To open the aviary door, slide the latch mechanism as shown in Figure 3.1 and pull the door outwards. To close, push the door firmly into the frame and engage the latch until it is securely locked.
Bird Placement and Environment
- Ensure the aviary is free from any sharp objects or debris before introducing birds.
- Provide appropriate perches, food, and water stations suitable for the bird species housed.
- Monitor the birds regularly, especially during initial placement, to ensure they adapt well to their new environment.
- Consider the aviary's placement to offer adequate shade and protection from extreme weather conditions.
5. Maintenance
Regular maintenance will extend the life of your aviary and ensure a healthy environment for your birds.
Cleaning
- Daily: Remove any uneaten food, droppings, and refresh water.
- Weekly: Clean the floor of the aviary thoroughly. Wipe down the galvanized steel panels and mesh with a damp cloth and a mild, bird-safe disinfectant. Rinse thoroughly and allow to dry completely before reintroducing birds.
- Monthly/Quarterly: Perform a deep clean of the entire aviary, including all frame sections and mesh. Inspect for any rust or corrosion on the galvanized steel.
Inspection
- Periodically check all fasteners to ensure they remain tight. Re-tighten as necessary.
- Inspect the mesh for any tears, holes, or weak points that could allow birds to escape or predators to enter.
- Examine the door and latch mechanism for smooth operation and secure locking.
- Check the ground around the aviary for any signs of instability or erosion.
6. Troubleshooting
This section addresses common issues you might encounter with your aviary.
| Problem | Possible Cause | Solution |
|---|---|---|
| Aviary feels unstable or wobbly. | Uneven ground; loose fasteners. | Ensure the aviary is on a perfectly level surface. Re-tighten all assembly fasteners. |
| Door does not close or latch properly. | Misaligned door frame; bent latch component. | Check door frame alignment during assembly. Gently adjust the latch mechanism if bent. Ensure no debris obstructs the latch. |
| Mesh panels are loose or sagging. | Incomplete fastening; fasteners have loosened over time. | Ensure all mesh panel fasteners are securely tightened. Add additional fasteners if necessary to maintain tension. |
| Rust spots appear on galvanized steel. | Damage to galvanization; prolonged exposure to moisture. | Clean the area, gently remove loose rust, and apply a rust-inhibiting primer and paint suitable for galvanized surfaces. |
7. Specifications
Key technical details for the vidaXL Outdoor Aviary Budgie Cage.
| Feature | Detail |
|---|---|
| Model Number | 171549 |
| Material | Galvanized Steel |
| Color | Anthracite |
| Overall Dimensions (L x W x H) | 84.1" x 85.6" x 83.3" (213.5 cm x 217.5 cm x 211.5 cm) |
| Item Weight | Approximately 121.14 lbs (54.95 kg) |
| Door Feature | Lockable |
| Mesh Size (approx.) | 12.7 mm x 12.7 mm (0.5" x 0.5") |
| Wire Diameter (approx.) | 0.75 mm (0.03") |

Figure 7.1: Dimensional diagram of the aviary. This image provides precise measurements for the length, width, and height of the cage, along with mesh details.
8. Warranty Information
Specific warranty terms and conditions for the vidaXL Outdoor Aviary Budgie Cage (Model 171549) are provided by the manufacturer, vidaXL. Please refer to the warranty documentation included with your purchase or visit the official vidaXL website for detailed information regarding warranty coverage, duration, and claims procedures. Warranty policies typically cover manufacturing defects but may not cover damage resulting from improper assembly, misuse, or normal wear and tear.
9. Customer Support
For further assistance, missing parts, or technical inquiries regarding your vidaXL Outdoor Aviary Budgie Cage, please contact the retailer from whom you purchased the product or refer to the official vidaXL customer support channels. Contact information can typically be found on the manufacturer's website or your purchase receipt.
Ask a question about this manual
Ask about setup, troubleshooting, compatibility, parts, safety, or missing instructions. Manuals+ will review the question and use this page’s manual context to help answer it.