
Introduction
This manual provides detailed instructions for the installation, operation, and maintenance of your THINKWARE X700 Dual Dash Cam. Please read this manual thoroughly before using the product to ensure proper functionality and to prevent damage.
Package Contents
Verify that all items are present in the package:
- Front X700 Dash Cam
- Rear Camera
- 32GB MicroSD Card
- 12V Car Charger
- Hardwiring Cable
- Windshield Mount
- Rear Camera Cable
- Quick Start Guide
Product Overview
The THINKWARE X700 is a dual dash cam system designed to record both front and rear views of your vehicle in Full HD 1080p resolution. It features a 2.7-inch LCD touchscreen for easy control and playback, a G-Sensor for incident detection, and night vision capabilities for clear recordings in low light.

Figure 1: Front view of the THINKWARE X700 Dash Cam, showing the main lens and "FHD RECORDER" label.

Figure 2: Angled view of the THINKWARE X700 Dash Cam, highlighting the power (PWR) and MicroSD card slots on the side.
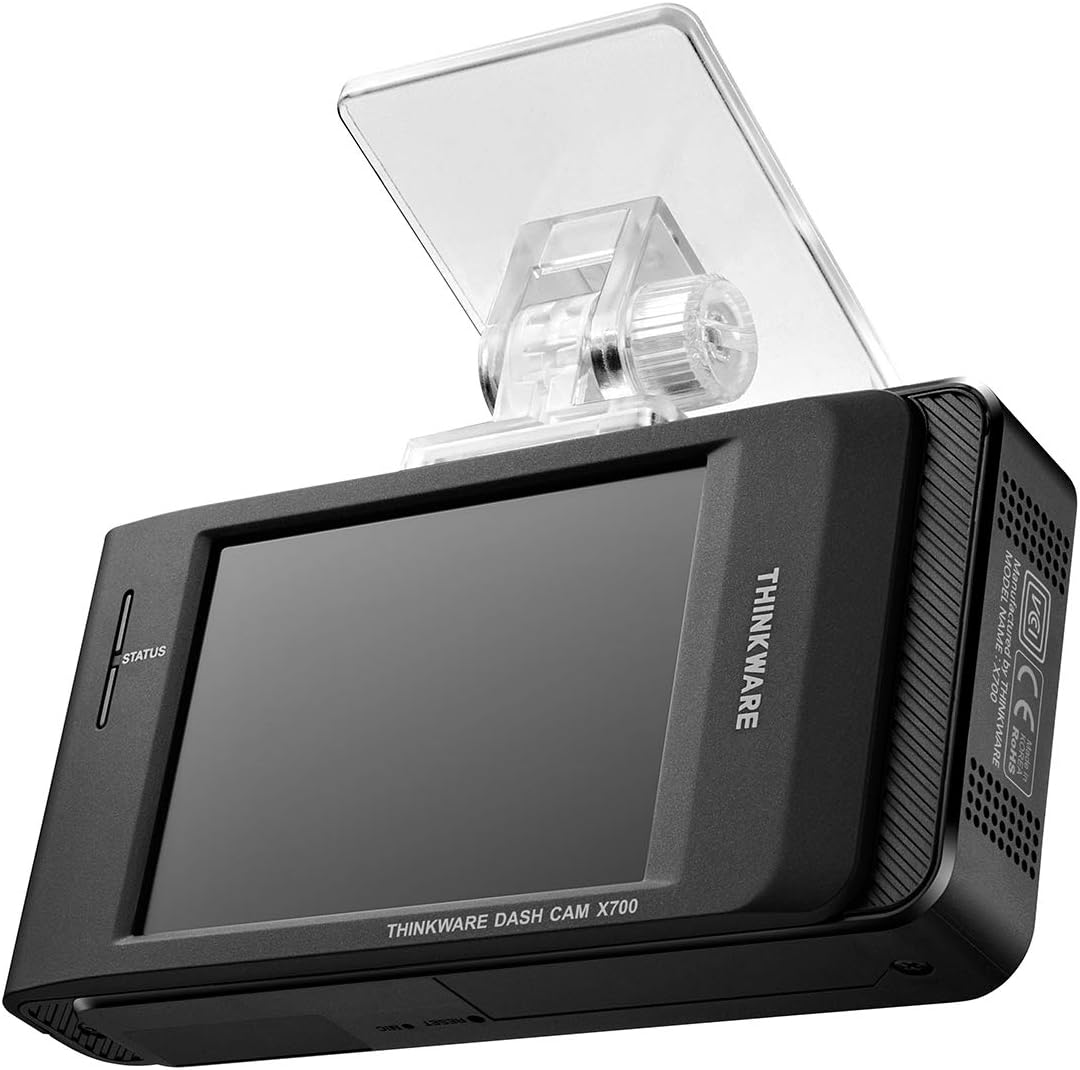
Figure 3: Rear view of the THINKWARE X700 Dash Cam, displaying the LCD screen and the attached windshield mount.
Setup
1. Inserting the MicroSD Card
- Ensure the dash cam is powered off.
- Locate the MicroSD card slot on the side of the main unit.
- Insert the provided 32GB MicroSD card into the slot until it clicks into place.
- To remove, gently push the card in until it springs out.
2. Mounting the Front Dash Cam
- Clean the windshield area where the dash cam will be mounted.
- Attach the windshield mount to the main dash cam unit.
- Remove the protective film from the adhesive pad on the mount.
- Press the mount firmly onto the windshield, ensuring the camera has a clear view of the road and does not obstruct the driver's vision.
- Adjust the camera angle as needed.

Figure 4: The THINKWARE X700 Dash Cam installed on the windshield, positioned to capture the road ahead.
3. Connecting the Rear Camera
- Mount the rear camera on the rear windshield, ensuring a clear view.
- Connect the rear camera cable to the rear camera and route the cable neatly to the front dash cam.
- Plug the other end of the rear camera cable into the designated port on the main X700 unit.
4. Power Connection
Choose one of the following power options:
- 12V Car Charger: Connect the 12V car charger to your vehicle's cigarette lighter socket and the other end to the dash cam's power input. The camera will power on and off with your vehicle's ignition.
- Hardwiring Cable (for Parking Mode): For continuous recording in Parking Mode, connect the hardwiring cable to your vehicle's fuse box according to the instructions provided with the hardwiring kit (sold separately or included in some packages). Professional installation is recommended for hardwiring.
Operating the Dash Cam
1. Powering On/Off
- The dash cam automatically powers on when connected to power and the vehicle ignition is on.
- It powers off automatically when the ignition is turned off (unless hardwired for Parking Mode).
- To manually power off, disconnect the power cable.
2. Recording Modes
- Continuous Recording: Records continuously while driving. Older files are overwritten by newer ones when the MicroSD card is full.
- Incident Recording: Automatically records and saves footage when an impact is detected by the G-Sensor. These files are protected from being overwritten.
- Manual Recording: Press the manual record button to save a segment of footage manually.
- Parking Mode (Optional): If hardwired, the dash cam can record events while the vehicle is parked, including motion detection and impact detection.

Figure 5: The X700's LCD screen displaying recording status and menu options.
3. Using the LCD Touchscreen
The 2.7-inch LCD touchscreen allows you to:
- View live footage from the front and rear cameras.
- Playback recorded videos.
- Access and adjust camera settings (e.g., resolution, G-Sensor sensitivity, time zone).
- Format the MicroSD card.
4. Viewing Recorded Footage
- On the Dash Cam: Use the touchscreen to navigate to the playback menu and select desired videos.
- On a Computer: Remove the MicroSD card from the dash cam and insert it into a computer's card reader. Use the THINKWARE PC Viewer software (available for download from the THINKWARE website) for optimal viewing and analysis of footage, including GPS data (if applicable).
Maintenance
1. MicroSD Card Management
- Formatting: Regularly format the MicroSD card (at least once a month) using the dash cam's menu or the THINKWARE PC Viewer to ensure optimal performance and prevent recording errors.
- Replacement: MicroSD cards have a limited lifespan. Replace the card if you experience frequent recording errors or data corruption. Use high-endurance MicroSD cards designed for dash cam use.
2. Cleaning the Dash Cam
- Use a soft, dry cloth to clean the camera lens and the LCD screen.
- Do not use chemical cleaners or abrasive materials, as they may damage the surfaces.
3. Firmware Updates
Periodically check the official THINKWARE website for firmware updates. Updating the firmware can improve performance, add new features, and resolve potential issues. Follow the instructions provided on the website for firmware update procedures.
Troubleshooting
| Problem | Possible Cause | Solution |
|---|---|---|
| Dash cam does not power on. | No power supply; faulty cable; vehicle power outlet issue. | Check power cable connection. Test the 12V car charger in another vehicle or outlet. Ensure vehicle ignition is on. |
| Recording errors or corrupted files. | MicroSD card error; card needs formatting; card lifespan expired. | Format the MicroSD card. Try a different, high-endurance MicroSD card. |
| Poor video quality. | Dirty lens; protective film still on lens; incorrect settings. | Clean the camera lens. Ensure protective film is removed. Check video resolution settings. |
| G-Sensor not detecting incidents or too sensitive. | Incorrect G-Sensor sensitivity setting. | Adjust G-Sensor sensitivity in the dash cam settings menu. |
| Rear camera not recording. | Loose connection; faulty cable or camera. | Check the rear camera cable connection to both the rear and front units. |
Specifications
| Feature | Detail |
|---|---|
| Model Name | X700 |
| Video Capture Resolution | 1080p Full HD (Front and Rear) |
| Field of View | 142 degrees |
| Frame Rate | 30 FPS |
| Special Features | Automatic Incident Detection, Night Vision, G-Sensor |
| Screen Size | 2.7 inches |
| Display Type | LCD |
| Control Method | Touch |
| Flash Memory Type | MicroSD (32GB included) |
| Mounting Type | Windshield Mount |
| Product Dimensions | 10 x 5.4 x 2.9 cm |
| Weight | 610 g |
Warranty and Support
THINKWARE products are covered by a limited warranty. For specific warranty terms and conditions, please refer to the warranty card included in your package or visit the official THINKWARE website.
For technical support, frequently asked questions, and driver/firmware downloads, please visit the official THINKWARE support page:


