Introduction
This manual provides detailed instructions for the installation, operation, maintenance, and troubleshooting of your Hapadif Motorized Blinds. Please read this manual thoroughly before installation and use to ensure proper function and longevity of your product.
The Hapadif Motorized Blinds are designed for convenience and privacy, featuring a no-drill installation mechanism and smart control options. They are made from a three-layer blackout textured fabric, offering excellent UV and privacy protection.
Product Specifications
| Feature | Description |
|---|---|
| Brand | Hapadif |
| Model Number | MH100 |
| Material | Fabric (Three-layer blackout textured) |
| Product Dimensions (Current Model) | 32"W x 72"H |
| Color (Current Model) | White |
| Opacity | Blackout |
| Operation Mode | Automatic, Motorized |
| Closure Type | Cordless |
| Mounting Type | Inside Mount; Outside Mount (No-drill mechanism suitable for inside mount) |
| Control Type | Remote, APP Control (requires Smart Bridge), Voice Control (Alexa, Google Assistant) |
| Included Components | Mounting Hardware, Remote, User Manual, Valance |
Setup and Installation
The Hapadif Motorized Blinds feature a convenient no-drill installation method for inside mounts. For outside mounts, traditional drilling may be required.
1. Measuring Your Window
For accurate fitting, measure the width at the top, middle, and bottom of your window frame. Record the narrowest measurement. For inside mount, subtract 1/4 inch from the actual window width. For outside mount, increase the length and width by 4 inches each.
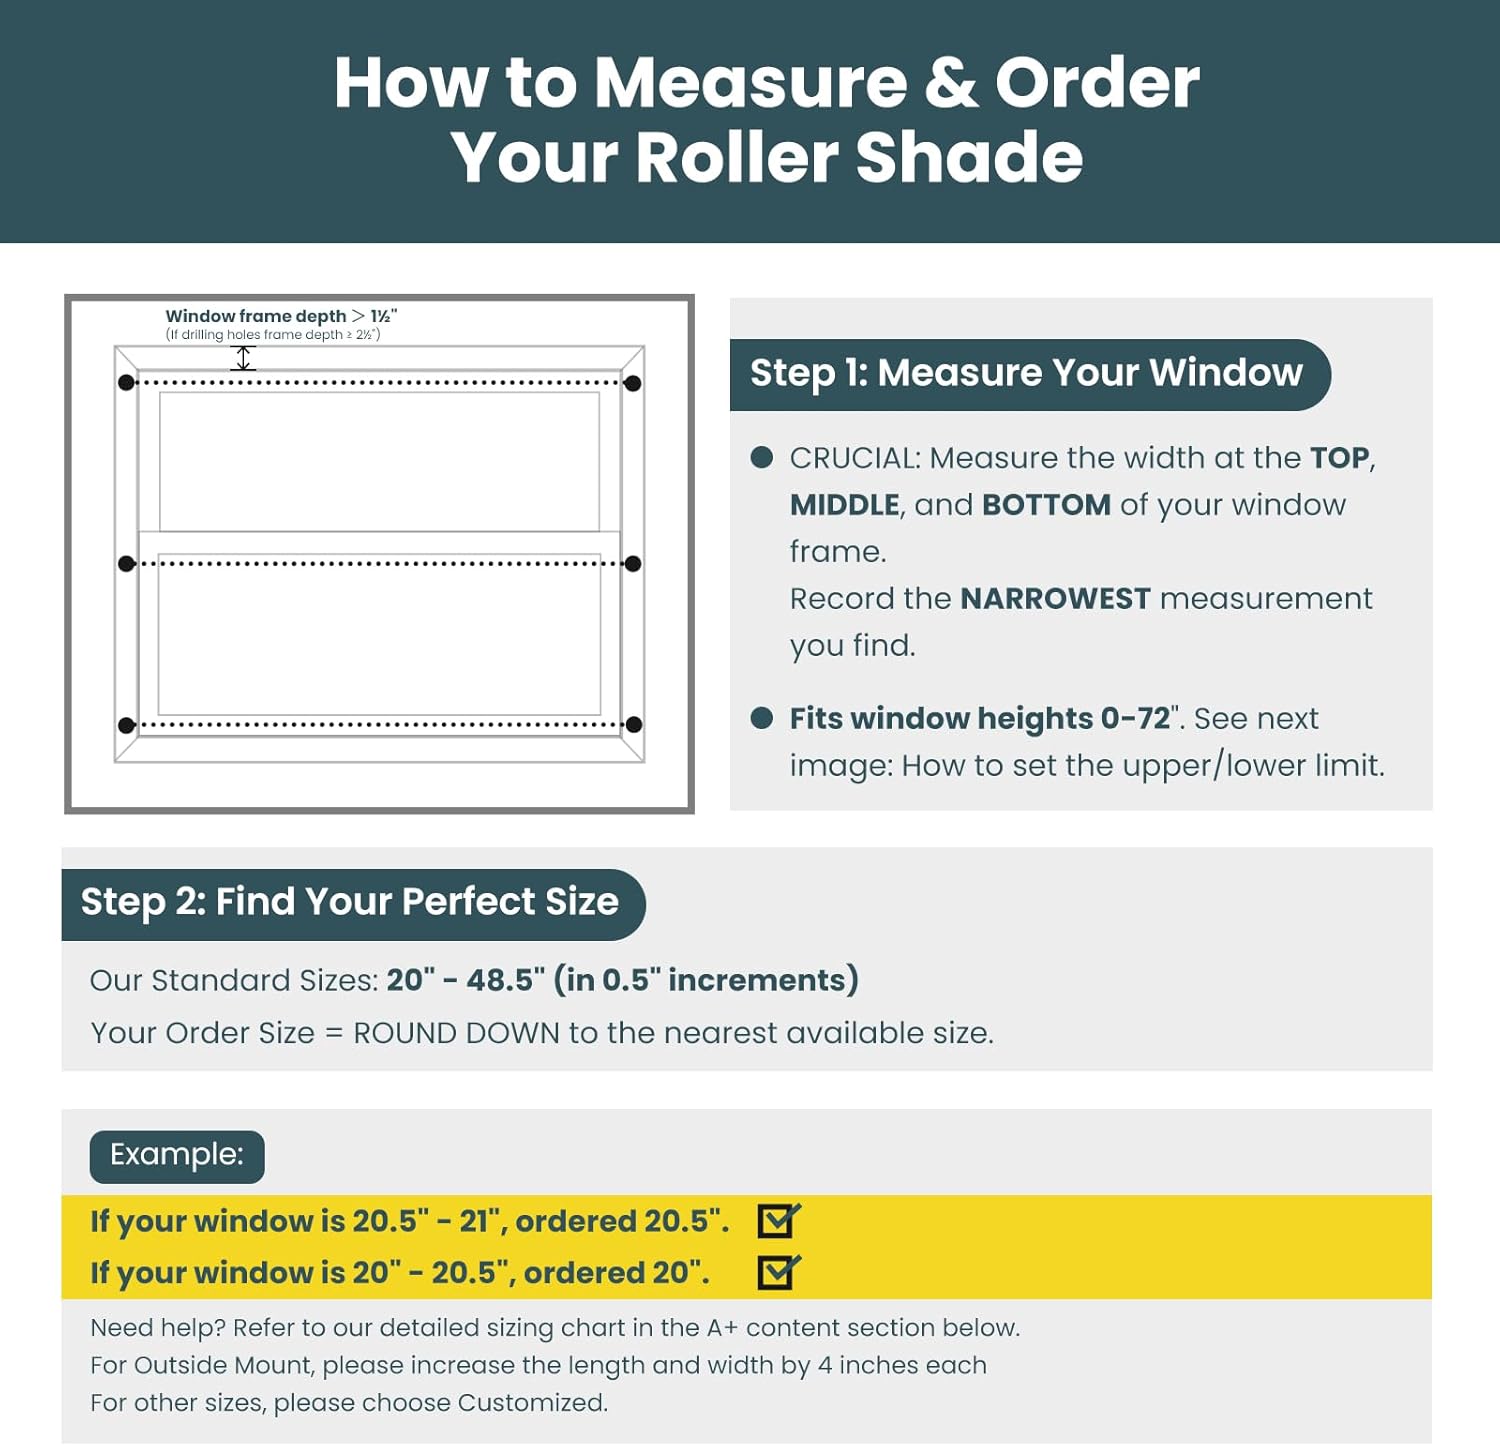
Image: Detailed diagram illustrating how to measure window dimensions for proper blind fit, emphasizing measuring at three points (top, middle, bottom) and using the narrowest measurement for inside mount, or adding 4 inches for outside mount.
2. No-Drill Installation (Inside Mount)
- Prepare the Shade: Install the cover plate buckle and four black pads onto it.
- Attach Extension Block: Attach an adhesive extension block to the groove of the upper rail on the right side. Ensure only one block is used.
- Insert into Frame: Push the shade into the window frame.
- Secure Tension: Use the provided Hex Key to lock the tension for a secure fit.
- Apply Decorative Covers: Snap on the decorative covers to complete the installation.

Image: A visual guide demonstrating the four-step no-drill installation process for the motorized blinds, including attaching the extension block, compressing the shade into the frame, locking tension with a hex key, and snapping on decorative covers.
Video: A demonstration video titled "How to no drill installation?" provided by the seller, showing the process of installing the Hapadif Motorized Blinds without drilling.
3. Pairing with Remote Control
The remote control is pre-matched with the blind. If re-pairing is needed:
- Remove the back cover of the remote control using a screwdriver.
- Ensure the switch inside the remote is in "Admin" mode.
- Press the "S" button 5 times in a row to restore the remote control to its initial stability.
- Press and hold the "M" button on the right side of the top rail of the blind until the blind jogs up and down once.
- Press and hold the "S" button on the remote until the blind jogs again. The remote is now paired.
Video: A seller-provided video titled "Set the up and down limits of the blinds with remote," which also demonstrates the pairing process for the remote control.
4. Setting Upper and Lower Limits
After pairing, you can set the desired upper and lower travel limits for your blinds using the remote control.
- Adjust the blind to your desired lower limit using the remote.
- Press the pause button, until the blind is fully lowered to your desired position.
- Press and hold the Down button on the back of the remote control until the blind jogs to confirm the setting.
- Adjust the blind to your desired upper limit using the remote.
- Press the pause button, until the blind is fully lowered to your desired position.
- Press and hold the Up button on the back of the remote control until the blind jogs to confirm the setting.
- Finally, slide the switch on the back to the "User" position and reattach the back cover. All settings are now complete.
Video: A seller-provided video titled "Set the up and down limits of the blinds with remote," demonstrating how to program the upper and lower travel limits for the blinds.
Operating Your Blinds
Your Hapadif Motorized Blinds offer multiple control options for your convenience.
1. Remote Control
Use the included remote control for basic up, down, and pause functions. A single-channel remote controls one blind, while a 15-channel remote can control up to 15 blinds and group control.

Image: An illustration detailing the three ways to control the Hapadif Motorized Blinds: Remote Control, APP Control (with Hub), and Voice Control (with Hub).
2. APP Control (Requires Smart Bridge)
For advanced control features like timing control, weather control, and remote access, you will need a Smart Bridge (AX290 motor compatible). This bridge connects your blinds to your smartphone via the TUYA app.
- Connect the Smart Bridge to a power supply (operates on 2.4 GHz Wi-Fi).
- Download the TUYA app from your app store.
- Ensure Bluetooth and other necessary authorizations are enabled on your phone.
- Press and hold the smart bridge button for 5 seconds to enter pairing mode.
- In the TUYA app, add the device (Smart Bridge). If it doesn't appear, unplug and replug the bridge, then try again.
- Once the bridge is added, you can add your motorized blinds within the app by following the on-screen instructions.
Video: A seller-provided video titled "How to connect blind with smart bridge?" demonstrating the steps to connect the blinds to a smart bridge and the TUYA app.
3. Voice Control (Requires Smart Bridge)
Once connected to the Smart Bridge and the TUYA app, you can integrate your blinds with Alexa or Google Assistant for voice commands.
- In the TUYA app, navigate to "Me" > "Third Party Service".
- Select Alexa or Google Assistant and follow the prompts to link your account.
- After linking, you can use voice commands like "Alexa, open my smart blinds" or "Hey Google, close the living room blinds."

Image: A woman in a kitchen using a smart speaker to control the motorized blinds, illustrating the voice control feature.
Maintenance
Proper maintenance ensures the longevity and optimal performance of your Hapadif Motorized Blinds.
- Cleaning: The fabric is easy to clean. Use a soft cloth or a duster to gently remove dust. For tougher spots, a damp cloth with mild soap can be used, but avoid harsh chemicals.
- Battery Replacement: The AX290 motor uses batteries that can last for approximately 1 year or 600 cycles. When batteries are low, simply remove them from the battery compartment at the top of the shade and replace them.
- Motor Noise: The motor is designed for ultra-quiet operation (around 35dB). If you notice unusual noises, refer to the troubleshooting section or contact customer support.
Troubleshooting
If you encounter any issues with your Hapadif Motorized Blinds, please refer to the following common solutions:
- Blinds not responding to remote:
- Check the remote control batteries and replace if necessary.
- Ensure the remote is in "User" mode after initial setup.
- Re-pair the remote control with the blind as described in the "Pairing with Remote Control" section.
- Blinds not responding to APP/Voice Control:
- Ensure the Smart Bridge is powered on and connected to your 2.4 GHz Wi-Fi network.
- Verify that the blinds are correctly added to the TUYA app and linked to your Alexa/Google Assistant account.
- Check your internet connection.
- Blinds not moving to correct limits:
- Re-set the upper and lower travel limits as described in the "Setting Upper and Lower Limits" section.
- Unusual noise during operation:
- Ensure the blinds are installed correctly and securely, without any obstructions.
- If the noise persists, contact customer support.
For further assistance, please contact Hapadif customer service.
Warranty and Support
Hapadif is committed to product quality and customer satisfaction.
- Warranty: Hapadif provides a 2-year warranty for motors and controllers.
- Damaged Components: If the fabric or components are damaged upon receipt, please take a photo and send it to Hapadif within 60 days for replacement.
- Customer Service: For any service inquiries or support, please refer to the contact information provided with your product packaging or visit the official Hapadif website.