Introduction
Welcome to the instruction manual for your MokerLink 12-Port Gigabit Ethernet Switch. This document provides detailed information on the product's features, installation, operation, and troubleshooting to ensure optimal performance and longevity of your device.
Product Overview
The MokerLink 12-Port Gigabit Ethernet Switch is an unmanaged network switch designed for small office/home office (SOHO) and small to medium business (SMB) environments. It features 8 Gigabit PoE+ ports, 2 Gigabit Uplink ports, and 2 Gigabit SFP ports, offering flexible connectivity and power options for various network devices.

Figure 1: Front view of the MokerLink 12-Port Gigabit Ethernet Switch, showcasing its compact design and port layout.
Key Features
- 12 Gigabit Ports: Includes 8 Gigabit PoE+ ports, 2 Gigabit Uplink ports, and 2 Gigabit SFP ports for versatile network connections.
- High PoE Power: Supports IEEE 802.3af/at standards, providing up to 30W per port with a total power budget of 120W.
- Unmanaged Plug & Play: Automatically detects devices and provides data links, compatible with both PoE and non-PoE devices without requiring complex configuration.
- Extend Mode: Allows PoE ports 7-8 to extend transmission distance up to 250 meters at a speed of 10Mbps.
- PoE Watchdog: Automatically monitors PoE devices and restarts ports if a device becomes unresponsive, enhancing network reliability.
- Fanless Design: Ensures silent operation, suitable for various environments.
- Durable Metal Housing: Provides robust protection and heat dissipation.
- 4KV Lightning Protection: Offers enhanced protection against electrical surges.
- Wide Operating Temperature: Functions reliably in temperatures ranging from -20°C to +50°C.

Figure 2: Visual representation of the MokerLink 12-Port Gigabit Ethernet Switch's main features.
Package Contents
Please check the package contents carefully. If any item is missing or damaged, contact your vendor immediately.
- 1 x MokerLink 12-Port Gigabit PoE Switch
- 1 x Power Cord
- 1 x User Manual
Hardware Description
Front Panel
The front panel of the switch features all network ports, LED indicators, and a DIP switch for mode selection.
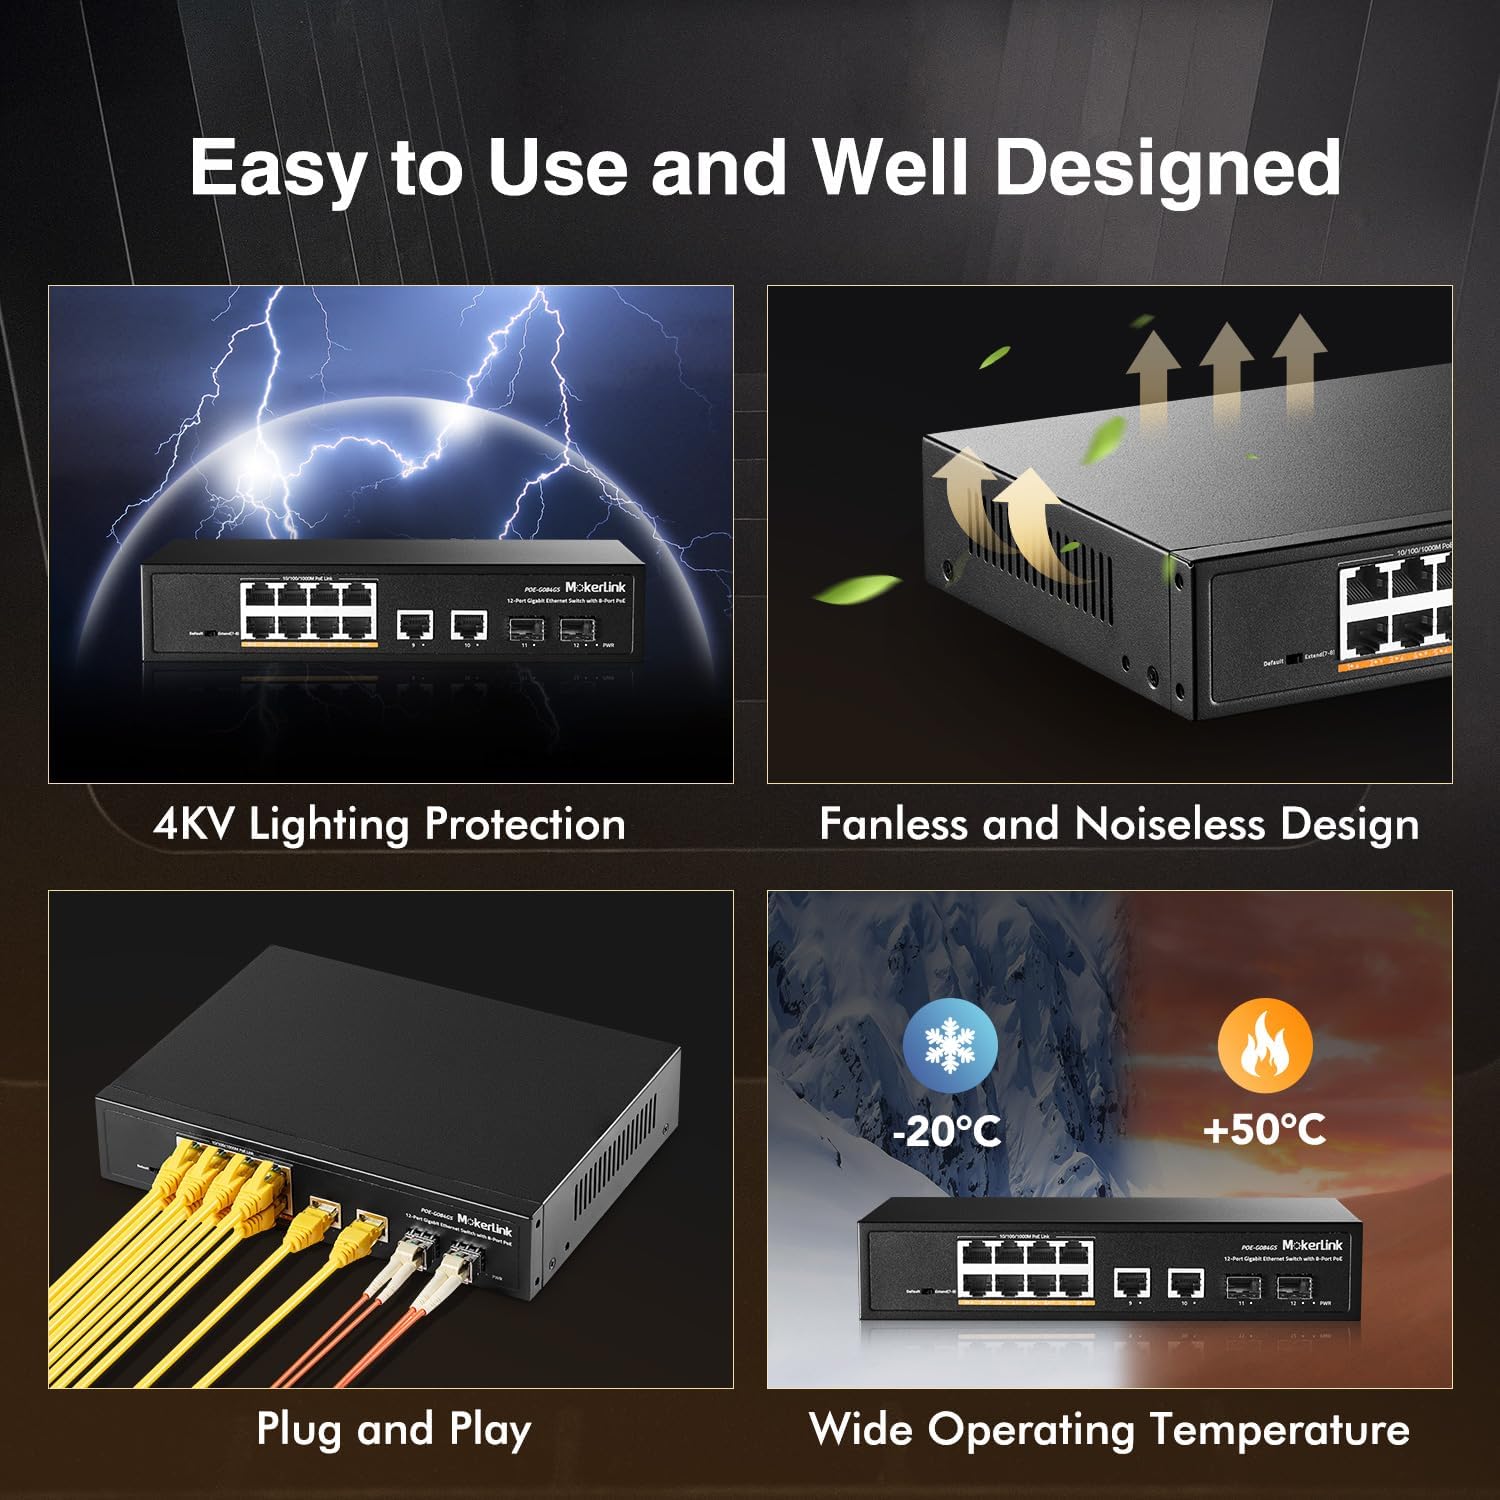
Figure 3: Detailed view of the switch's front panel with port labels and DIP switch.
- Ports 1-8: Gigabit PoE+ Ethernet ports (10/100/1000Mbps). These ports provide both data and power to connected PoE-compatible devices.
- Ports 9-10: Gigabit Uplink Ethernet ports (10/100/1000Mbps). Used for connecting to routers, NVRs, or other network devices.
- Ports 11-12: Gigabit SFP Ports. Used for fiber optic connections with compatible SFP modules (single-mode or multimode).
- DIP Switch: Used to select between Default Mode and Extend Mode.
Rear Panel
The rear panel includes the AC power input.

Figure 4: Rear view of the switch, highlighting the AC power input.
- AC Input 100-240V: Power connector for the switch.
LED Indicators
The switch features LED indicators to provide status information:
- PWR LED: Illuminates when the switch is powered on.
- Link/Act LEDs (per port): Illuminates when a network link is established and flashes during data transmission.
- PoE LEDs (per PoE port): Illuminates when PoE power is being supplied to a connected device.
Setup and Installation
Step 1: Unpacking
Carefully remove the switch from its packaging. Ensure all components listed in the "Package Contents" section are present and undamaged.
Step 2: Power Connection
Connect the power cord to the AC input on the rear panel of the switch and then to a standard electrical outlet. The PWR LED on the front panel should illuminate, indicating that the switch is receiving power.
Step 3: Network Connections
Connect your network devices to the switch as follows:
- Connecting PoE Devices: Connect your PoE-compatible devices (e.g., IP cameras, wireless access points, IP phones) to ports 1-8 using standard Ethernet cables. The Link/Act and PoE LEDs for these ports will light up, indicating a successful connection and power delivery.
- Connecting Non-PoE Devices: Connect non-PoE network devices (e.g., computers, routers, NVRs) to any of the Gigabit Ethernet ports (1-10). The switch will automatically detect non-PoE devices and provide data connectivity without power.
- Uplink Connection: Connect one of the Gigabit Uplink ports (9 or 10) to your router or main network backbone using an Ethernet cable.
- SFP Connection: For fiber optic connections, insert compatible SFP modules into ports 11-12 and connect fiber optic cables.
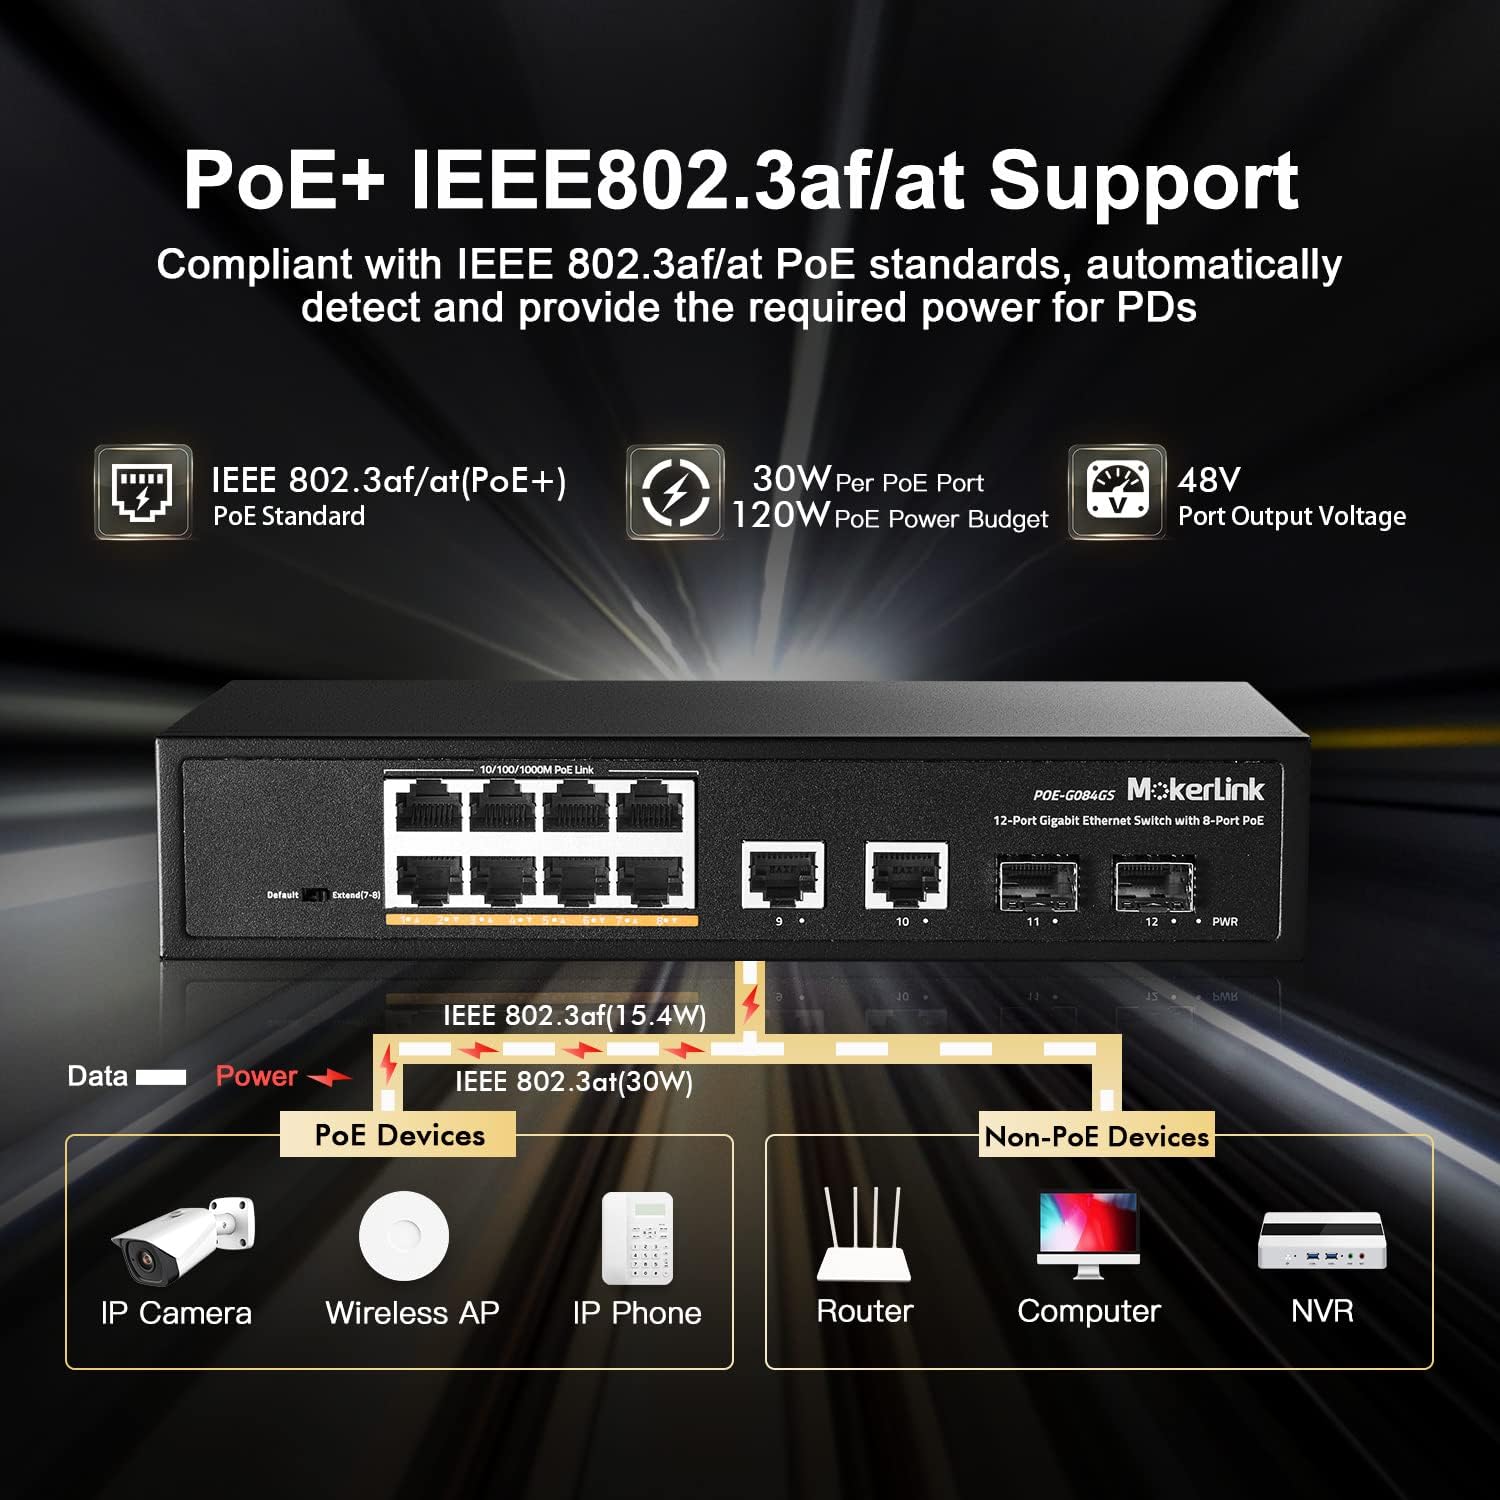
Figure 5: Example of connecting various devices to the MokerLink PoE switch.
Operating Instructions
The MokerLink 12-Port Gigabit Ethernet Switch is an unmanaged, plug-and-play device. No software configuration is typically required for basic operation.
Data Transmission
Once devices are connected and powered on, the switch will automatically facilitate high-speed data transmission between all connected devices at Gigabit speeds (10/100/1000Mbps).
Power over Ethernet (PoE)
For devices connected to PoE+ ports (1-8) that support IEEE 802.3af/at standards, the switch will automatically detect their power requirements and supply the necessary power through the Ethernet cable. This eliminates the need for separate power adapters for PoE-compatible devices.
Advanced Features: Extend Mode and PoE Watchdog
The DIP switch on the front panel allows you to enable advanced features for specific ports.

Figure 6: DIP switch settings and their effect on port distance and speed.
Extend Mode
When the DIP switch is set to "Extend" mode, PoE ports 7 and 8 will operate at a reduced speed of 10Mbps but can extend the PoE transmission distance up to 250 meters. This feature is particularly useful for connecting devices located further away, such as outdoor IP cameras, where standard Ethernet cable length limits (100 meters) would otherwise be an issue.
PoE Watchdog
Simultaneously, enabling Extend Mode also activates the PoE Watchdog function for ports 7 and 8. The PoE Watchdog continuously monitors the status of connected PoE devices. If a device becomes unresponsive or drops its connection, the switch will automatically restart the corresponding PoE port to re-establish the connection, improving system reliability and reducing the need for manual intervention.
Troubleshooting
If you encounter issues with your MokerLink switch, please refer to the following troubleshooting tips:
- No Power: Ensure the power cord is securely connected to both the switch and a working electrical outlet. Check if the PWR LED is illuminated. If not, try a different power outlet.
- No Link/Activity: Verify that Ethernet cables are securely connected to both the switch and the connected device. Ensure the connected device is powered on and functioning correctly. Try a different Ethernet cable or port to rule out cable or port issues.
- No PoE Power: Confirm that the connected device is PoE-compatible (IEEE 802.3af/at standard). Check if the PoE LED for the port is illuminated. If using Extend Mode, ensure the device can operate at 10Mbps.
- Slow Connection: Ensure all connected devices and cables support Gigabit Ethernet for optimal performance. If using Extend Mode, remember that ports 7-8 will operate at 10Mbps.
- Intermittent Connection: Check for loose cable connections. Ensure the switch is placed in a well-ventilated area to prevent overheating, as excessive heat can affect performance.
Specifications
| Feature | Detail |
|---|---|
| Brand | MokerLink |
| Model Number | POE-G084GS |
| Number of Ports | 12 (8 GE PoE+, 2 GE Uplink, 2 Gigabit SFP) |
| Data Transfer Rate | 1000 Megabits Per Second |
| PoE Standard | IEEE 802.3af/at |
| Max Power Per PoE Port | 30 Watts |
| Total PoE Power Budget | 120 Watts |
| Switch Type | Unmanaged |
| Case Material | Metal |
| Cooling | Fanless |
| Operating Temperature | -20°C to +50°C |
| Voltage | 100-240V AC Input |
| Item Weight | 1.25 Kilograms |
Warranty and Support
This MokerLink product comes with a 1-year warranty. For technical support or warranty inquiries, please contact MokerLink customer service through their official website or the platform where the product was purchased.
For further assistance, please refer to the MokerLink official store page: MokerLink Store.