
Hotpoint NSWF945CW
Hotpoint NSWF945CW 9KG 1400RPM Washing Machine
User Manual
Introduction
This manual provides essential information for the safe and efficient operation, installation, and maintenance of your new Hotpoint NSWF945CW 9KG 1400RPM Washing Machine. Please read this manual thoroughly before using the appliance for the first time and keep it for future reference. Proper use and care will ensure the longevity and optimal performance of your washing machine.

Figure 1: Hotpoint NSWF945CW Washing Machine - Front View. This image shows the complete washing machine with its white finish, central door, and control panel at the top.
Safety Information
Always follow basic safety precautions when using electrical appliances to reduce the risk of fire, electric shock, or injury to persons.
- Ensure the appliance is properly grounded.
- Do not allow children to play on or in the appliance.
- Do not operate the machine if it is damaged or malfunctioning.
- Unplug the appliance before performing any maintenance or cleaning.
- Do not install or store the appliance where it will be exposed to temperatures below freezing or exposed to the weather.
- Only use detergents and additives suitable for automatic washing machines.
Setup and Installation
Proper installation is crucial for the safe and efficient operation of your washing machine.
1. Unpacking
Carefully remove all packaging materials. Check the appliance for any transport damage. Report any damage immediately to your retailer.
2. Removing Transit Bolts
Before using the appliance, it is essential to remove all transit bolts located at the rear of the machine. These bolts secure the drum during transport and must be removed to prevent damage during operation. Refer to the diagram in your quick start guide for exact locations.
3. Placement
Place the washing machine on a firm, level floor. Ensure there is adequate ventilation around the appliance. Adjust the feet of the machine to ensure it is perfectly level and stable. An unstable machine can lead to excessive noise and vibration during operation.
4. Water Connection
Connect the water inlet hose to a cold water tap with a 3/4" thread. Ensure the connection is tight to prevent leaks. This model is designed for cold fill only.
5. Drainage Connection
Connect the drain hose to a standpipe or a suitable drain. Ensure the hose is not kinked or obstructed, as this can prevent proper water drainage. The end of the drain hose should be positioned at a height between 65 cm and 100 cm from the floor.
6. Electrical Connection
Plug the power cord into a grounded electrical outlet. Ensure the voltage and frequency match the specifications on the rating plate of the appliance. Do not use extension cords or adapters.

Figure 2: Washing Machine with Door Open. This image provides a view of the washing machine's interior drum, highlighting its capacity and design, useful for understanding loading.
Operating Instructions
1. Control Panel Overview
The control panel allows you to select programs and adjust settings. It features a program selector knob, a digital display, and various function buttons.

Figure 3: Control Panel. This image details the control panel, showing the program dial, digital display, and buttons for temperature, spin, delay, and special options like Steam Hygiene.
- Program Selector Knob: Used to choose the desired washing program.
- Digital Display: Shows program duration, remaining time, and error codes.
- Temperature Button: Adjusts the wash temperature.
- Spin Button: Modifies the spin speed.
- Delay Button: Sets a delayed start time for the wash cycle.
- Extra Rinse Button: Adds an additional rinse cycle.
- Rapid Option Button: Reduces the wash time for selected programs.
- Steam Hygiene Button: Activates the Steam Hygiene cycle for enhanced sanitization.
- Key Lock Button: Locks the control panel to prevent accidental changes.
2. Loading Laundry and Detergent
Open the washing machine door and load your laundry, ensuring not to exceed the maximum 9KG capacity. Close the door firmly. Pull out the detergent dispenser drawer and add the appropriate amount of detergent and fabric softener to the designated compartments.
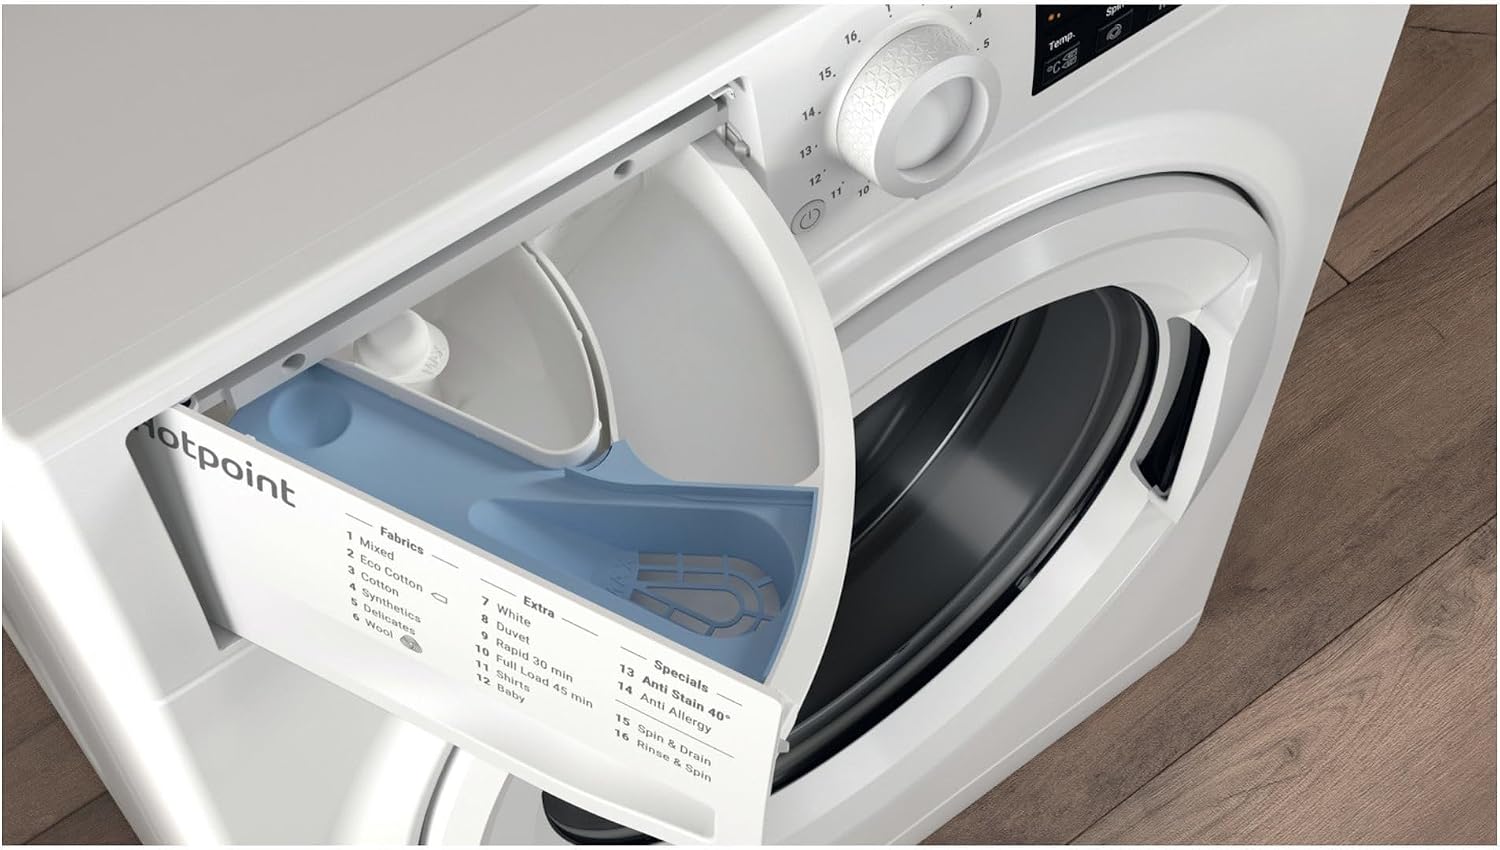
Figure 4: Detergent Dispenser. This image details the open detergent drawer, indicating compartments for pre-wash, main wash, and fabric softener.
3. Washing Programs
Select the appropriate program based on the fabric type and soil level of your laundry using the program selector knob.
| Program | Description |
|---|---|
| Anti-Stain 40° | Designed to tackle common household stains without pre-treatment, using tailored drum motions and water monitoring. |
| Mixed | For mixed loads of cottons and synthetics. |
| Eco 40-60 | Standard program for normally soiled cotton laundry declared to be washable at 40°C or 60°C, together in the same cycle. |
| Cotton | For cotton garments. |
| Synthetics | For synthetic fabrics. |
| Delicates | For delicate garments requiring gentle care. |
| Wool | Specific program for wool garments. |
| Anti Allergy | Helps remove major allergens. |
| Spin & Drain | Performs a spin cycle and drains water. |
| Rinse & Spin | Performs a rinse cycle followed by a spin. |
| 30 min | Quick wash program for lightly soiled items. |
| White | For white cottons. |
| Duvet | For washing duvets and large items. |
| Baby | Gentle program for baby clothes. |
4. Starting a Wash Cycle
- Load laundry and add detergent.
- Close the door firmly.
- Turn the program selector knob to the desired program.
- Adjust temperature, spin speed, or add special options using the respective buttons.
- Press the Start/Pause button to begin the cycle.
5. Special Features
- Steam Hygiene: Injects steam into the drum at the end of the cycle to remove up to 99.9% of common bacteria without chemical additives.
- Anti-Stain Cycle: Utilizes specific drum motions and water monitoring to effectively remove common stains.
- Antimicrobial Protection: Reduces bacteria build-up by 99.99% in the washing machine's door seal, helping to keep the machine clean.
Maintenance and Care
Regular maintenance ensures the optimal performance and extends the lifespan of your washing machine.
1. Cleaning the Detergent Dispenser
Periodically remove and clean the detergent dispenser drawer under running water to prevent detergent residue buildup. Use a brush if necessary to remove stubborn deposits.
2. Cleaning the Drum
Run a maintenance wash (e.g., a hot cycle with no laundry and a descaling agent or washing machine cleaner) regularly to clean the drum and prevent odors.

Figure 5: Washing Machine Drum Interior. This image provides a clear view of the stainless steel drum, showing the perforations and paddles, essential for effective washing and rinsing.
3. Cleaning the Filter
The filter should be cleaned regularly to prevent blockages. Refer to your quick start guide for the exact location and procedure for accessing and cleaning the filter. Ensure to drain any residual water before opening the filter cover.
4. Cleaning the Exterior
Wipe the exterior of the washing machine with a soft, damp cloth. Do not use abrasive cleaners or solvents.
5. Winter Storage
If the appliance is to be stored in an area subject to freezing temperatures, ensure all water is drained from the hoses and pump to prevent damage from ice formation.
Troubleshooting
Before contacting customer service, please refer to the following common issues and their solutions.
| Problem | Possible Cause / Solution |
|---|---|
| Machine does not start | Check if the power cord is plugged in, the door is closed properly, and the Start/Pause button has been pressed. Ensure the water tap is open. |
| Excessive noise or vibration | Ensure transit bolts have been removed. Check if the machine is level and stable on the floor. Distribute laundry evenly inside the drum. Overloading or an unbalanced load can cause significant noise, especially during the spin cycle. |
| Water not draining | Check if the drain hose is kinked or blocked. Clean the pump filter. |
| Detergent residue in dispenser | Clean the detergent dispenser regularly. Ensure sufficient water pressure. |
| Error codes on display | Refer to the specific error code in your quick start guide for detailed instructions. Often, turning the machine off and on again can reset minor errors. |
If the problem persists after attempting these solutions, please contact Hotpoint Customer Service.
Specifications
Key technical specifications for the Hotpoint NSWF945CW Washing Machine.
| Feature | Value |
|---|---|
| Model | NSWF945CW |
| Brand | Hotpoint |
| Capacity | 9 Kilograms |
| Maximum Spin Speed | 1400 RPM |
| Energy Rating | B |
| Product Dimensions (WxDxH) | 59.5 x 60.5 x 85 cm |
| Item Weight | 68 Kilograms |
| Colour | White |
| Access Location | Front Load |
| Controls Type | Knob |
| Fill Type | Cold Fill Only |
Warranty and Support
Your Hotpoint washing machine comes with a manufacturer's warranty. Please refer to the warranty card included with your appliance for specific terms and conditions, including the duration of coverage and what is covered.
For technical assistance, spare parts, or to schedule a service appointment, please contact Hotpoint Customer Service. Have your appliance's model number (NSWF945CW) and serial number ready when you call.
Hotpoint Customer Service: Please visit the official Hotpoint website for contact details specific to your region, or refer to the contact information provided in your appliance documentation.
Related documentsNSWF945CW


Ask a question about this manual
Ask about setup, troubleshooting, compatibility, parts, safety, or missing instructions. Manuals+ will review the question and use this page’s manual context to help answer it.