1. Introduction
This manual provides detailed instructions for the assembly, operation, and maintenance of your NEEWER TP75 74-inch Video Tripod. Please read this manual thoroughly before using the product to ensure proper and safe operation.
What's in the Box
- 1 x Fluid Tripod Head (QR Plate Included)
- 1 x Aluminum Alloy Tripod
- 3 x Hexagon Wrench
- 1 x Carrying Bag

Image 1.1: Contents of the NEEWER TP75 Video Tripod package, including the tripod, fluid head, quick release plate, hex wrenches, and carrying bag.
2. Setup
2.1 Unfolding the Tripod
- Place the tripod on a stable, flat surface.
- Release the quick release flip locks on each leg to extend the tripod legs to your desired height.
- Ensure all flip locks are securely fastened after adjustment.
- Adjust the center spreader to stabilize the tripod legs.

Image 2.1: The NEEWER TP75 tripod demonstrating its adjustable height from minimum (35"/89cm) to medium (53.1"/135cm) and maximum (74.4"/189cm) heights, highlighting the quick release flip locks and mid spreader for stability.
2.2 Attaching the Camera to the Fluid Head
- Locate the quick release plate. Use the provided hex wrench to attach the quick release plate to the bottom of your camera.
- Ensure the quick release plate is firmly secured to your camera.
- Press the quick release plate directly from the top of the fluid head until it locks into place. You should hear a click.
- To release, press the side release button on the fluid head.

Image 2.2: Illustration of the dual-mode quick release plate, compatible with DJI RS2/RS3 gimbals and 501PL QR mode, allowing for quick attachment and release of the camera.
2.3 Leveling the Tripod Head
The fluid head features a 75mm diameter bowl-shaped base and a head locking handle. Use the built-in bubble level to ensure your horizon is straight. Loosen the head locking handle to adjust the head slightly up and down to fit uneven ground, then tighten to secure.
3. Operating Instructions
3.1 Adjusting Pan Damping
- Release the pan locking knob.
- Rotate the bottom ring (panorama damping adjustment ring) to customize the horizontal damping levels. Rotate clockwise to increase damping, counter-clockwise to decrease.

Image 3.1: Detailed view of the fluid head showing the pan locking knob and the panorama damping adjustment ring for customizing horizontal movement.
3.2 Adjusting Tilt Damping
- Release the tilt locking knob.
- Use the side dampening knob (tilt damping adjustment knob) to adjust the fluid drag of tilt movement. Rotate clockwise to increase damping, counter-clockwise to decrease.
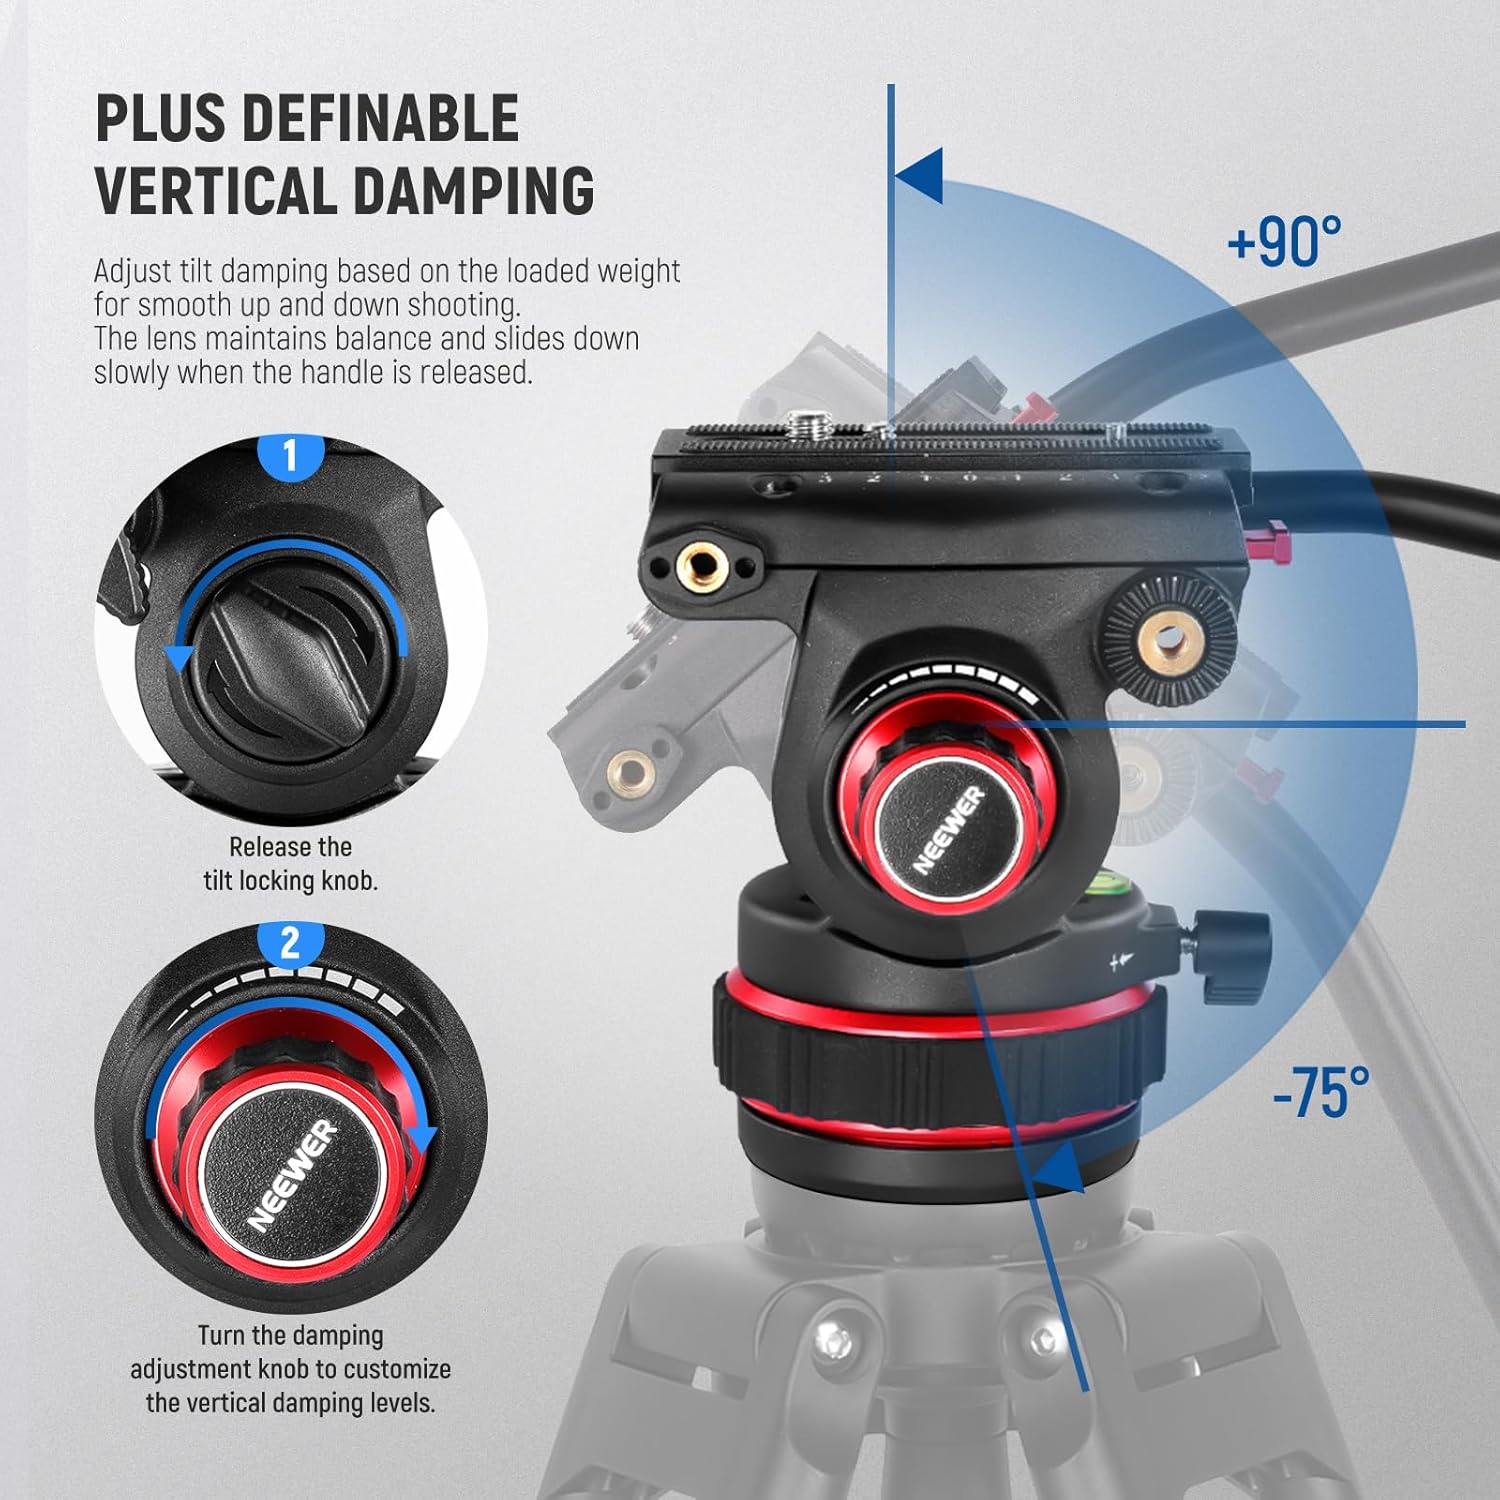
Image 3.2: Close-up of the fluid head illustrating the tilt locking knob and the tilt damping adjustment knob for precise vertical movement control.
3.3 Using the Detachable Handle
The fluid head includes a detachable handle for enhanced control during panning and tilting. Attach the handle to the designated port on the fluid head and secure it. This allows for smoother, more controlled camera movements.

Image 3.3: Various features of the tripod, including the detachable handle for improved control, an extra 1/4" screw hole for accessories, the center spreader for stability, and rotatable rubber feet for adaptability on different surfaces.
3.4 Quick and Easy Modes Switching
The fluid head supports two quick release modes, making it compatible with DJI RS2, RS3, and RS3 PRO gimbals. This allows for efficient transitions between tripod and gimbal shooting setups.
Video 3.1: This video demonstrates the quick release mechanism and the fluid head's smooth panning and tilting capabilities, showcasing its ease of use for various camera setups.
4. Maintenance
4.1 Cleaning
Regularly clean the tripod legs and fluid head with a soft, dry cloth. For stubborn dirt, use a slightly damp cloth and mild soap, then wipe dry immediately. Avoid using harsh chemicals or abrasive materials that could damage the finish.
4.2 Storage
When not in use, collapse the tripod legs and store it in the provided carrying bag. Store in a cool, dry place away from direct sunlight and extreme temperatures to prolong its lifespan.
5. Troubleshooting
5.1 Fluid Head Movement Not Smooth
If the pan or tilt movement feels stiff or uneven, check the damping adjustment knobs. Rotate them counter-clockwise to decrease damping and allow for smoother movement. Ensure no debris is obstructing the head's rotation.
5.2 Tripod Legs Not Extending/Retracting Smoothly
Ensure the quick flip locks are fully disengaged before attempting to extend or retract the legs. If there is resistance, check for any dirt or sand in the leg mechanisms. Clean as per the maintenance instructions.
5.3 Camera Not Secure on Quick Release Plate
Verify that the quick release plate is correctly attached to your camera with the screw tightened. When attaching the plate to the fluid head, ensure it clicks into place and the side release button is not accidentally pressed. Always double-check the connection before use.
6. Specifications
| Feature | Detail |
|---|---|
| Brand | NEEWER |
| Model Name | TP75 |
| Material | Aluminum Alloy |
| Item Weight | 5.48 Kilograms (10.1lb/4.6kg product weight) |
| Maximum Load Capacity | 22 Pounds / 10 kg |
| Maximum Height | 189 Centimeters (74.4 inches) |
| Minimum Height | 35 Inches / 89 cm |
| Folded Size | 36.6 inches / 93 cm |
| Tripod Head Type | Fluid Head |
| Horizontal Rotation Angle | 360° |
| Vertical Shooting Angle | +90° / -75° |
| Leg Tube Sections | 3 |
| Compatible Devices | DSLR cameras, camcorders, DJI RS Gimbals (RS2, RS3, RS3 PRO) |
7. Warranty and Support
7.1 Manufacturer's Warranty
This NEEWER TP75 Video Tripod comes with a 1-Year Manufacturer's Warranty. Please retain your proof of purchase for any warranty claims.
7.2 Customer Support
For technical assistance, troubleshooting, or warranty inquiries, please contact NEEWER customer support through their official website or the retailer where the product was purchased.