1. Introduction
This user manual provides comprehensive instructions for the safe operation, installation, maintenance, and troubleshooting of your ZAFRO Commercial Ice Maker. Please read this manual thoroughly before operating the appliance to ensure proper use and to prevent damage or injury.
2. Safety Information
Always adhere to the following safety precautions:
- Ensure the ice maker is connected to a grounded power outlet.
- Do not operate the machine with a damaged power cord or plug.
- Keep ventilation openings clear of obstructions.
- Do not store explosive substances such as aerosol cans with a flammable propellant in this appliance.
- Only use potable water for ice production.
- Unplug the appliance before cleaning or performing any maintenance.
- This appliance is not intended for use by persons (including children) with reduced physical, sensory or mental capabilities, or lack of experience and knowledge, unless they have been given supervision or instruction concerning use of the appliance by a person responsible for their safety.
3. Product Overview and Components
The ZAFRO Commercial Ice Maker is designed for high-volume ice production, featuring a robust stainless steel construction and an intelligent control panel.

Figure 3.1: ZAFRO Commercial Ice Maker and included accessories, including the ice scoop, water inlet pipe, and drain hose.

Figure 3.2: Overview of key features such as low noise operation, adjustable ice thickness, automatic cleaning, energy efficiency, ice full reminder, and water shortage reminder.

Figure 3.3: Performance metrics showing 160 ice cubes per cycle, 11-20 minute cycle time, 352 lbs/24H production, and 198 lbs ice bin capacity.
Main Components:
- Ice Maker Unit: The main body containing the compressor, evaporator, and control system.
- Ice Storage Bin: Insulated compartment for storing produced ice.
- Control Panel: LCD display with buttons for operation and settings.
- Water Inlet Port: Connection point for water supply.
- Drainage Port: Outlet for water drainage.
- Ice Scoop: For hygienic ice retrieval.
4. Setup and Installation
Proper installation is crucial for the optimal performance and longevity of your ice maker. Follow these steps carefully:
- Unpacking: Carefully remove the ice maker from its packaging. Inspect for any shipping damage. Retain packaging for future transport if needed.
- Placement: Choose a stable, level surface capable of supporting the weight of the unit when full of ice. Ensure adequate ventilation around the machine. Avoid direct sunlight or heat sources.
- Leveling: Adjust the leveling feet at the bottom of the unit to ensure it is perfectly level. This is important for proper water flow and ice production.
- Water Connection:

Figure 4.1: Water inlet and drainage connections on the rear of the unit.
- Connect the provided water inlet pipe (9' inlet pipe) to the water intake port on the back of the ice maker and to a potable water supply with appropriate pressure.
- Connect the drain hose (6'5" drain-pipe) to the water outlet port and route it to a suitable drain. Ensure the drain hose has a continuous downward slope to prevent water stagnation.
- Check all connections for leaks before proceeding.
- Electrical Connection: Plug the ice maker into a dedicated, grounded electrical outlet. Refer to the specifications for voltage requirements.
5. Operating Instructions
The ZAFRO Commercial Ice Maker features an intelligent LCD control panel for easy operation.

Figure 5.1: Intelligent LCD Control Panel.
Control Panel Functions:
- ON/OFF Button: Press to turn the ice maker on or off.
- TIMER Button: Activates the 1-24 hour timing function. Use the (+) and (-) buttons to set the desired delay for starting or stopping ice production.
- (+) and (-) Buttons: Adjust the ice making time, which in turn adjusts the size (thickness) of the ice cubes. Press (+) for thicker ice, (-) for thinner ice.
- CLEAN Button: Initiates the automatic self-cleaning cycle.
- Full Ice Reminder: An indicator on the display will illuminate when the ice storage bin is full.
- Water Shortage Reminder: An indicator will illuminate if the water supply is insufficient.
Initial Operation:
- After connecting water and power, press the ON/OFF button to start the machine.
- The machine will automatically begin the ice-making cycle. The first few cycles may produce smaller or irregular ice cubes; this is normal.
- Allow the machine to run for several cycles to stabilize performance.
Adjusting Ice Thickness:
Use the (+) and (-) buttons to fine-tune the ice cube thickness. Longer ice-making time results in thicker ice.

Figure 5.2: Recommended ice thickness settings for various applications: thin ice for smoothies (approx. 12 mins), medium ice for drinks/wine (approx. 15 mins), and thick ice for seafood (approx. 18 mins).
6. Maintenance
Regular maintenance ensures efficient operation and extends the lifespan of your ice maker.
Automatic Self-Cleaning:
The ice maker is equipped with an automatic self-cleaning function.

Figure 6.1: The 'CLEAN' button on the control panel initiates the self-cleaning cycle.
- To activate, ensure the ice maker is empty of ice and water, then press the "CLEAN" button on the control panel.
- The machine will run a cleaning cycle, flushing the internal components.
- It is recommended to perform this cleaning cycle regularly, especially if the machine is used frequently or if the water quality is poor.
General Cleaning and Care:
- Exterior: Wipe the exterior surfaces with a soft cloth and mild detergent. Do not use abrasive cleaners or solvents.
- Ice Bin: Periodically clean the ice storage bin with a solution of mild soap and water. Rinse thoroughly and dry before use.
- Water Lines: Inspect water inlet and drain lines for kinks or blockages.
- Condenser Coils: The condenser coils, located on the side or back of the unit, should be cleaned periodically to ensure efficient heat dissipation. Use a soft brush or vacuum cleaner to remove dust and debris.
- Long-Term Storage: If the ice maker will not be used for an extended period, drain all water, clean the unit thoroughly, and leave the ice bin door slightly ajar to prevent odors.
7. Troubleshooting
Refer to the table below for common issues and their potential solutions.
| Problem | Possible Cause | Solution |
|---|---|---|
| Ice maker not producing ice. | No water supply; Water shortage indicator on; Power issue; Ambient temperature too high. | Check water connection and supply valve; Refill water reservoir (if applicable) or check water pressure; Ensure unit is plugged in and power outlet is functional; Move unit to a cooler environment. |
| Ice cubes are too small or soft. | Water temperature too high; Ambient temperature too high; Insufficient ice-making time. | Use colder water; Ensure proper ventilation; Adjust ice-making time using (+) button on control panel. |
| Ice maker is noisy. | Unit not level; Fan obstruction; Normal operation sounds. | Adjust leveling feet; Check for obstructions around fan; Some operational noise is normal. |
| Water leakage. | Loose water connections; Clogged drain hose. | Tighten all water inlet and drain connections; Clear any blockages in the drain hose. |
| Ice bin full indicator not working. | Sensor obstruction or malfunction. | Check for ice blocking the sensor; Clean the sensor area. |
If the problem persists after attempting these solutions, please contact ZAFRO customer support.
8. Specifications
| Attribute | Value |
|---|---|
| Brand | ZAFRO |
| Model Name | commercial ice maker (350lbs/24H variant) |
| Product Dimensions | 26.1"D x 22.51"W x 63.5"H |
| Weight | 159 Pounds |
| Capacity (Ice Bin) | 198 Pounds |
| Ice Production (24H) | 352 lbs |
| Voltage | 120 Volts |
| Manufacturer | ZAFRO |
| Country of Origin | China |
| Date First Available | December 13, 2022 |
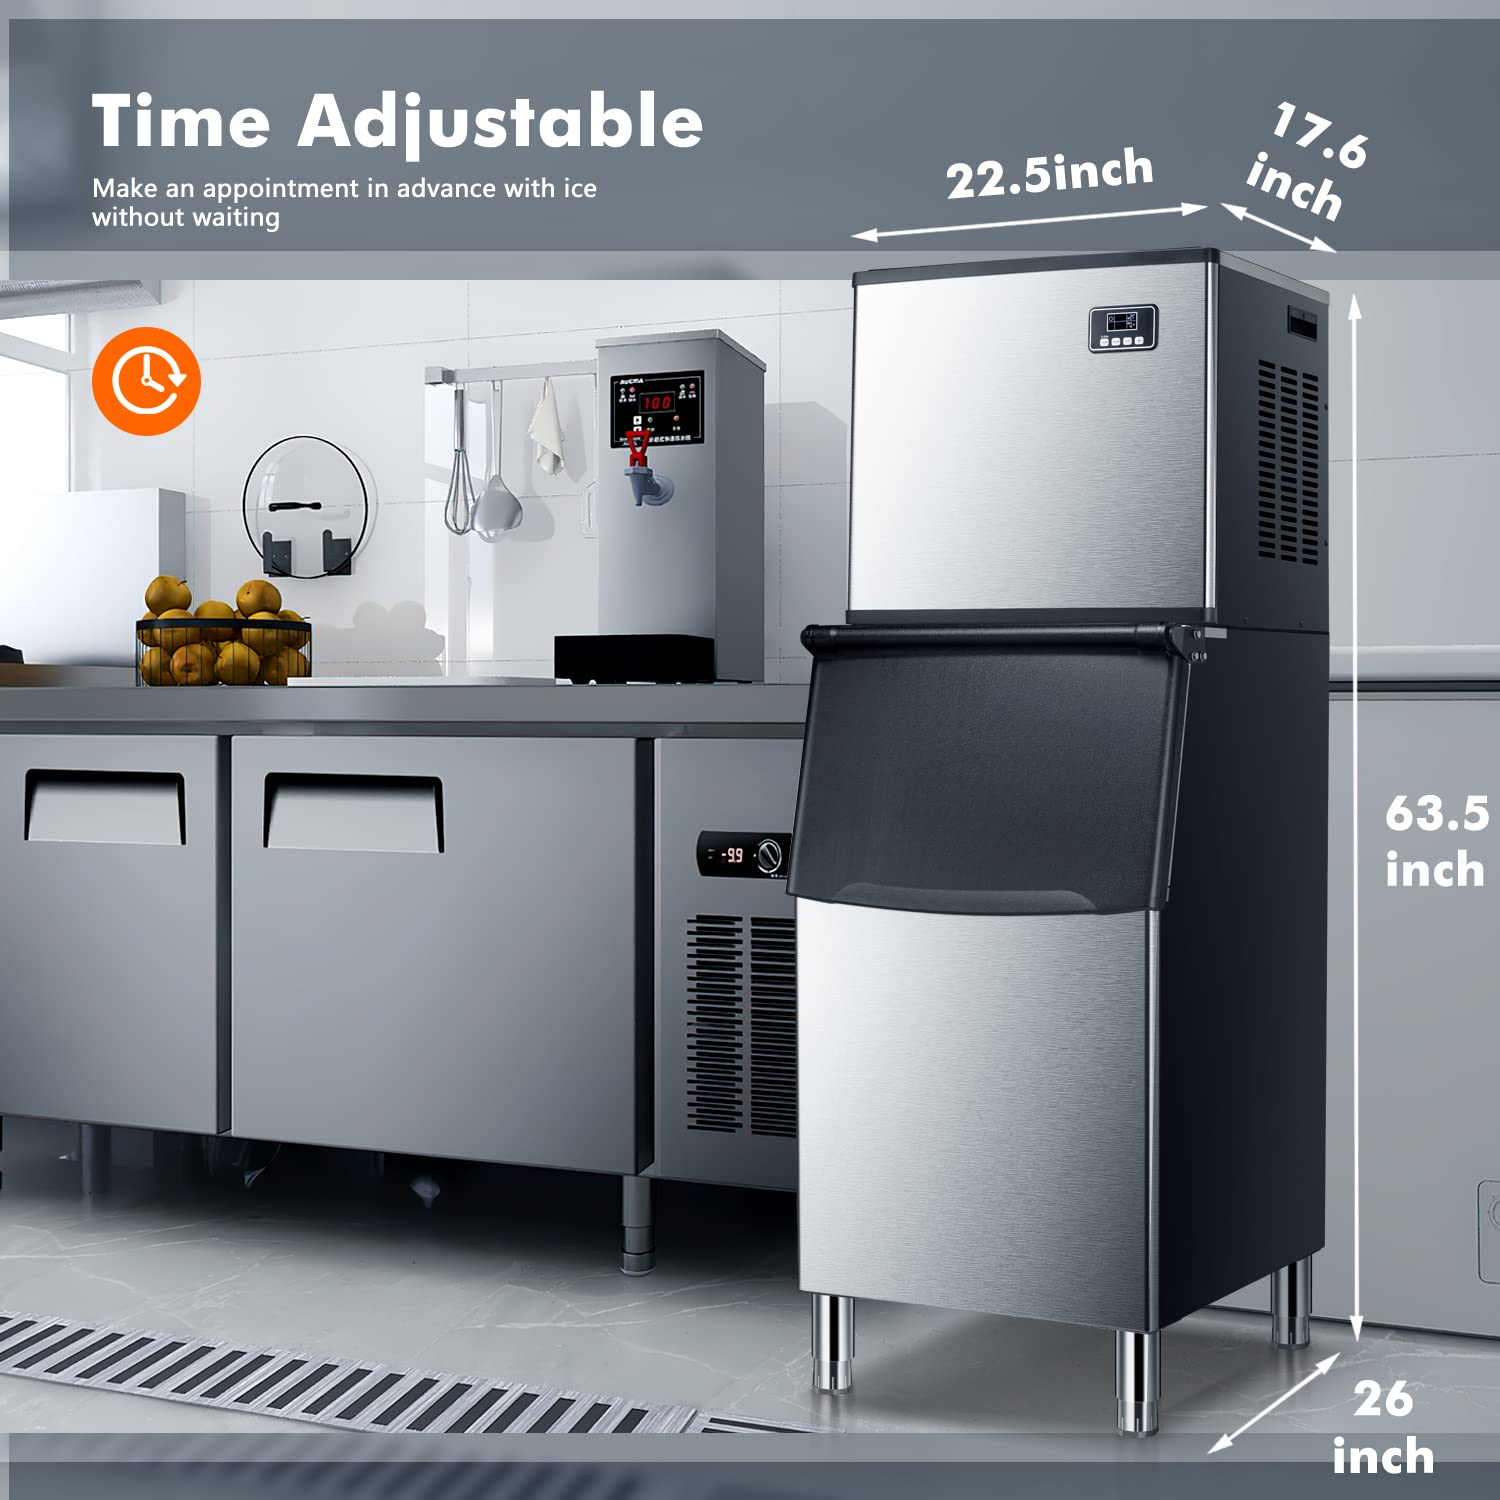
Figure 8.1: Detailed dimensions of the ZAFRO Commercial Ice Maker.
9. Warranty and Support
For warranty information, please refer to the documentation included with your product packaging or visit the official ZAFRO website. For technical support, troubleshooting assistance beyond this manual, or to inquire about parts, please contact ZAFRO customer service.
ZAFRO Customer Support: Refer to your purchase receipt or the ZAFRO brand store for contact details.


