Introduction
Thank you for choosing the JKHFDDIG FJ3533 Digital Alarm Clock. This device combines multiple functions including a digital clock, dual alarms with snooze, temperature and humidity display, and an automatic backlight. This manual provides detailed instructions to help you set up and operate your new alarm clock effectively.
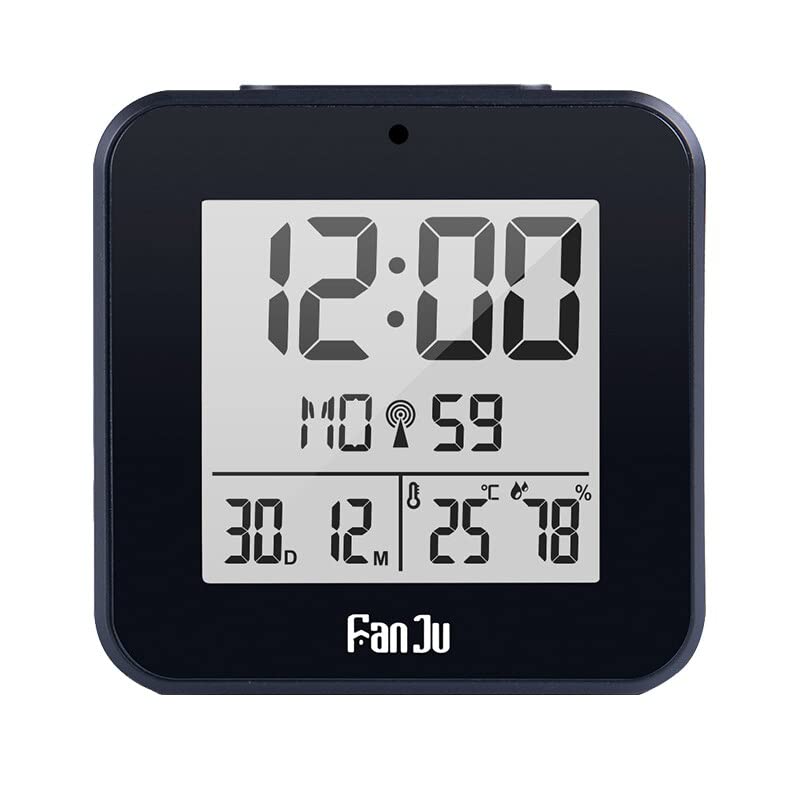
Image: The FJ3533 Digital Alarm Clock displaying time, date, temperature, and humidity.
Product Features
- Small Alarm Clock with 2 alarm and snooze functions.
- Automatic Night Light with Light Sensor.
- Indoor temperature and humidity display.
- Calendar with 7 Language selection and 12/24 hour format.
- Battery-operated for convenient placement.

Image: Visual representation of the clock's key features including dual alarms, temperature/humidity, and automatic backlight.
Package Contents
- 1 x FJ3533 Digital Alarm Clock
- 1 x User Manual
Note: 2 x AA batteries are required for operation and are not included in the package. Please purchase them separately.
Setup
- Battery Installation: Open the battery compartment cover on the back of the clock. Insert 2 new AA batteries, ensuring correct polarity (+/-). Close the battery compartment cover securely.
- Initial Power-On: The clock will power on automatically once batteries are installed. The display will show default time and date settings.
Operating Instructions
1. Setting Time and Date
Refer to the buttons on the back or side of the clock. Typically, there is a "MODE" or "SET" button to enter setting mode, and "UP" / "DOWN" or "+" / "-" buttons to adjust values.
- Press the MODE/SET button repeatedly until the time display starts flashing.
- Use the UP/DOWN buttons to adjust the hour. Press MODE/SET to confirm and move to minutes.
- Adjust minutes using UP/DOWN buttons. Press MODE/SET to confirm.
- Continue this process for year, month, and day.
- You may also be able to select 12/24 hour format and calendar language (7 options) in this mode.
- Press MODE/SET one last time or wait for a few seconds for the clock to exit setting mode.
2. Setting Alarms (Alarm 1 & Alarm 2)
The clock features two independent alarms. Look for "ALARM" or "AL1/AL2" buttons.
- Press the ALARM SET button (or similar) to enter alarm setting mode. You might see "AL1" flashing.
- Use UP/DOWN buttons to set the desired alarm hour. Press ALARM SET to confirm.
- Use UP/DOWN buttons to set the desired alarm minute. Press ALARM SET to confirm.
- Repeat for Alarm 2 if needed.
- To activate/deactivate an alarm, locate the alarm switch (often on the side) or press the ALARM ON/OFF button. An alarm icon will appear on the display when active.
3. Snooze Function
When an alarm sounds, press the large button on top of the clock (often labeled "SNOOZE" or simply a large touch area). The alarm will pause and sound again after a few minutes (typically 5-10 minutes). To turn off the alarm completely, press any other button or flip the alarm switch off.
4. Temperature and Humidity Display
The clock continuously displays indoor temperature and humidity. To switch between Celsius (°C) and Fahrenheit (°F) for temperature, locate the °C/°F button, usually on the back of the unit.
5. Backlight Operation
- Automatic Backlight: The clock features an auto night light with a light sensor. When the ambient light is low, the backlight will automatically illuminate softly for easy viewing.
- Manual Backlight: To activate the backlight manually for 8 seconds, gently touch the top of the clock.

Image: Demonstrates the clock's automatic and manual backlight functions in different lighting conditions.
Maintenance
- Cleaning: Wipe the clock with a soft, dry cloth. Do not use abrasive cleaners or solvents.
- Battery Replacement: Replace batteries when the display becomes dim or functions become erratic. Always replace both AA batteries at the same time.
- Storage: If storing the clock for an extended period, remove the batteries to prevent leakage.
Troubleshooting
| Problem | Possible Cause | Solution |
|---|---|---|
| Display is blank or dim. | Low or dead batteries; incorrect battery installation. | Replace with new AA batteries, ensuring correct polarity. |
| Alarm does not sound. | Alarm is not activated; alarm volume is too low (if adjustable); incorrect alarm time set. | Ensure alarm is switched ON. Verify alarm time settings. |
| Time/Date is incorrect. | Time was not set correctly after battery installation or power interruption. | Follow "Setting Time and Date" instructions to reset. |
| Backlight not working automatically. | Light sensor is obstructed or in a brightly lit environment. | Ensure the light sensor is clear. Test in a darker environment. |
Specifications
| Model | FJ3533 |
| Brand | JKHFDDIG |
| Color | Black |
| Display Type | Digital |
| Power Source | Battery Powered (2 x AA, not included) |
| Special Features | Night light, Dual Alarm, Snooze, Temperature Display, Humidity Display, Calendar |
| Frame Material | Acrylonitrile Butadiene Styrene |
| Mounting Type | Tabletop |
| Item Weight | 0.035 ounces (approx. 1 gram) |
Warranty and Support
This product is covered by a standard manufacturer's warranty. Please refer to the packaging or contact your retailer for specific warranty terms and conditions.
For technical support or inquiries, please contact the retailer where you purchased the product or visit the JKHFDDIG official website for contact information.