
1. Important Safety Instructions
Please read all instructions carefully before using the LEHMANN Strokkur Steam Iron. Keep this manual for future reference.
- Always ensure the voltage rating on the iron matches your mains supply.
- Do not immerse the iron, power cord, or plug in water or other liquids.
- Unplug the iron from the outlet when filling with water, emptying, or when not in use.
- Do not leave the iron unattended while it is switched on or connected to the power supply.
- Keep the iron and its cord out of reach of children and pets.
- The soleplate becomes very hot during use. Avoid direct contact with hot surfaces.
- Use the iron only on a stable, heat-resistant surface, preferably an ironing board.
- Do not operate the iron with a damaged cord or plug, or if the iron has been dropped or damaged.
- This appliance is equipped with an automatic shut-off feature for enhanced safety: it turns off after 30 seconds if left horizontal and after 8 minutes if left vertical.
2. Product Overview
Familiarize yourself with the components of your LEHMANN Strokkur Steam Iron.
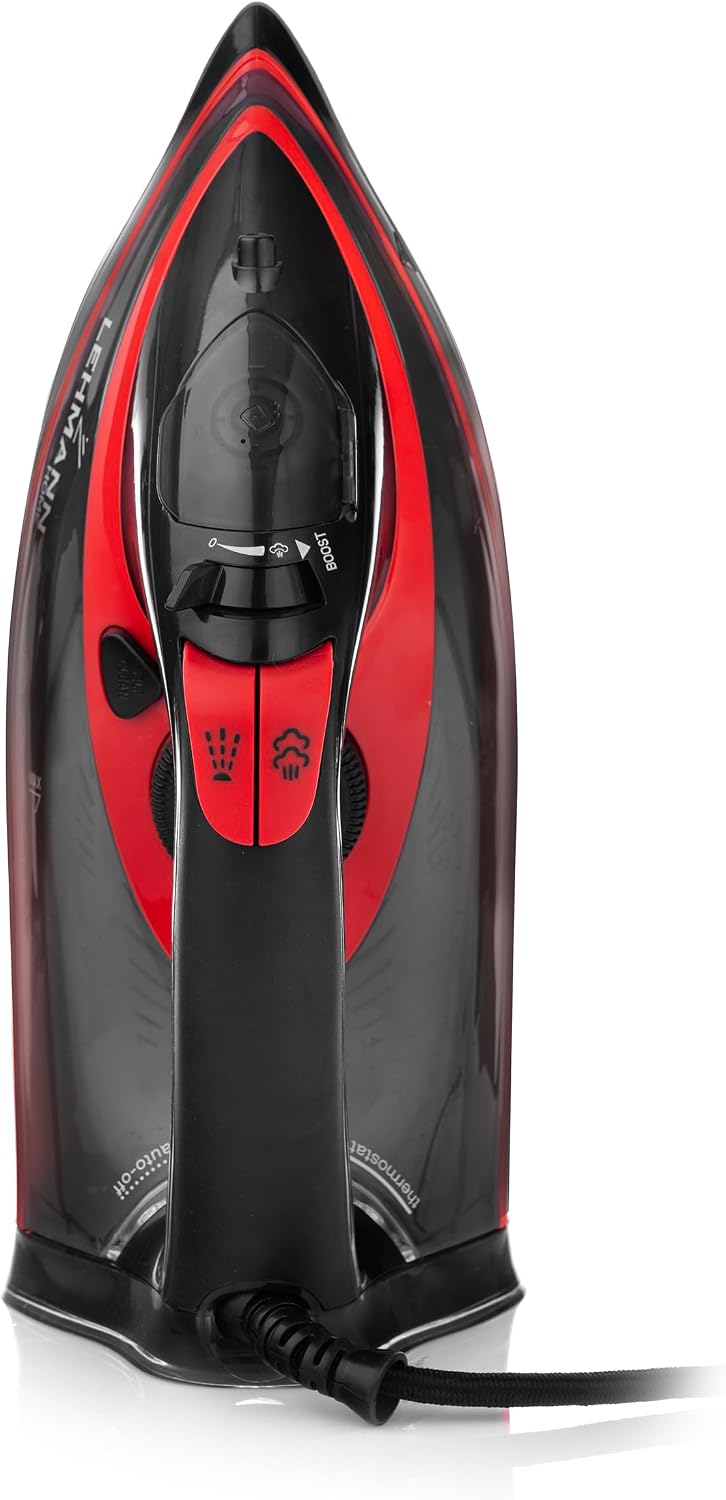
Figure 2.1: Top view of the iron, highlighting key controls.

Figure 2.2: Side view of the iron, illustrating its profile and soleplate.
- Water Spray Nozzle: For moistening stubborn creases.
- Water Filling Inlet: Where water is added to the tank.
- Steam Control Slider: Adjusts continuous steam output.
- Steam Boost Button: Delivers an extra burst of steam.
- Spray Button: Activates the water spray.
- Temperature Control Dial: Selects the appropriate ironing temperature for different fabrics.
- Indicator Light: Illuminates when the iron is heating and turns off when the set temperature is reached.
- Handle: Ergonomically designed for comfortable grip.
- Power Cord: 2-meter cord with 360° swivel for flexibility.
- Ceramic Soleplate: Scratch-resistant surface for smooth gliding.
- Water Tank: Transparent tank with 380 ml capacity.
3. Setup and First Use
3.1 Unpacking
Carefully remove the iron from its packaging. Remove any labels or protective film from the soleplate. Retain the packaging for storage or future transport.
3.2 Before First Use
It is normal for a slight odor or smoke to be emitted during the first use as manufacturing residues burn off. This is harmless and will disappear quickly. To ensure optimal performance, test the iron on an old piece of fabric before ironing your garments.
3.3 Filling the Water Tank
Always unplug the iron before filling the water tank. Use tap water; however, if your tap water is very hard, it is recommended to use a mixture of 50% tap water and 50% distilled water to prevent limescale buildup.
- Ensure the iron is unplugged and cooled down.
- Open the water filling inlet cover.
- Using the provided measuring cup, slowly pour water into the tank up to the 'MAX' level indicator. Do not overfill.
- Close the water filling inlet cover securely.

Figure 3.1: Filling the 380 ml water tank.
4. Operating Instructions
4.1 Temperature Settings
Always check the garment's care label for recommended ironing temperature. Sort fabrics by type and iron those requiring lower temperatures first.
- Plug the iron into a suitable power outlet.
- Rotate the temperature control dial to the desired setting (e.g., Nylon, Silk, Wool, Cotton, Linen). The indicator light will illuminate.
- Wait for the indicator light to turn off, indicating the iron has reached the set temperature.

Figure 4.1: Adjusting the temperature dial for different fabrics.
4.2 Dry Ironing
For dry ironing, ensure the steam control slider is set to the '0' (no steam) position. Follow the temperature setting instructions above.
4.3 Steam Ironing
Steam ironing is suitable for most fabrics, especially cotton and linen. Ensure the water tank is filled.
- Set the temperature control dial to the 'Steam' range (usually between Wool and Linen settings). The indicator light will turn off when ready.
- Slide the steam control slider to the desired steam level. The iron will produce a continuous steam output of 45 g/min.
4.4 Steam Boost Function
For stubborn creases, press the steam boost button. This delivers a powerful burst of steam up to 140 g/min. Wait a few seconds between bursts to allow the steam to regenerate.

Figure 4.2: Activating the 140 g/min steam boost.
4.5 Vertical Steam
The steam boost function can also be used for vertical steaming of hanging garments, curtains, or drapes. Hold the iron vertically a few centimeters away from the fabric and press the steam boost button.
4.6 Water Spray Function
Press the spray button to lightly moisten fabrics, which helps in removing stubborn wrinkles. Ensure the water tank is filled.
5. Maintenance and Cleaning
Regular maintenance ensures the longevity and optimal performance of your iron.
5.1 Cleaning the Soleplate
Allow the iron to cool completely. Wipe the soleplate with a damp cloth and a non-abrasive cleaner if necessary. Do not use metallic scouring pads or harsh abrasives.
5.2 Anti-Calc Function (Calc-Clean)
The iron is equipped with an anti-calc system to reduce limescale buildup. For optimal performance, perform the self-cleaning function regularly.
5.3 Self-Cleaning Function
This function helps to flush out mineral deposits and impurities from the steam chambers.
- Fill the water tank to the 'MAX' level.
- Set the steam control to '0' (no steam) and the temperature dial to 'MAX'.
- Plug in the iron and wait for the indicator light to turn off.
- Unplug the iron. Hold it horizontally over a sink.
- Press and hold the 'Self-Clean' button (if available, or refer to specific button on your model) while gently shaking the iron back and forth. Hot water and steam will be expelled from the soleplate, carrying impurities.
- Continue until the water tank is empty.
- Plug the iron back in, let it heat up to dry the soleplate, then unplug and store.

Figure 5.1: Illustration of the Self-Clean and Anti-Drip features.
5.4 Storage
After use, unplug the iron and allow it to cool completely. Empty any remaining water from the tank. Store the iron upright on its heel rest in a safe, dry place.
6. Troubleshooting
If you encounter issues with your iron, refer to the following table before contacting customer support.
| Problem | Possible Cause | Solution |
|---|---|---|
| Iron does not heat up. | Not plugged in; power outage; automatic shut-off activated. | Check power connection; reset circuit breaker; move the iron to reactivate. |
| No steam or insufficient steam. | Water tank empty; temperature too low; steam control set to '0'; calc buildup. | Fill water tank; set temperature to steam range; adjust steam control; perform self-clean. |
| Water leaks from soleplate. | Temperature too low for steam; water tank overfilled; anti-drip system issue. | Increase temperature; do not overfill tank; perform self-clean. |
| White flakes on clothes. | Limescale buildup. | Perform self-clean function. Use distilled water or a mix if tap water is hard. |
7. Specifications
Detailed technical information for your LEHMANN Strokkur Steam Iron.
- Model Number: LHCLXL3038
- Power: 3000 Watts
- Voltage: 230 Volts
- Frequency: 50 Hz
- Continuous Steam Output: 45 g/min
- Steam Boost: Up to 140 g/min
- Water Tank Capacity: 380 ml
- Soleplate Material: Ceramic
- Product Dimensions (L x W x H): 31.5 x 13.7 x 0.1 cm (Iron body: 30L x 16W cm)
- Item Weight: 1.45 kg
- Special Features: Automatic Shut-off, Rapid Heating, Anti-Calc Function, Overheat Protection, Vertical Steam, Anti-Drip, Self-Clean
- Color: Black/Red
- Included Components: 1 Strokkur Steam Iron, 1 Refill Cup, 1 User Manual

Figure 7.1: Product dimensions of the steam iron.
8. Warranty and Support
LEHMANN products are designed for quality and reliability. For any questions, technical assistance, or warranty claims, please contact LEHMANN customer support through the retailer where the product was purchased or visit the official LEHMANN website for contact information.
Please retain your proof of purchase for warranty purposes.