1. Introduction
This manual provides detailed instructions for the setup, operation, and maintenance of your Aqara Smart Pet Feeder C1 Plus and Aqara Smart Hub M2. Please read this manual thoroughly before using the product to ensure proper functionality and safety. Keep this manual for future reference.
2. Safety Information
- Ensure the device is placed on a stable, level surface to prevent tipping.
- Use only the provided power adapter.
- Do not immerse the main unit in water or other liquids.
- Keep out of reach of children and pets to prevent accidental operation or damage.
- The feeder is designed for dry pet food only. Do not use wet food, canned food, or treats.
- Regularly clean parts that come into contact with food to maintain hygiene.
- The Smart Hub M2 is for indoor use only.
3. Package Contents
- Aqara Smart Pet Feeder C1 Plus
- Aqara Smart Hub M2
- Power Adapter for Feeder
- Power Adapter for Hub M2
- Stainless Steel Food Bowl
- Desiccant Bag
- User Manual
4. Product Overview
The Aqara Smart Pet Feeder C1 Plus is an automatic food dispenser designed for cats and dogs, offering programmable portion control. It works in conjunction with the Aqara Smart Hub M2, which acts as a central control unit for smart home automations and infrared device control.

Image 1: The Aqara Smart Pet Feeder C1 Plus (left) and the Aqara Smart Hub M2 (right).
5. Setup
5.1. Pet Feeder C1 Plus Setup
- Unpack and Assemble: Remove all components from the packaging. Place the stainless steel food bowl into its designated slot at the base of the feeder.
- Install Desiccant Bag: Open the lid of the food tank and insert the desiccant bag into its compartment to keep food fresh. Replace the desiccant bag periodically.
- Fill Food Tank: Pour dry pet food into the transparent food tank. Ensure the lid is securely closed after filling.
- Power Connection: Connect the power adapter to the feeder and plug it into a wall outlet.
- Battery Backup (Optional): For uninterrupted operation during power outages, install three D-cell batteries (not included) in the battery compartment at the bottom of the feeder. This ensures scheduled feeding plans continue to function.

Image 2: The battery compartment for backup power, ensuring scheduled feeding continues even without internet or main power.
5.2. Smart Hub M2 Setup
- Placement: Place the Smart Hub M2 in a central location within your home, ensuring it is within range of your Wi-Fi router and any Aqara child devices (recommended maximum distance of 7-10m).
- Power Connection: Connect the power adapter to the Hub M2 and plug it into a wall outlet. The indicator light will illuminate.
- Network Connection: The Hub M2 requires a 2.4 GHz Wi-Fi network for initial setup and operation.

Image 3: Illustration of the recommended maximum distance for child device connection to the Aqara Hub M2.
5.3. Aqara Home App Configuration
- Download App: Download the Aqara Home app from your device's app store.
- Create Account: Register for an Aqara account or log in if you already have one.
- Add Hub M2: Follow the in-app instructions to add the Smart Hub M2 to your account. This typically involves scanning a QR code or manually selecting the device.
- Add Pet Feeder C1 Plus: Once the Hub M2 is added, follow the in-app instructions to add the Pet Feeder C1 Plus as a child device. Note: An Aqara Zigbee 3.0 Hub (M2) is required and sold separately for the Pet Feeder C1 Plus to function.
6. Operation
6.1. Scheduled and Remote Feeding
The Aqara Home app allows you to create customized feeding schedules and dispense food remotely. You can set specific times and portion sizes for your pet's meals.
- Open the Aqara Home app and select your Pet Feeder C1 Plus.
- Navigate to the 'Feeding Plan' section to set up daily or weekly schedules.
- To dispense food immediately, use the 'One-time feeding' option in the app.
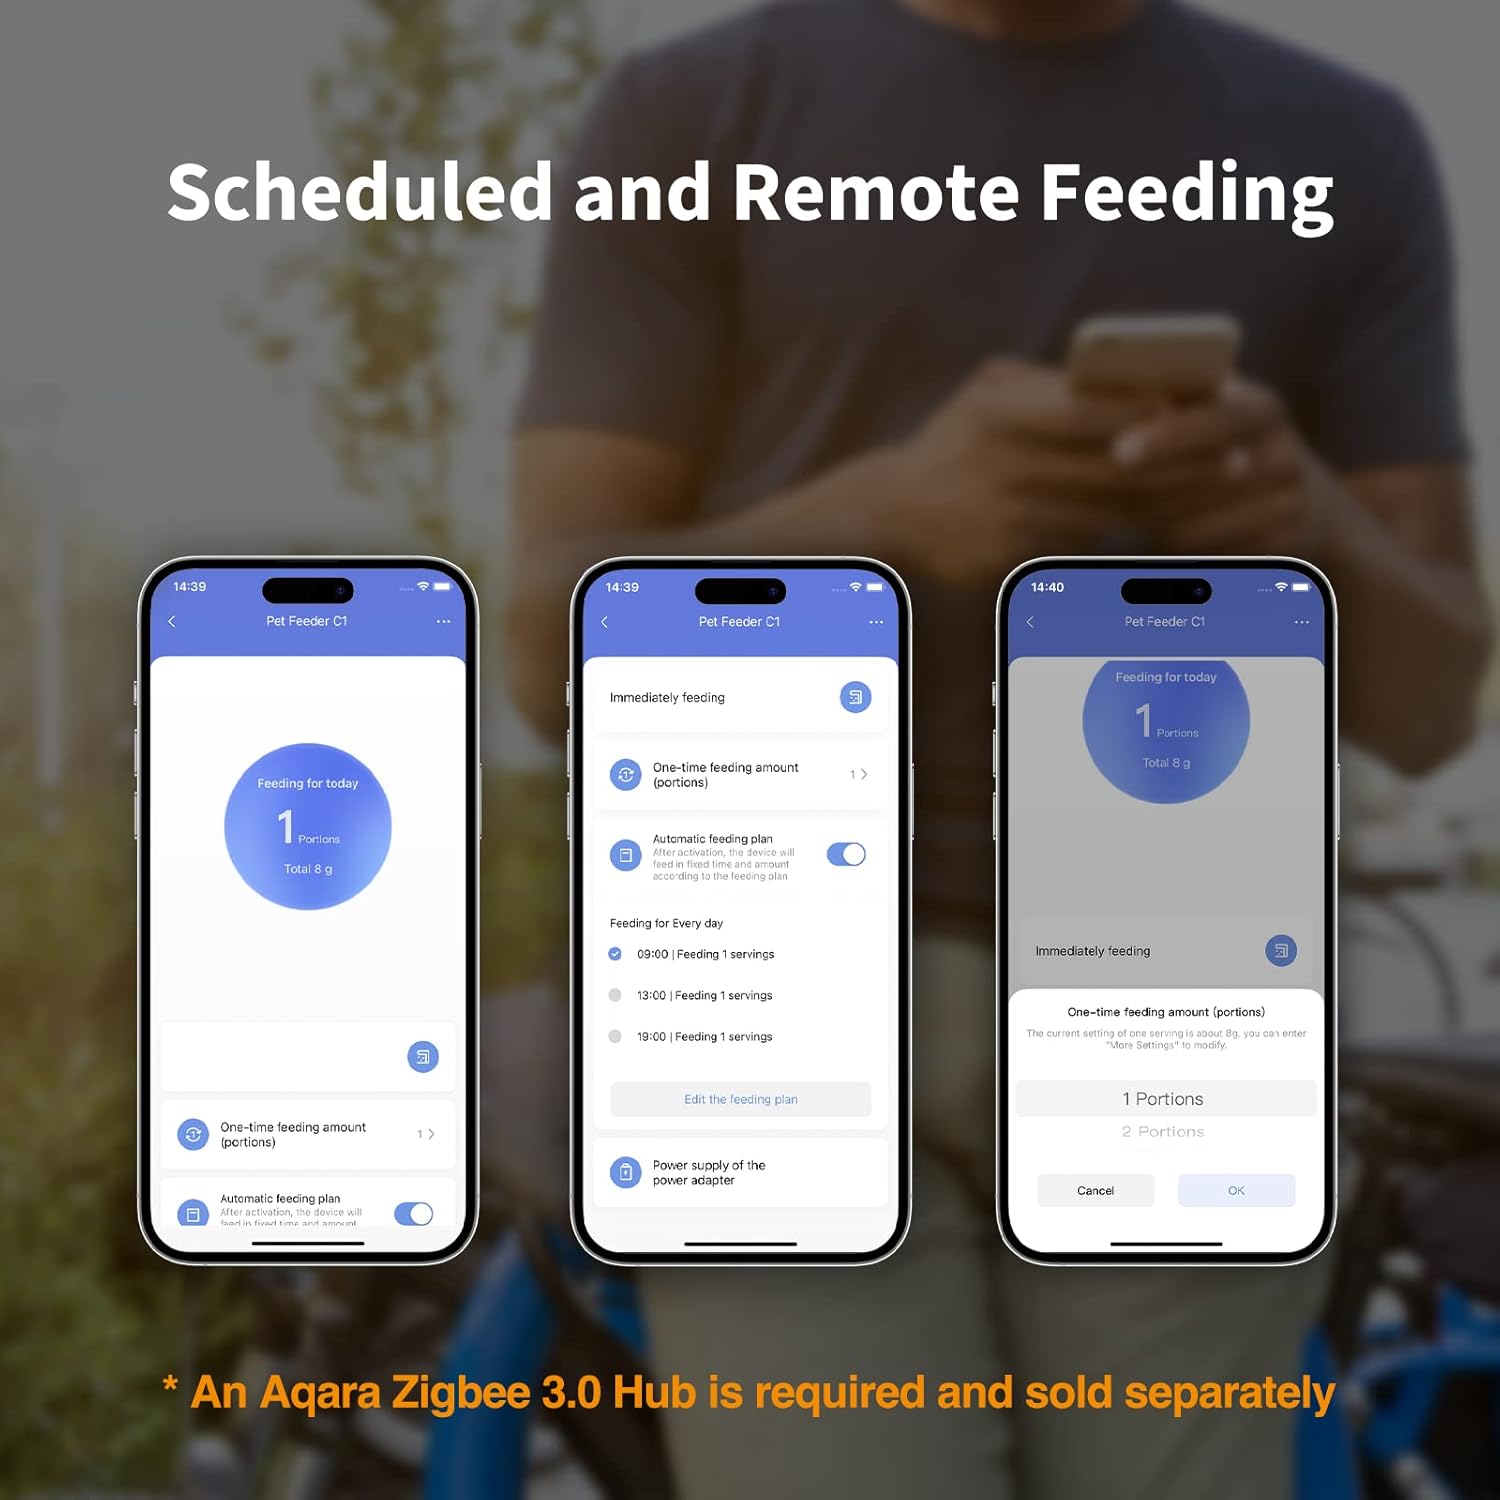
Image 4: Screenshots from the Aqara Home app demonstrating options for scheduled and remote feeding, including one-time feeding and editing feeding plans.
6.2. Feeding Statistics
The Aqara Home app provides statistics on your pet's food consumption, allowing you to monitor their daily intake. You can also calibrate portion weights for accurate tracking.
- In the Pet Feeder C1 Plus settings within the Aqara Home app, access 'More Settings'.
- Select 'Portion weight (for statistics)' to enter the weight of one portion in grams. This helps the app calculate daily consumption.
- View cumulative feeding data and historical feeding events in the app's 'Pet Feeder C1' section.

Image 5: Screenshots from the Aqara Home app showing how to set portion weight for statistics and view daily feeding logs.
6.3. Voice Control
While the Pet Feeder C1 Plus is not directly compatible with HomeKit, Alexa, or Google Assistant, it can be controlled by voice commands through Aqara Home scenes. This requires setting up scenes in the Aqara Home app and binding your accounts.
- Create a scene in the Aqara Home app (e.g., 'Feed Pet') that triggers a feeding event.
- Link your Aqara account with Alexa or Google Assistant through their respective apps.
- Use voice commands like "Hey Alexa, activate Feed Pet" to dispense food.

Image 6: Various smart speakers and devices illustrating compatibility with voice assistants such as Alexa, Siri, and Google Assistant for controlling Aqara devices via scenes.
6.4. Smart Home Automations
The Aqara Smart Hub M2 enables advanced automations with other Aqara devices and IFTTT. For example, you can set up a camera to record when food is dispensed.
- In the Aqara Home app, navigate to the 'Automation' section.
- Create new automations using the Pet Feeder C1 Plus as a trigger or action.
- Example: IF food is dispensed by Pet Feeder C1 Plus, THEN an Aqara Camera Hub G3 records a video.
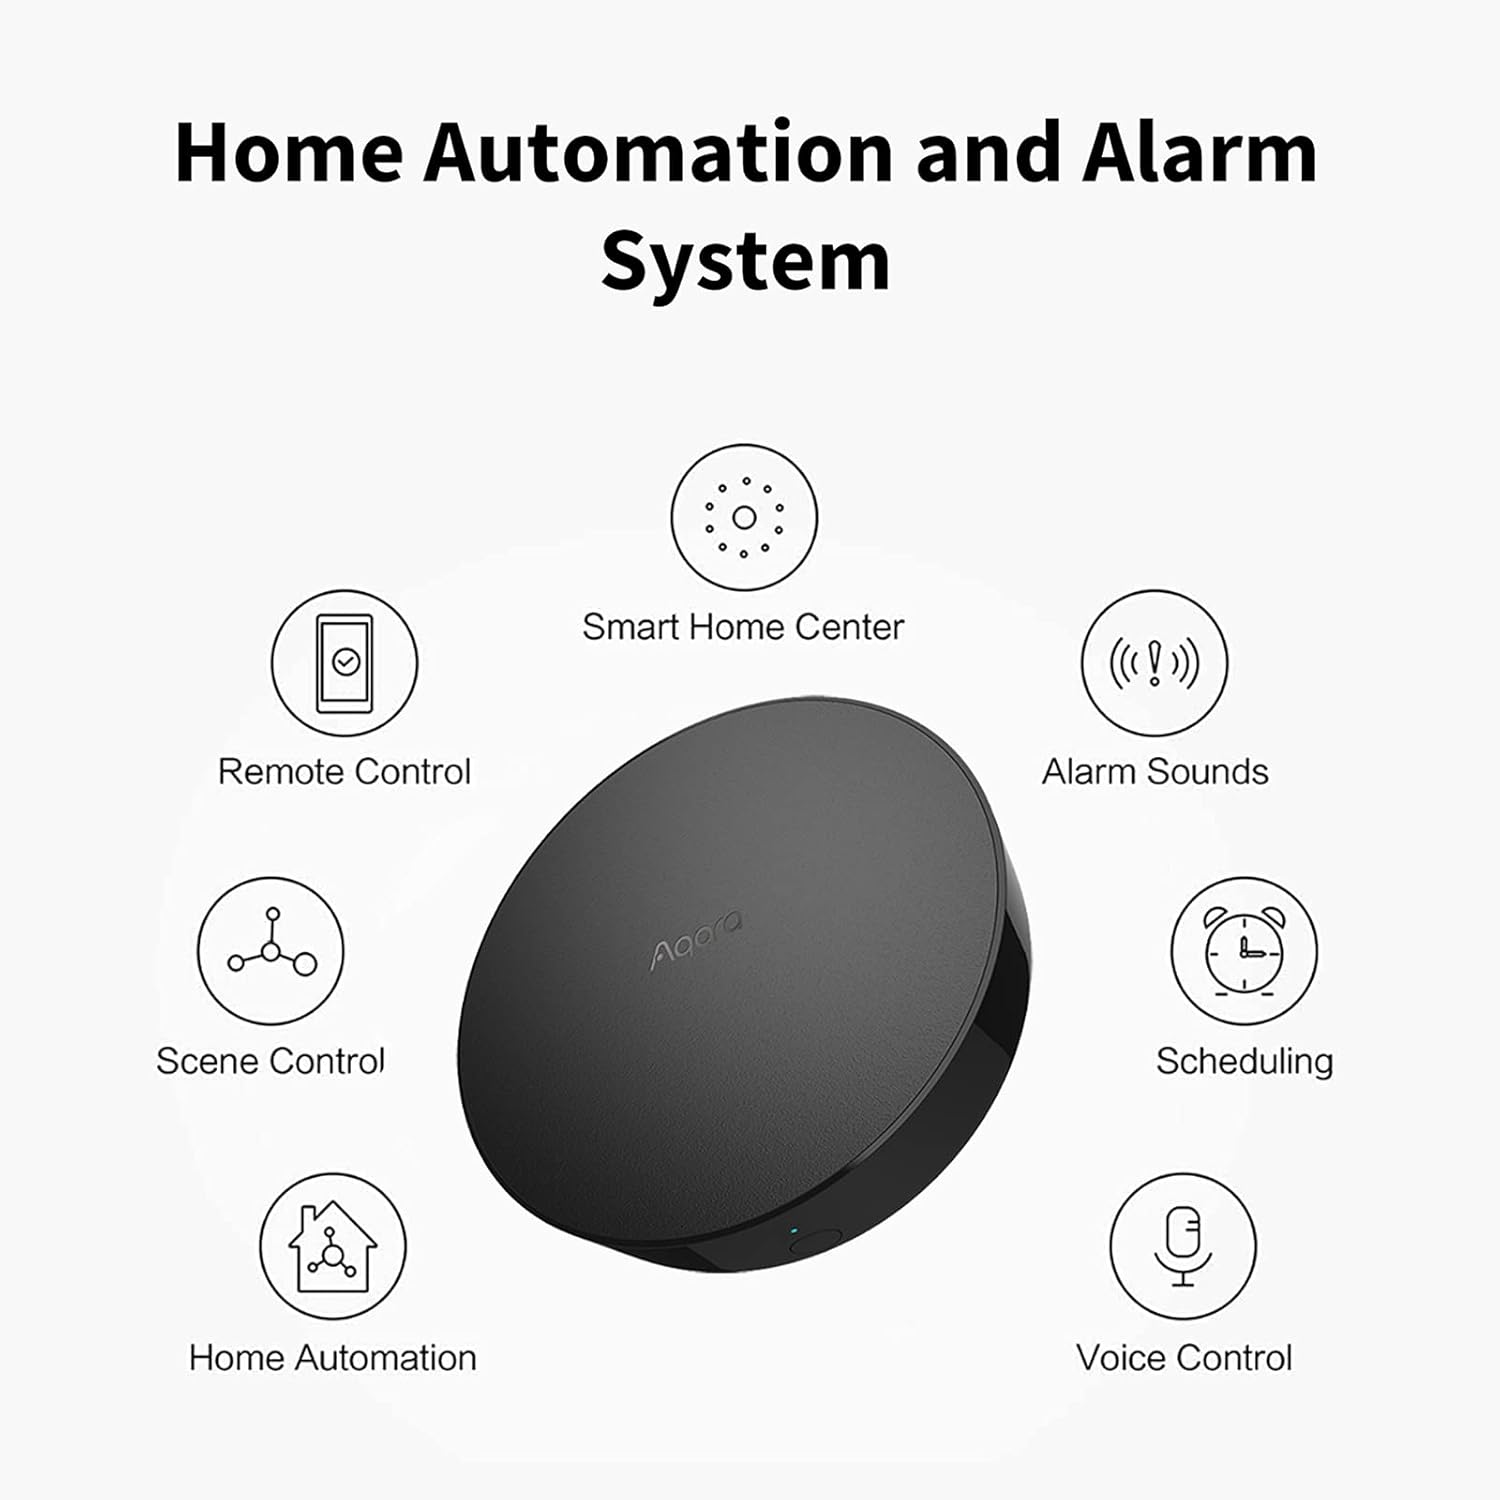
Image 7: Diagram illustrating the Aqara Hub M2's capabilities as a smart home center, including remote control, scene control, home automation, alarm sounds, scheduling, and voice control.
6.5. 360° Infrared Control (Hub M2)
The Aqara Smart Hub M2 features a 360° infrared (IR) transmitter, allowing it to control existing IR devices such as TVs, air conditioners, and fans. This functionality is for indoor use only.
- In the Aqara Home app, add your IR-controlled devices to the Hub M2.
- You can then control these devices via the app, voice commands (through scenes), or integrate them into automations.

Image 8: Visual representation of the Aqara Hub M2's 360-degree infrared control, showing its ability to control various IR devices like TVs, fans, and other smart home components.
7. Maintenance
7.1. Cleaning
Regular cleaning ensures hygiene and proper functioning of the feeder.
- Food Bowl: The stainless-steel food bowl is removable and can be hand washed with mild soap and water. Rinse thoroughly and dry completely before reinserting.
- Food Tank: The plastic food tank can be removed and hand washed. Ensure it is completely dry before refilling with food.
- Dispenser Wheel: The rubber dispenser wheel is removable for cleaning. Hand wash and dry thoroughly.
- Main Unit: Wipe the exterior of the main feeder unit and the Hub M2 with a soft, damp cloth. Do not use abrasive cleaners or immerse in water.
7.2. Food Refill and Desiccant Replacement
- Monitor the food level in the transparent tank and refill as needed.
- Replace the desiccant bag every 1-2 months, or as indicated by its color change, to maintain food freshness.
8. Troubleshooting
- Feeder not dispensing food: Check power connection. Ensure food tank is not empty. Verify there are no food blockages in the dispenser mechanism. Check app schedule.
- Device offline in Aqara Home app: Ensure the Hub M2 is powered on and connected to your 2.4 GHz Wi-Fi network. Check Wi-Fi signal strength. Restart the Hub M2 and your router.
- Voice control not working: Verify that your Aqara account is linked to Alexa/Google Assistant. Ensure the scene is correctly configured in the Aqara Home app. Check your internet connection.
- IR control not working (Hub M2): Ensure the Hub M2 has a clear line of sight to the IR device. Re-learn the IR commands in the Aqara Home app if necessary.
- Food not fresh: Replace the desiccant bag. Ensure the food tank lid is securely closed.
9. Specifications
| Feature | Detail |
|---|---|
| Brand | Aqara |
| Model | Smart Pet Feeder C1 Plus, Smart Hub M2 |
| ASIN | B0BPCK34R1 |
| Color | White |
| Connectivity | Zigbee 3.0 (Feeder), 2.4 GHz Wi-Fi (Hub M2) |
| Power Source | AC Power Adapter, D-cell batteries (Feeder backup) |
| Care Instructions | Hand Wash Only (removable parts) |
| Breed Recommendation | All Breed Sizes |
| Target Species | Cat, Dog |
| Special Feature | Voice Recording (Hub M2), Programmable Feeding |
| Recommended Uses | Indoor, Multiple Pets |
10. Warranty and Support
For warranty information, technical support, or service inquiries, please refer to the official Aqara website or contact Aqara customer support directly. Keep your purchase receipt for warranty claims.


